Introduction
In this tip, I will demonstrate how to extend ASP.NET MVC Behaviour using Windsor as Dependency Injection/Inversion of Control container. Windsor is one of many libraries used for Dependency Injection. It's easy to setup and use.
If you don't know what Dependency Injection (DI) is, you can read the article about DI here.
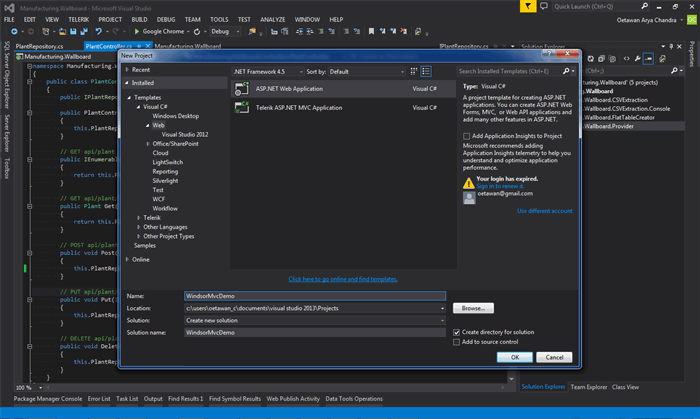
Create ASP.NET MVC Application
To create ASP.NET MVC application, select ASP.NET Web application in project template and name the application WindsorMvcDemo. Click OK to create the application.
Add Windsor Library Reference
The easiest way to reference windsor library is using Nuget package installer. Right click on Reference, and select Manage Nuget Package.

In the manage nuget package dialog, type windsore mvc in search textbox, then select Castle Windsor MVC Bootstrapper in the list, and click Install. It will download the lib and its dependency automatically.
After installation complete, it generated 4 files:
- App_Start\ContainerBootstrapper.cs
- App_Start\WindsorActivator.cs
- Plumbing\WindsorControllerFactory.cs
- Installers\ControllersInstaller.cs
The first 3 files are used by the Windsor library to configure the controller. Don't worry, you don't need to touch those files. The 4th file is where the controller behaviour is extended by the lib. You will configure your interface and implementation class in the Installer folder. Before that, we need to create our interface and implementation class.
Create Interface and Implementation Class
using System;
using System.Collections.Generic;
using System.Linq;
using System.Web;

namespace WindsorMvcDemo.Models
{
    public class ToDo
    {
        public string Title { get; set; }
        public DateTime Date { get; set; }
        public string Comment { get; set; }
    }

    public interface ToDoListService
    {
        IEnumerable<ToDo> GetToDoList();
    }

    public class ToDoListServiceImpl : ToDoListService
    {
        public IEnumerable<ToDo> GetToDoList()
        {
            return new List<ToDo>
            {
                new ToDo
                {
                    Title = "Meeting with client",
                    Comment = "Meet at the office on 08:00AM",
                    Date = DateTime.Today
                },
                new ToDo
                {
                    Title = "Lunch with Girlfriend",
                    Comment = "At restaurant near the office",
                    Date = DateTime.Today
                },
                new ToDo
                {
                    Title = "Go to dentist",
                    Comment = "Scheduled Visit to dentist",
                    Date = DateTime.Today.AddDays(2)
                }
            };
        }
    }
}
Create ToDoListController
For demonstation, let's create a Controller that will show list of ToDo.
public class ToDoListController : Controller
{
private ToDoListService toDoListService;
public ToDoListController(ToDoListService service)
{
this.toDoListService = service;
}
public ActionResult Index()
{
var model = toDoListService.GetToDoList();
return View(model);
}
}
Configure the Dependency
In the ToDoListController above, notice the constructor. The constructor requires ToDoListService parameter. How can we pass that parameter while we cannot instantiate the controller class? That's where the Windsor library plays the role. We must first configure the dependency by registering the interface and service class to Windsor Container. Create a class that implement IWindsorInstaller interface. When application starts, Windsor will search all classes that implement the interface, instantiate the class and call Install method.
Below is how to register the interface and implementation:
public class ServiceInstaller : IWindsorInstaller
{
    public void Install(Castle.Windsor.IWindsorContainer container,
	Castle.MicroKernel.SubSystems.Configuration.IConfigurationStore store)
    {
        container.Register(
            Component
                .For<ToDoListService>()
                .ImplementedBy<todolistserviceimpl>()
                .LifestyleTransient());
        }
    }
}
Create ToDo List View
Next, create a view that will list the todo list. Open ToDoListController, right click on Index method, select Add View. In Add View dialog, select List in Template options, and select ToDo model in Model class. Leave the Data Context class blank and then click OK to create the View. MVC framework will scaffold the view and generate Index.cshtml in Views\ToDoList folder.
In this demo, we only need to show the list of todo, so remove the Edit, Detail and Delete link generated by MVC framework.
The Index.cshtml should be like below:
Create ToDo List View
To run the application, press F5 and navigate to http://localhost:port/ToDoList in browser address. It should show list of todo as below:
Conclusion
That is how we use Windsor to extend ASP.NET MVC behaviour to auto wire the controller depedency using Windsor container as the Dependency Injection. For more details about Windsor, please go here.
I have been working in software development using Microsoft technologies for many years.


 General
  News
News  Suggestion
  Question
  Bug
Bug  Answer
  Joke
Joke  Praise
  Rant
Rant  Admin
Admin 


