Introduction
This step by step guild is packed full of screen shots to guide you in the journey of creating a simple Hello World application. Ready to code?
Background
This tutorial was made using Windows 8, Eclipse Platform 4.2.2 and the Android ADK 23.0.2.1259578.
Lets learn...
Step 1: Definitions and Basic Components
Minimum SDK = This is how far back you wish to go in regards to the Android OS.
Target SDK = Is the Android OS you have in mind for developing this application
Compile With SDK = Is recommended to be set to the most recent stable SDK in the market.
The Basic Components are...
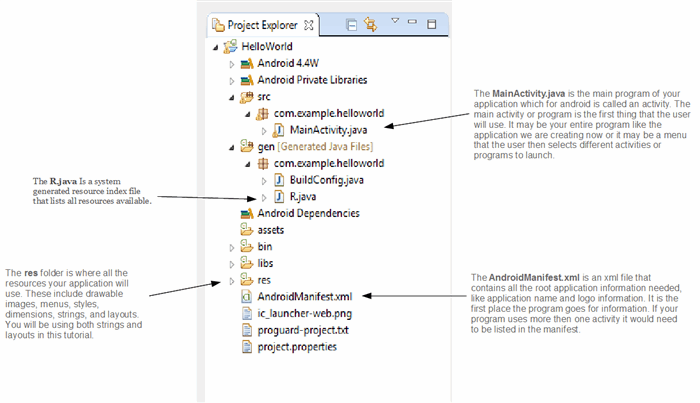
![Image 1](/KB/android/803451/basic-r-700.png)
Resources...
![Image 2](data:image/gif;base64,R0lGODlhAQABAAAAACH5BAEKAAEALAAAAAABAAEAAAICTAEAOw==)
Step 2: Launch Eclipse
![Image 3](data:image/gif;base64,R0lGODlhAQABAAAAACH5BAEKAAEALAAAAAABAAEAAAICTAEAOw==)
Step 3: Create Project
![Image 4](data:image/gif;base64,R0lGODlhAQABAAAAACH5BAEKAAEALAAAAAABAAEAAAICTAEAOw==)
![Image 5](data:image/gif;base64,R0lGODlhAQABAAAAACH5BAEKAAEALAAAAAABAAEAAAICTAEAOw==)
![Image 6](data:image/gif;base64,R0lGODlhAQABAAAAACH5BAEKAAEALAAAAAABAAEAAAICTAEAOw==)
You can use this public domain image for the next step.
![Image 7](data:image/gif;base64,R0lGODlhAQABAAAAACH5BAEKAAEALAAAAAABAAEAAAICTAEAOw==)
![Image 8](data:image/gif;base64,R0lGODlhAQABAAAAACH5BAEKAAEALAAAAAABAAEAAAICTAEAOw==)
![Image 9](data:image/gif;base64,R0lGODlhAQABAAAAACH5BAEKAAEALAAAAAABAAEAAAICTAEAOw==)
![Image 10](data:image/gif;base64,R0lGODlhAQABAAAAACH5BAEKAAEALAAAAAABAAEAAAICTAEAOw==)
![Image 11](data:image/gif;base64,R0lGODlhAQABAAAAACH5BAEKAAEALAAAAAABAAEAAAICTAEAOw==)
Step 3: Review and Update your application
![Image 12](data:image/gif;base64,R0lGODlhAQABAAAAACH5BAEKAAEALAAAAAABAAEAAAICTAEAOw==)
Lets find out why...
![Image 13](data:image/gif;base64,R0lGODlhAQABAAAAACH5BAEKAAEALAAAAAABAAEAAAICTAEAOw==)
Lets fix it....
![Image 14](data:image/gif;base64,R0lGODlhAQABAAAAACH5BAEKAAEALAAAAAABAAEAAAICTAEAOw==)
![Image 15](data:image/gif;base64,R0lGODlhAQABAAAAACH5BAEKAAEALAAAAAABAAEAAAICTAEAOw==)
![Image 16](data:image/gif;base64,R0lGODlhAQABAAAAACH5BAEKAAEALAAAAAABAAEAAAICTAEAOw==)
![Image 17](data:image/gif;base64,R0lGODlhAQABAAAAACH5BAEKAAEALAAAAAABAAEAAAICTAEAOw==)
You could also change the theme to something compatible or create a custom theme using styles, if you prefer.
![Image 18](data:image/gif;base64,R0lGODlhAQABAAAAACH5BAEKAAEALAAAAAABAAEAAAICTAEAOw==)
![Image 19](data:image/gif;base64,R0lGODlhAQABAAAAACH5BAEKAAEALAAAAAABAAEAAAICTAEAOw==)
![Image 20](data:image/gif;base64,R0lGODlhAQABAAAAACH5BAEKAAEALAAAAAABAAEAAAICTAEAOw==)
![Image 21](data:image/gif;base64,R0lGODlhAQABAAAAACH5BAEKAAEALAAAAAABAAEAAAICTAEAOw==)
The Graphical Layout tab gives you an idea of what the user will see. There are widget tools you can use to create your layout and GUI interface by dragging the items onto the screen.
![Image 22](data:image/gif;base64,R0lGODlhAQABAAAAACH5BAEKAAEALAAAAAABAAEAAAICTAEAOw==)
![Image 23](data:image/gif;base64,R0lGODlhAQABAAAAACH5BAEKAAEALAAAAAABAAEAAAICTAEAOw==)
![Image 24](data:image/gif;base64,R0lGODlhAQABAAAAACH5BAEKAAEALAAAAAABAAEAAAICTAEAOw==)
![Image 25](data:image/gif;base64,R0lGODlhAQABAAAAACH5BAEKAAEALAAAAAABAAEAAAICTAEAOw==)
![Image 26](data:image/gif;base64,R0lGODlhAQABAAAAACH5BAEKAAEALAAAAAABAAEAAAICTAEAOw==)
If you go back to the Graphical Layout tab you will see the string we added string now shows in the GUI layout.
![Image 27](data:image/gif;base64,R0lGODlhAQABAAAAACH5BAEKAAEALAAAAAABAAEAAAICTAEAOw==)
Step 4: prepare the first test
![Image 28](data:image/gif;base64,R0lGODlhAQABAAAAACH5BAEKAAEALAAAAAABAAEAAAICTAEAOw==)
![Image 29](data:image/gif;base64,R0lGODlhAQABAAAAACH5BAEKAAEALAAAAAABAAEAAAICTAEAOw==)
Now enter two more like these to represent Android 4.2.2. Then enter one to represents Android 4.4.2 and an extra large screen.
![Image 30](data:image/gif;base64,R0lGODlhAQABAAAAACH5BAEKAAEALAAAAAABAAEAAAICTAEAOw==)
![Image 31](data:image/gif;base64,R0lGODlhAQABAAAAACH5BAEKAAEALAAAAAABAAEAAAICTAEAOw==)
![Image 32](data:image/gif;base64,R0lGODlhAQABAAAAACH5BAEKAAEALAAAAAABAAEAAAICTAEAOw==)
![Image 33](data:image/gif;base64,R0lGODlhAQABAAAAACH5BAEKAAEALAAAAAABAAEAAAICTAEAOw==)
![Image 34](data:image/gif;base64,R0lGODlhAQABAAAAACH5BAEKAAEALAAAAAABAAEAAAICTAEAOw==)
![Image 35](data:image/gif;base64,R0lGODlhAQABAAAAACH5BAEKAAEALAAAAAABAAEAAAICTAEAOw==)
Step 5: Test on Virtual Android Devices
![Image 36](data:image/gif;base64,R0lGODlhAQABAAAAACH5BAEKAAEALAAAAAABAAEAAAICTAEAOw==)
![Image 37](data:image/gif;base64,R0lGODlhAQABAAAAACH5BAEKAAEALAAAAAABAAEAAAICTAEAOw==)
![Image 38](data:image/gif;base64,R0lGODlhAQABAAAAACH5BAEKAAEALAAAAAABAAEAAAICTAEAOw==)
![Image 39](data:image/gif;base64,R0lGODlhAQABAAAAACH5BAEKAAEALAAAAAABAAEAAAICTAEAOw==)
![Image 40](data:image/gif;base64,R0lGODlhAQABAAAAACH5BAEKAAEALAAAAAABAAEAAAICTAEAOw==)
![Image 41](data:image/gif;base64,R0lGODlhAQABAAAAACH5BAEKAAEALAAAAAABAAEAAAICTAEAOw==)
![Image 42](data:image/gif;base64,R0lGODlhAQABAAAAACH5BAEKAAEALAAAAAABAAEAAAICTAEAOw==)
API 14 Looks good..
Repeat the above steps for AVD Android 4.2.2
![Image 43](data:image/gif;base64,R0lGODlhAQABAAAAACH5BAEKAAEALAAAAAABAAEAAAICTAEAOw==)
![Image 44](data:image/gif;base64,R0lGODlhAQABAAAAACH5BAEKAAEALAAAAAABAAEAAAICTAEAOw==)
API 17 Looks good.
Repeat the above steps for AVD Android 4.4.2
![Image 45](data:image/gif;base64,R0lGODlhAQABAAAAACH5BAEKAAEALAAAAAABAAEAAAICTAEAOw==)
![Image 46](data:image/gif;base64,R0lGODlhAQABAAAAACH5BAEKAAEALAAAAAABAAEAAAICTAEAOw==)
API 19 Looks good...
Step 6: Test on actual Android Devices
Make sure your device has USB Debugging checked in Developer Options, located in Settings. Then plug your android device into your PC or Laptop using its USB cable.
![Image 47](data:image/gif;base64,R0lGODlhAQABAAAAACH5BAEKAAEALAAAAAABAAEAAAICTAEAOw==)
![Image 48](data:image/gif;base64,R0lGODlhAQABAAAAACH5BAEKAAEALAAAAAABAAEAAAICTAEAOw==)
View HelloWorld in both Portrait and Landscape.
![Image 49](data:image/gif;base64,R0lGODlhAQABAAAAACH5BAEKAAEALAAAAAABAAEAAAICTAEAOw==)
Portrait looks good...
![Image 50](data:image/gif;base64,R0lGODlhAQABAAAAACH5BAEKAAEALAAAAAABAAEAAAICTAEAOw==)
Landscape looks good...
Run HelloWorld for one hour to see how the application effects the battery level of your device.
Before for instance, record the starting level. Mine is at 100%.
![Image 51](data:image/gif;base64,R0lGODlhAQABAAAAACH5BAEKAAEALAAAAAABAAEAAAICTAEAOw==)
Run HelloWorld and leave it running.
![Image 52](data:image/gif;base64,R0lGODlhAQABAAAAACH5BAEKAAEALAAAAAABAAEAAAICTAEAOw==)
One hour later, close HelloWorld. Record the level, mine is 97%.
![Image 53](data:image/gif;base64,R0lGODlhAQABAAAAACH5BAEKAAEALAAAAAABAAEAAAICTAEAOw==)
Looks good... No significant loss of battery.
The End!
Points of Interest
While creating this tutorial, I actually started with API 8 and was not aware at the time that my theme selection was incompatible. I had to decide whether to keep the error and fix it in the tutorial, or start over. I decided that I would rather use it as an opportunity to teach the user how to look for and fix this type of issue.
This member has not yet provided a Biography. Assume it's interesting and varied, and probably something to do with programming.