Introduction
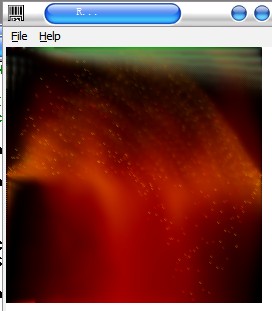
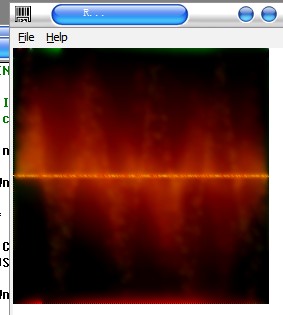
One day when I was listening to a song, I saw the special effect on Media Player. So I began to think how it was created. As a matter of fact, I really don't know how to create it. I started finding a method to simulate it. This time I used the dib to realize it, but I think “DX” will be better. The article may use a lot of DIB manipulation. I will not give any more introduction, please look up in other articles.
Background
I love computer programming. I waste several hours doing it. May be it is useless but I like it because it's created by me. Next time, I'll create the effect by DX. Everyone, please give me more help and suggestions. You can use and modify the code in any way as per your wish.
Using the Code & Sample program
Add the two files to your test application, “RippeEffect.h” and “RippeEffect.cpp”. (Sorry because when I typed the word ripple, I lost a letter “l”.) Now include the header into your code.
#include "RippeEffect.h"
…
RippeEffect Rip;
Rip.init();
…
Rip.UpdateData(hdc);
Principle of the Effect
Let’s take a look at the class’s definition:
class RippeEffect {
public:
void SetEffectSize(int iWidth,int iHeight); void UpdateData(HDC hdc); BOOL Init(); BYTE *pBits2; RippeEffect();
virtual ~RippeEffect();
private:
int kind; inline void mysetPixel2(BYTE *pBits,int x,int y,COLORREF rgb); COLORREF mygetPixel(BYTE *pBits,int x,int y); inline POINT ComputerNewPoint(POINT pt,int angle); inline void FadePixel(BYTE *pBits,int x,int y); UINT getBitCount(); UINT getBmHeight(); UINT getBmWidth(); inline void mysetPixel(BYTE *pBits,int x,int y,COLORREF rgb); UINT i,x,y,r,k; POINT pt; UINT m_nBmSize; BITMAPINFOHEADER bih;
BITMAPINFO bi;
BYTE *pBits;
UINT m_nBmHeight; UINT m_nBmWidth; };
After seeing these functions, let's start to have a look at the main line of the code. First, we must fill the struct of BITMAPINFOHEADER and BITMAPINFO. For this reason, we will use SetDIBitsToDevice() function to display the effect as last. Look at the snippet below, it's the member function of the RippleEffect class. It is used to initialize all kinds of data structures, alloc memory.
BOOL RippeEffect::Init()
{
srand(::GetTickCount()); bih.biSize =sizeof(BITMAPINFOHEADER);
bih.biBitCount =24 ;
bih.biCompression =BI_RGB;
bih.biHeight=m_nBmHeight;
bih.biWidth=m_nBmWidth;
bih.biPlanes =1;
bih.biSizeImage=m_nBmHeight*m_nBmWidth*bih.biBitCount /8;
bih.biXPelsPerMeter=0;
bih.biYPelsPerMeter =0;
bih.biClrUsed=256;
bih.biClrImportant =0;
bi.bmiHeader =bih; m_nBmSize=m_nBmWidth*m_nBmHeight*bih.biBitCount /8;
pBits=(BYTE*)malloc(m_nBmSize); if(!pBits) return FALSE;
pBits2=(BYTE*)malloc(m_nBmSize);if(!pBits2) return FALSE;
for(i=0;i<m_nBmSize;i++)
{
pBits[i]=0x0;
}
for(y=0;y<getBmHeight();y++)
for(x=0;x<getBmWidth();x++)
{
mysetPixel(pBits,x,y,RGB((255-y)*sin(PI*x/255),0,0));
}
return TRUE;
}
When finished with the initialization, you get to show the image:
::SetDIBitsToDevice (hdc,0,0,getBmWidth(),getBmHeight(),0,0,0,getBmHeight(),
pBits,&bi,0);
Okay, now the image was shown. We must fade it. How do we do it? Look at the snippet below:
for(y=1;y<getBmHeight();y++)
for(x=1;x<getBmWidth();x++)
{
FadePixel(pBits,x,y);
}
FadePixel() method will reduce the value of point's RGB. Be sure that the min RGB value of pixel is 0. R G B are also zero.
Add a new shape to bitmap, I use the easy way to do that. You can understand it:
for(x=0;x<getBmWidth();x++)
{
mysetPixel(pBits,x,rand()%(getBmHeight()/2)*sin((k)*PI*x/255)+(getBmHeight()/2),
RGB(255,rand()%255,0));
}
How to rotate the bitmap? It's always a big problem. I have not found a better way. So I use the formula:
newx = x.cos(angle) + y.sin(angle)
newy = y.cos(angle) - x.sin(angle)
With this formula, I calculate the new point. Copy pBits to pBits2 first, and calculate the new position of pixel in pBits2 assign it to pBits.
We have finished the work, so we could deal with the pBits (a pointer to a bitmap’s bits). We draw some shapes on it and call the FadePixel() function to swap it. Want to know more? Please download the demo and resource to check it out.
History
- 24th December, 2009: Initial post
- 25th December, 2009: Article updated
Secret..


 General
  News
News  Suggestion
  Question
  Bug
Bug  Answer
  Joke
Joke  Praise
  Rant
Rant  Admin
Admin 


