Introduction
I am writing this article because when I started working on WPF related project where I had to develop transition of pages, I came to know that there is no inbuilt support and also couldn’t find a simple solution to it over the internet. I found some articles in Code Project which explain only single page transition. My requirement was to slide the pages where existing page slides-out and new page slides-in.
Design
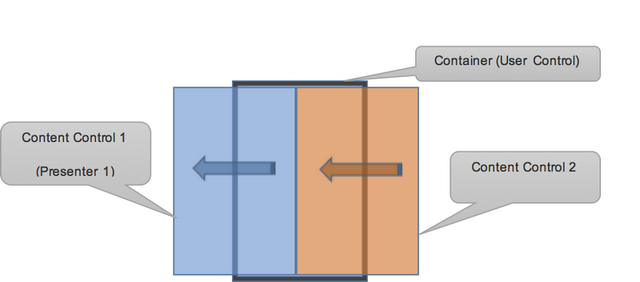
I implemented a custom control (PageTransitor), which internally has two content controls and different animation types for each control, based on the transition type. My custom control can be visualized as the below shown figure. Two content controls hold user/client supplied controls.
Using of PageTransitor Control
<transit:PageTransitor Name="Transistor"/>
Using of PageTransitor custom control is very simple and easy. PageTransitor control is implemented to suit MVVM based application. PageTransitor exposes the methods to perform the different types of transitions. It can be extended to support Pop-up and Pop-out of pages like:
Transitor.SlideLeft(newPage);
Transitor.SlideDown(newPage);
Transitor.Push(newPage);
Transitor.Pop();
These above methods can be used inside your transition request handler to transit the pages.
Implementation Details
PageTransitor, a custom control’s XAML code:
<UserControl
x:Class="PageTransition.PageTransitor"
xmlns="http://schemas.microsoft.com/winfx/2006/xaml/presentation"
xmlns:x="http://schemas.microsoft.com/winfx/2006/xaml"
xmlns:mc="http://schemas.openxmlformats.org/markup-compatibility/2006"
xmlns:d="http://schemas.microsoft.com/expression/blend/2008"
xmlns:local="clr-namespace:PageAnimator"
mc:Ignorable="d>
    <Grid>
        <ContentControl
Name="Presenter1">
            <ContentControl.RenderTransform>
                <TranslateTransform X="0" Y="0"/>
            </ContentControl.RenderTransform>
        </ContentControl>
        <ContentControl

Name="Presenter2">
            <ContentControl.RenderTransform>
                <TranslateTransform X="0" Y="0"/>
            </ContentControl.RenderTransform>
        </ContentControl>
    </Grid>
</UserControl>
Following is the animation example for horizontal transition:
<Storyboard
    x:Key="SlideLeft"
    Completed="SlideLeft_Completed"
    FillBehavior="Stop" Duration="0:0:0.6">
        <DoubleAnimation
            Name="LRLeft" Storyboard.TargetProperty="
            (RenderTransform).(TranslateTransform.X)"
            From="{Binding RelativeSource={RelativeSource FindAncestor,
                AncestorType=UserControl, AncestorLevel=1},
                Converter={StaticResource invertConverter}, Path=ActualWidth}"
            To="0"
            Duration="0:0:0.6"/>
        <DoubleAnimation
            Name="LRRight"
            Storyboard.TargetProperty="(RenderTransform).(TranslateTransform.X)"
            From="0"
            To="{Binding RelativeSource={RelativeSource FindAncestor,
                AncestorType=UserControl, AncestorLevel=1}, Path=ActualWidth}"
            Duration="0:0:0.6"/>
</Storyboard>
The above mentioned StoryBoard has two animations, one for existing page and another for new page. Both animations are of the same type, differences are only the start and end positions of control. Existing page transition starts from its current position 0 to X (which is equal to its width) and new page transition starts from position -X (its width) to 0.
But the above mentioned animations are not assigned to any control. This assignment is done in SlideLeft method, in code behind file.
void SlideLeft(object newPage)
{
if (currentPresenter.Content == null)
{
currentPresenter.Content = newPage;
return;
}
if (currentPresenter == Presenter1)
{
newPresenter = Presenter2;
}
else
{
newPresenter = Presenter1;
}
Storyboard.SetTarget(slideLeft.Children[0], currentPresenter);
Storyboard.SetTarget(slideLeft.Children[1], newPresenter);
newPresenter.Visibility = System.Windows.Visibility.Visible;
newPresenter.Content = newPage;
slideLeft.Begin();
}
In this transitions, there are two important points to handle:
- Setting the animation target for each transition and every time
- Changing the Z-order of control after the transition
Animation Target
As I mentioned earlier, in PageTransitor control, two content controls are used for the transition, named as Presenter1 and Presenter2. Each time animation targets have to be changed. Assume that first time, if the target for animation “LRLeft” is set to Presenter1, then for the 2nd time the target for animation “LRLeft” is set to Presenter2.
Z-Order

In my custom control, presenter2 will be on top of presenter1 as per the order of control creation. Even after transition, if presenter1 is supposed to be visible, presenter2 gets displayed because of the way controls are created. So after every transition, presenter1 Z-order will be changed so that presenter1 will be shown and presenter2 will be hidden if presenter1 is to be visible. In the next transition, Presenter1 will be hidden and presenter2 will be shown if presenter2 is to be visible. This will be in Animation completion handler as shown below:
private void SlideLeft_Completed(object sender, EventArgs e)
{
if (currentPresenter == Presenter2)
Panel.SetZIndex(Presenter1, 1);
else
Panel.SetZIndex(Presenter1, 0);
(currentPresenter.RenderTransform as TranslateTransform).X = 0;
currentPresenter.Visibility = System.Windows.Visibility.Collapsed;
currentPresenter = newPresenter;
}
You may be thinking, instead of changing the z-order, visibility of control can be changed to Collapsed so that control will be hidden. If you do that, then presenter2 will be seen for short during after transition. So to avoid this, first z-order will be changed then visibility to “Collapsed” to stop unnecessary rendering of control behind another control.
I change the z-order based on which control is getting rendered. If present1 is shown, presenter1 control’s Z-order will be raised to 1. Otherwise if presenter2 is shown, presenter1 control’s Z-order will be reset to 0. Along with this, slide-out control position will be reset.
Sample Application
I have created the sample application, which has one container and 2 user controls to show transition between controls. I have added two buttons to show horizontal and vertical sliding transition.
10 years of experience in software development, on windows platform.


 General
  News
News  Suggestion
  Question
  Bug
Bug  Answer
  Joke
Joke  Praise
  Rant
Rant  Admin
Admin 


