TL;DR
This is the simplest example which shows how to POST data from an Ionic app to a PHP server.
Quickstart
To see it in action:
- Clone the finished project from Github
- Run
ionic serve
- You should see something like this:
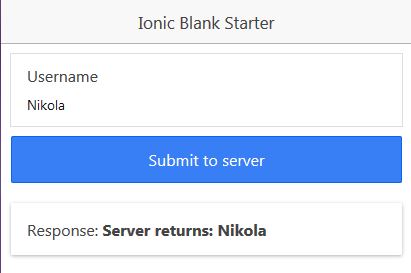
If you want to make it work from your server:
- Clone the finished project from Github
- Upload the PHP/api.php file to your server
- In the www/js/app.js file adjust the link variable to point to your server
- Run
ionic serve
Step by Step On How to Create This Yourself From Scratch
- Create a new blank Ionic project with:
ionic start ionicServerSendTest blank
- Copy the following code (you’ll already have the
.run() part, the .controller() part is novelty here) in www/js/app.js file:
angular.module('starter', ['ionic'])
.run(function($ionicPlatform) {
$ionicPlatform.ready(function() {
if (window.cordova && window.cordova.plugins.Keyboard) {
cordova.plugins.Keyboard.hideKeyboardAccessoryBar(true);
}
if (window.StatusBar) {
StatusBar.styleDefault();
}
});
})
.controller('AppCtrl', function($scope, $http) {
$scope.data = {};
$scope.submit = function(){
var link = 'http://nikola-breznjak.com/_testings/ionicPHP/api.php';
$http.post(link, {username : $scope.data.username}).then(function (res){
$scope.response = res.data;
});
};
});
- On your server, create a api.php file with the following content:
<?php
if (isset($_SERVER['HTTP_ORIGIN'])) {
header("Access-Control-Allow-Origin: {$_SERVER['HTTP_ORIGIN']}");
header('Access-Control-Allow-Credentials: true');
header('Access-Control-Max-Age: 86400');
}
if ($_SERVER['REQUEST_METHOD'] == 'OPTIONS') {
if (isset($_SERVER['HTTP_ACCESS_CONTROL_REQUEST_METHOD']))
header("Access-Control-Allow-Methods: GET, POST, OPTIONS");
if (isset($_SERVER['HTTP_ACCESS_CONTROL_REQUEST_HEADERS']))
header("Access-Control-Allow-Headers:
{$_SERVER['HTTP_ACCESS_CONTROL_REQUEST_HEADERS']}");
exit(0);
}
$postdata = file_get_contents("php://input");
if (isset($postdata)) {
$request = json_decode($postdata);
$username = $request->username;
if ($username != "") {
echo "Server returns: " . $username;
}
else {
echo "Empty username parameter!";
}
}
else {
echo "Not called properly with username parameter!";
}
?>
As you can see from the code, the first part is explained in detail in this StackOverflow question, and it basically solves the CORS issue that you would otherwise run into.
The second part, explained in detail in this StackOverflow question, deals with the way you POST data from Ionic (basically an AngularJS app) to your PHP server. The gist is that AngularJS POSTs by default in a JSON format, and thus you have to
json_decode
the data that comes to your PHP server. - In www/js/app.js file, adjust the
link variable to point to the file on your server. - In www/index.html file, copy the following content:
<!DOCTYPE html>
<html>
<head>
<meta charset="utf-8">
<meta name="viewport" content="initial-scale=1,
maximum-scale=1, user-scalable=no, width=device-width">
<title></title>
<link href="lib/ionic/css/ionic.css" rel="stylesheet">
<link href="css/style.css" rel="stylesheet">
<!--
<!--
<script src="lib/ionic/js/ionic.bundle.js"></script>
<!--
<script src="cordova.js"></script>
<!--
<script src="js/app.js"></script>
</head>
<body ng-app="starter" ng-controller="AppCtrl">
<ion-pane>
<ion-header-bar class="bar-stable">
<h1 class="title">Ionic Blank Starter</h1>
</ion-header-bar>
<ion-content padding="true">
<form ng-submit="submit()">
<label class="item item-input item-stacked-label">
<span class="input-label">Username</span>
<input type="text" name="username"
placeholder="enter username" ng-model="data.username">
</label>
<input class="button button-block button-positive"
type="submit" name="submit" value="Submit to server">
</form>
<div class="card">
<div class="item item-text-wrap">
Response: <b ng-bind="response"></b>
</div>
</div>
</ion-content>
</ion-pane>
</body>
</html>
Here, you basically created a form with an username input field and with a submit button. Using AngularJS ng-submit, you’re saying that once the submit button is clicked, AngularJS should handle it within the submit() function which you defined in app.js file before. Input username uses the ng-model to bind to the variable on the $scope so that you can then use it in your submit() function.
- Run
ionic serve
from the root directory of your Ionic app (I’m sure you know this, but just in case, that’s where the folders like www, plugins, scss reside).
I’m an engineer at heart and a jack of all trades kind of guy.
For those who care about titles, I hold a masters degree in computing from
FER (and a black belt in karate, but that’s another story…).
During the last years, worked in a betting software industry where I made use of my knowledge in areas ranging from full-stack (web & desktop) development to game development through Linux and database administration and use of various languages (C#, PHP, JavaScript to name just a few).
Currently, I’m a senior software engineer at
TelTech, where we make innovative communications apps, and I <3 it.
Lately, I’m very passionate about Ionic framework and am currently in the top 3 answerers on
StackOverflow in
Ionic framework. I wrote a book about Ionic framework which you can get for free on Leanpub:
Ionic framework – step by step from idea through prototyping to the app stores.
Other technical writing:
+ wrote a book
Getting MEAN with MEMEs
was a technical reviewer for a book
Deploying Node published by Packt
was a technical reviewer for a book
Getting started with Ionic published by Packt
After writing 300 posts, this is why I think
you should start blogging too
Come and see what I write about on
my blog.


 General
  News
News  Suggestion
  Question
  Bug
Bug  Answer
  Joke
Joke  Praise
  Rant
Rant  Admin
Admin 


