Click here to Skip to main content
16,002,061 members
Articles / Productivity Apps and Services / Sharepoint
Article

Three State Workflow

Rate me:
Please Sign up or sign in to vote.
5.00/5 (1 vote)
16 Oct 2012CPOL3 min read 31.2K   3   1
In this article we explore the Three-state workflow of SharePoint 2010.

Introduction

In this article we will explore the three-state workflow of SharePoint 2010. Please note that this is an out-of-the-box workflow also known as built-in workflow.

Pre-Requisite

For viewing the email notifications generated by the workflow, you need to configure the Development Machine with an SMTP receiver tool. You can view the Real World Scenarios on configuring this.

What is the purpose of the Three-state workflow?

The three-state workflow can be used to track the status of list items. For each status change there will be an email notification performed by this workflow.

The Issue Tracking template is built to work with this workflow as it contains a Choice column with three different states.

Exploring the Workflow

For starting with create a new list using the Issue Tracking template as shown below:
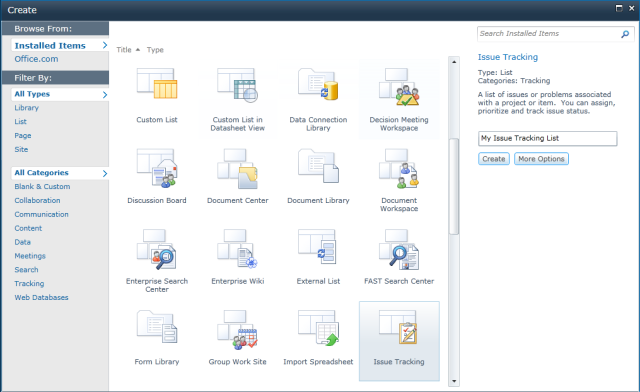
Image 1

After creating the list we need to Associate the workflow with the list using the List tab > Workflow Settings > Add a Workflow.

Image 2

A wizard page will be started as shown below.

Image 3

Select the Three-state workflow and enter a unique name for the workflow. In the bottom of the page, you can see the Start Options. Check the Start this workflow when an item is created check box.

Image 4

Click the Next button to continue.

Now you will be prompted with the second page of the Workflow as shown below:

Image 5

Please note that the Three-state workflow requires a column with three0 states as the ‘Choice’ field. In this list the Issue Status column is selected as the ‘Choice’ field. The rest of the three drop down lists show the three different value selections for the Issue Status to set the Active / Resolved / Closed states.

Coming down to the page you can set Emailing options like Task Information, Email Subject and Body, etc. Email Notifications are sent to the involved persons.

Image 6

Leave the default options and click the OK button. Now your workflow is ready to send email notifications on task creation.

Email Notification

For viewing the emails generated by the workflow, you need to have:

  • Email server configured in Central Administration

  • E-mail property set in User Profile

  • Smtp4dev tool running

Please view the Real World Scenarios section of the book to enable this.

  • Configuring Email for Development Server

Testing Workflow

Now let us test the workflow by creating a task. Create a Task and make sure you select a valid user having email for the Assigned To column.

Image 7

Save the changes and you should see the smtp4dev tool catches the email as shown below.

Image 8

You can see that the ID value is being highlighted. This concludes our experiment with the Three-state workflow.

Editing the Workflow

We can associate multiple workflows with a list or library. To edit an existing association use the Workflow Settings > Workflow Settings menu item.

Image 9

In the appearing page you can view the existing workflows associated and edit the settings.

Image 10

The Workflows in Progress column displays the number of workflow instances currently active.

There are additional links to Add / Remove workflows, View workflow reports, too.

Where should I apply this Workflow?

We can use this workflow for the following requirement scenarios:

  • Product or Project approval process where a new product idea can be traversed through different stages of approval before acceptance.

  • Issue tracking system where a customer can create an issue item, the support team updates it to resolved, customer can change the status to Closed or Active again.

  • Bug tracking system where the QA can create a task item, developer can change it to Resolved, QA can reopen it.

The effective use of Three-state workflow should decrease the delivery time for a tracking system with email notifications. We can also use custom lists with transition properties for using the Three-state workflow.

References

Summary

In this article we explored the Three-state workflow of SharePoint 2010. Following are the points worth to be summarized:

  • Three-state workflow tracks status changes.

  • A Choice column is required for the list / library to use this Workflow.

  • Choice column requires at least three fields.

  • Issue Tracking list template is apt for this workflow.

  • Association of Three-state workflow with list instance is required.

  • Email notification is enabled for Three-state workflow.

License

This article, along with any associated source code and files, is licensed under The Code Project Open License (CPOL)


Written By
Architect
United States United States
Jean Paul is a Microsoft MVP and Architect with 12+ years of experience. He is very much passionate in programming and his core skills are SharePoint, ASP.NET & C#.

In the academic side he do hold a BS in Computer Science & MBA. In the certification side he holds MCPD & MCTS spanning from .Net Fundamentals to SQL Server.

Most of the free time he will be doing technical activities like researching solutions, writing articles, resolving forum problems etc. He believes quality & satisfaction goes hand in hand.

You can find some of his work over here. He blogs at http://jeanpaulva.com

Comments and Discussions

 
Question3 state workflow sharepoint 2010 Pin
Member 111390878-Oct-14 10:43
Member 111390878-Oct-14 10:43 
I am looking to see if a 3 state workflow will be the solution I am looking for. We use sharepoint to house our department of consultants' policies and procedures.

I have the standard approval workflow set up now (actually 2 different workflows since there are 2 stages or approval) along with major and minor versions set.
The consultants propose changes to the policy and they start a workflow (Betty workflow) that goes to a specific person (minor version 1.1) lets call her Betty. Betty does the triage to be sure that the content is correct (font color etc.) then goes in and reviews the changes as far as do they work. Once she reviews and all is ok she approves that workflow (major version 2.0) so the consultant gets an SharePoint email stating it was approved and then Betty starts a second workflow ( Policy update workflow) to send to the management team (2 people) for final approval. Once those 2 people approve the workflow it goes live (new major version 3.0)

For auditing purposes it is essential that we add a Modified Effective date for when that info goes live on a "What's New" page. I have an alert set up once the what's new page is updated they get an email saying that page is updated. I gave the consultants instructions on how to go to Page then page history and compare version to see what has changed.

Since we don't know ahead of time what date this info will go live we have to go in and add a modified effective date and then publish the page which makes it yet another major version (4.0)

What I am looking for a solution for is how can we do all these changes and only have 1 new major version. The issue we have is sometime they have to go back 2 to 3 major version to get back to what it was before all these workflows were started. We really need to be able to do all the changes and still track who approved the changes and only be one major version change.
I was thinking if we did a 3 state workflow we could have all 3 reviewers be able to approve the changes without the major version changing.

I am new to sharepoint and very unfamiliar to how the 3 state process works. I did read the article about how to set them up but am not sure how to set it up to work off our tasks page so the approvers can see what needs their attention and see where in the process the request is.
J Warner

General General    News News    Suggestion Suggestion    Question Question    Bug Bug    Answer Answer    Joke Joke    Praise Praise    Rant Rant    Admin Admin   

Use Ctrl+Left/Right to switch messages, Ctrl+Up/Down to switch threads, Ctrl+Shift+Left/Right to switch pages.