This article shows how to add new Ribbon themes to an MFC application built using the Visual Studio 'Feature Pack' (CMFCVisualManager) classes.
Introduction
This article presents a class derived from CMFCVisualManager which allows any number of colour variations to be used on the MFC Ribbon menu. Each variation can simply be added to your application's style menu and switched to via CMainFrame::OnApplicationLook(), just like the standard theme variations.
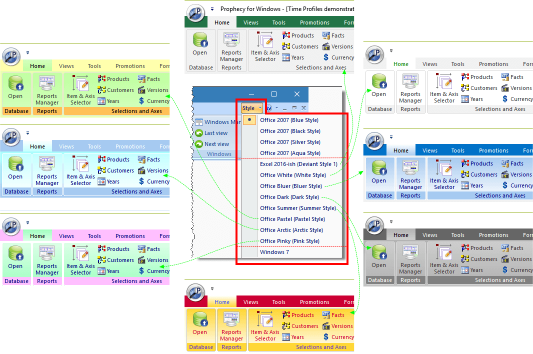
My MFC application already used the MFC Feature Pack classes and ribbon but I wanted it to have a more modern look as the original themes are beginning to look a bit dated. Rather than go through the pain of replacing the existing code with a paid-for updated ribbon (Codejock looks pretty good), I decided to see how far simply changing the colours on the existing themes would take me. Here are some samples of what's possible with the class I developed.
The article application (in the zip download) re-uses the standard 'RibbonGadgets' application from the Microsoft Visual Studio MFC Feature Pack samples and adds a 'Deviant Editor' additional tab. This additional tab lets you visually design your new theme. The button labeled 'Get Code' launches a window containing the specific code for the current theme, which you can copy / paste into your application's CMainFrame::OnApplicationLook().

Clicking the 'Get Code' button launches a window containing the core C++ to render the current theme from the sample application:
Using the Code
The following instructions show how to implement the CMFCVisualManagerDeviant class in a new Visual Studio 2015 MFC project. Adding it to an existing project should be pretty similar.
First, create a new MFC application using the Visual Studio Application Wizard, making sure you select a 'Project style' of 'Office' on the 'Application Type' dialog. On the 'User Interface Features' dialog, ensure you choose the 'Use ribbon' option.
Now add a new menu entry to the ribbon's 'Style' menu in the resource editor. In the screenshot, we've used the ID ID_VIEW_APPLOOK_DEVIANT1.
Now, we need to capture the Style menu event in CMainFrame. On the assumption that you're going to want to add more than one new style, navigate to the BEGIN_MESSAGE_MAP section of your CMainFrame and add the following code inside the BEGIN_MESSAGE_MAP section. The *_RANGE macros capture the range of IDs from the first to the second.
ON_COMMAND_RANGE(ID_VIEW_APPLOOK_DEVIANT1, ID_VIEW_APPLOOK_DEVIANT1,
                 &CMainFrame::OnApplicationLook)
ON_UPDATE_COMMAND_UI_RANGE(ID_VIEW_APPLOOK_DEVIANT1,
ID_VIEW_APPLOOK_DEVIANT1, &CMainFrame::OnUpdateApplicationLook)
In CMainFrame::OnApplicationLook(), make the following changes:
- In the code block starting
switch (theApp.m_nAppLook), add a case statement for the new theme ID:, pasting in the code you copied from the 'Get Code' button option from the sample application. In the SetStyle() statement, choose the existing visual theme enumerator that looks best with your colour theme - for example, CMFCVisualManagerOffice2007::Office2007_Silver.
case ID_VIEW_APPLOOK_DEVIANT1:
{
CMFCVisualManagerOffice2007::SetStyle
(CMFCVisualManagerOffice2007::Office2007_Silver);
CMFCVisualManager::SetDefaultManager
(RUNTIME_CLASS(CMFCVisualManagerDeviant));
CMFCVisualManagerDeviant* pVisMan =
(CMFCVisualManagerDeviant*)CMFCVisualManager::GetInstance();
if (pVisMan->GetRuntimeClass() ==
RUNTIME_CLASS(CMFCVisualManagerDeviant))
{
pVisMan->SetClrRibbonBarBackground(RGB(241, 241, 241));
pVisMan->SetClrRibbonBarTextPB(RGB(75, 75, 75));
pVisMan->SetClrRibbonBarTextHighlightedPB(RGB(0, 128, 0));
m_clrMenuBarBk = RGB(241, 241, 241);
pVisMan->SetClrRibbonCategoryBkTop(RGB(255, 255, 255));
pVisMan->SetClrRibbonCategoryBkBottom(RGB(255, 255, 255));
pVisMan->SetClrRibbonPanelBkTop(RGB(255, 255, 255));
pVisMan->SetClrRibbonPanelBkBottom(RGB(255, 255, 255));
pVisMan->SetClrRibbonPanelCaptionBk(RGB(241, 241, 241));
pVisMan->SetClrRibbonPanelCaptionTextPB(RGB(68, 68, 68));
pVisMan->SetClrRibbonPanelCaptionTextHighlightedPB(RGB(77, 0, 38));
pVisMan->SetClrRibbonPanelTextPB(RGB(60, 60, 60));
pVisMan->SetClrRibbonPanelOutline(RGB(210, 210, 210));
}
}
break;
- Locate the following line of code in
CMainFrame::OnApplicationLook() which should be the third from last statement within the switch (theApp.m_nAppLook) block.
CMFCVisualManager::SetDefaultManager(RUNTIME_CLASS(CMFCVisualManagerOffice2007));
Replace it with the following:
if(theApp.m_nAppLook >= ID_VIEW_APPLOOK_OFF_2007_BLUE &&
             theApp.m_nAppLook <= ID_VIEW_APPLOOK_OFF_2007_AQUA)
   CMFCVisualManager::SetDefaultManager(RUNTIME_CLASS(CMFCVisualManagerOffice2007));
- Finally, disable redraw at the start of
CMainFrame::OnApplicationLook() with SetRedraw(FALSE) and re-enable at the end with SetRedraw(TRUE) in order to avoid screen flicker. -
Here is the full CMainFrame::OnApplicationLook() code. The additions and changes are commented starting // **
void CMainFrame::OnApplicationLook(UINT id)
{
CWaitCursor wait;
theApp.m_nAppLook = id;
SetRedraw(FALSE);
switch (theApp.m_nAppLook)
{
case ID_VIEW_APPLOOK_WIN_2000:
CMFCVisualManager::SetDefaultManager(RUNTIME_CLASS(CMFCVisualManager));
m_wndRibbonBar.SetWindows7Look(FALSE);
break;
case ID_VIEW_APPLOOK_OFF_XP:
CMFCVisualManager::SetDefaultManager(RUNTIME_CLASS(CMFCVisualManagerOfficeXP));
m_wndRibbonBar.SetWindows7Look(FALSE);
break;
case ID_VIEW_APPLOOK_WIN_XP:
CMFCVisualManagerWindows::m_b3DTabsXPTheme = TRUE;
CMFCVisualManager::SetDefaultManager(RUNTIME_CLASS(CMFCVisualManagerWindows));
m_wndRibbonBar.SetWindows7Look(FALSE);
break;
case ID_VIEW_APPLOOK_OFF_2003:
CMFCVisualManager::SetDefaultManager(RUNTIME_CLASS(CMFCVisualManagerOffice2003));
CDockingManager::SetDockingMode(DT_SMART);
m_wndRibbonBar.SetWindows7Look(FALSE);
break;
case ID_VIEW_APPLOOK_VS_2005:
CMFCVisualManager::SetDefaultManager(RUNTIME_CLASS(CMFCVisualManagerVS2005));
CDockingManager::SetDockingMode(DT_SMART);
m_wndRibbonBar.SetWindows7Look(FALSE);
break;
case ID_VIEW_APPLOOK_VS_2008:
CMFCVisualManager::SetDefaultManager(RUNTIME_CLASS(CMFCVisualManagerVS2008));
CDockingManager::SetDockingMode(DT_SMART);
m_wndRibbonBar.SetWindows7Look(FALSE);
break;
case ID_VIEW_APPLOOK_WINDOWS_7:
CMFCVisualManager::SetDefaultManager(RUNTIME_CLASS(CMFCVisualManagerWindows7));
CDockingManager::SetDockingMode(DT_SMART);
m_wndRibbonBar.SetWindows7Look(TRUE);
break;
default:
switch (theApp.m_nAppLook)
{
case ID_VIEW_APPLOOK_OFF_2007_BLUE:
CMFCVisualManagerOffice2007::SetStyle
(CMFCVisualManagerOffice2007::Office2007_LunaBlue);
break;
case ID_VIEW_APPLOOK_OFF_2007_BLACK:
CMFCVisualManagerOffice2007::SetStyle
(CMFCVisualManagerOffice2007::Office2007_ObsidianBlack);
break;
case ID_VIEW_APPLOOK_OFF_2007_SILVER:
CMFCVisualManagerOffice2007::SetStyle
(CMFCVisualManagerOffice2007::Office2007_Silver);
break;
case ID_VIEW_APPLOOK_OFF_2007_AQUA:
CMFCVisualManagerOffice2007::SetStyle
(CMFCVisualManagerOffice2007::Office2007_Aqua);
break;
case ID_VIEW_APPLOOK_DEVIANT1: {
CMFCVisualManagerOffice2007::SetStyle
(CMFCVisualManagerOffice2007::Office2007_Silver);
CMFCVisualManager::SetDefaultManager
(RUNTIME_CLASS(CMFCVisualManagerDeviant));
CMFCVisualManagerDeviant* pVisMan =
(CMFCVisualManagerDeviant*)CMFCVisualManager::GetInstance();
if (pVisMan->GetRuntimeClass() == RUNTIME_CLASS(CMFCVisualManagerDeviant))
{
pVisMan->SetClrRibbonBarBackground(RGB(0, 0, 128));
pVisMan->SetClrRibbonBarTextPB(RGB(255, 255, 255));
pVisMan->SetClrRibbonBarTextHighlightedPB(RGB(0, 0, 0));
pVisMan->SetClrRibbonCategoryBkTop(RGB(0, 0, 128));
pVisMan->SetClrRibbonCategoryBkBottom(RGB(166, 202, 240));
pVisMan->SetClrRibbonPanelBkTop(RGB(166, 202, 240));
pVisMan->SetClrRibbonPanelBkBottom(RGB(255, 255, 255));
pVisMan->SetClrRibbonPanelCaptionBk(RGB(166, 202, 240));
pVisMan->SetClrRibbonPanelCaptionTextPB(RGB(0, 0, 128));
pVisMan->SetClrRibbonPanelCaptionTextHighlightedPB(RGB(255, 255, 255));
pVisMan->SetClrRibbonPanelTextPB(RGB(0, 0, 128));
pVisMan->SetClrRibbonPanelOutline(RGB(255, 255, 255));
}
}
break;
}
if(theApp.m_nAppLook >= ID_VIEW_APPLOOK_OFF_2007_BLUE &&
theApp.m_nAppLook <= ID_VIEW_APPLOOK_OFF_2007_AQUA)
CMFCVisualManager::SetDefaultManager
(RUNTIME_CLASS(CMFCVisualManagerOffice2007));
CDockingManager::SetDockingMode(DT_SMART);
m_wndRibbonBar.SetWindows7Look(FALSE);
}
SetRedraw(TRUE);
RedrawWindow(NULL, NULL, RDW_ALLCHILDREN | RDW_INVALIDATE |
RDW_UPDATENOW | RDW_FRAME | RDW_ERASE);
theApp.WriteInt(_T("ApplicationLook"), theApp.m_nAppLook);
}
You can add any number of additional themes by iterating the above process.
Points of Interest
I'm not going to explain how the CMFCVisualManagerDeviant class works - why be different to Microsoft, haha, the code is there for you to read! The goal was to provide a simple, add-in class that can be easily plugged into any new or existing application which uses the Feature Pack ribbon. It got to its current state with many hours of code browsing and experimentation.
However, there are two things that have eluded me to date, and I'd welcome anyone contributing a solution.
- I haven't cracked how to change the menu text colours for the Style menu:
- I can't change the background colour of the '
orb' menu:
These snags are only problematic on some combinations of colours, but it would be fantastic to resolve them.
I will integrate any changes that resolve these issues or improve this class upon receipt.
History
- 31st October, 2017 - Initial article submitted

