Introduction
In this article, I am going to explain how to insert data to multiple tables
using the Code First approach.
Let’s begin with the View Model.
What is ViewModel?
ViewModel in MVC design pattern is very similar to 'model'. The major difference between 'Model' and ‘ViewModel’ is that we use ViewModel only in rendering views.
Start with a small example
Let’s assume we want to implement a view that will have five textboxes for UserName, Password, RePassword, Address, and Email.
Now, I want to store UserName and Password into the Login table and UserName, Address, and Email into
the User table. I want to insert the data into these two tables from a single view. For this I am taking advantage of
the ViewModel to render all controls in a single view.
Let’s begin with creating the Model.
public class Login
{
    [Key]
    public String Username { get; set; }
    [DataType(DataType.Password)]
    public String Password { get; set; }
}
public class User
{
    [Key]
    public string Username { get; set; }
    public string Address { get; set; }
    public string Email { get; set; }
}
Let’s create the View Model to render the controls in the view:
public class LoginViewModel
{
    public String Username { get; set; }
    [DataType(DataType.Password)]
    public String Password { get; set; }
    [DataType(DataType.Password)]
    public String RePassword { get; set; }
    public String Address { get; set; }
    public string Email { get; set; }
}
Let’s add LoginDBContext:
public class LoginDBContext : DbContext
{
    public DbSet<Login> logins { get; set; }
    public DbSet<User> user { get; set; }
}
We are done with creating Model classes.
Let’s create the Controller and name it Login.
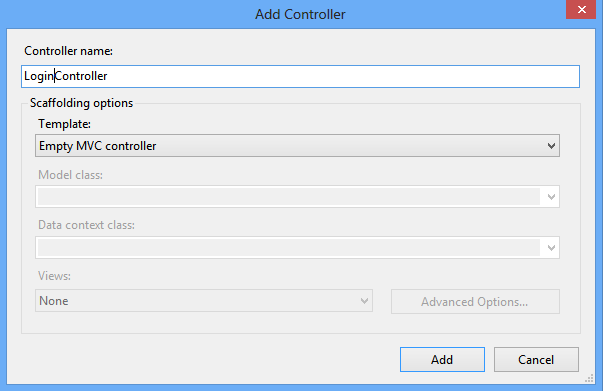
Add the following code inside the controller.
LoginDBContext db = new LoginDBContext();
public ActionResult Index()
{
return View();
}
public ActionResult Login()
{
return View();
}
[HttpPost]
public ActionResult Login(LoginViewModel viewModel)
{
var login = new Login()
{
Username = viewModel.Username,
Password = viewModel.Password
};
var user = new User()
{
Username=viewModel.Username,
Address=viewModel.Address,
Email=viewModel.Email
};
db.logins.Add(login);
db.user.Add(user);
db.SaveChanges();
return View();
}
We are done with creating the Controller, let's create a view. Right-click on Login,
Add View.

Login view will be generated for us.
@model MvcViewModel.Models.LoginViewModel

@{
    ViewBag.Title = "Login";
}

<h2>Login</h2>

@using (Html.BeginForm()) {
    @Html.ValidationSummary(true)

    <fieldset>
        <legend>LoginViewModel</legend>

        <div class="editor-label">
            @Html.LabelFor(model => model.Username)
        </div>
        <div class="editor-field">
            @Html.EditorFor(model => model.Username)
            @Html.ValidationMessageFor(model => model.Username)
        </div>

        <div class="editor-label">
            @Html.LabelFor(model => model.Password)
        </div>
        <div class="editor-field">
            @Html.EditorFor(model => model.Password)
            @Html.ValidationMessageFor(model => model.Password)
        </div>

        <div class="editor-label">
            @Html.LabelFor(model => model.RePassword)
        </div>
        <div class="editor-field">
            @Html.EditorFor(model => model.RePassword)
            @Html.ValidationMessageFor(model => model.RePassword)
        </div>

        <div class="editor-label">
            @Html.LabelFor(model => model.Address)
        </div>
        <div class="editor-field">
            @Html.EditorFor(model => model.Address)
            @Html.ValidationMessageFor(model => model.Address)
        </div>

        <div class="editor-label">
            @Html.LabelFor(model => model.Email)
        </div>
        <div class="editor-field">
            @Html.EditorFor(model => model.Email)
            @Html.ValidationMessageFor(model => model.Email)
        </div>

        <p>
            <input type="submit" value="Create" />
        </p>
    </fieldset>
}

<div>
    @Html.ActionLink("Back to List", "Index")
</div>

@section Scripts {
    @Scripts.Render("~/bundles/jqueryval")
}
Finally the rendered view will look like this:


 General
  News
News  Suggestion
  Question
  Bug
Bug  Answer
  Joke
Joke  Praise
  Rant
Rant  Admin
Admin 


