This article provides a step-by-step guide to installing Agent DVR, setting up a Wyze Cam v3 with Agent DVR, configuring CodeProject.AI Server with Agent DVR, and using them to detect a person.
Agent DVR is a video surveillance software that's used for home security, theft prevention, and wildlife watching. Like Blue Iris, Agent DVR also supports multiple cameras, offers recording, alert notifications, and has AI integration. The difference between Blue Iris and Agent DVR is that Agent DVR is free to use locally for private use, while Blue Iris has a trial version. Because Agent DVR also works with CodeProject.AI Server, I thought it would be fun to try and set it up.
In this article, I go through setting up Agent DVR and getting it working with CodeProject.AI Server, then using Agent DVR and CodeProject.AI Server to detect a person. For this article, I am using Windows 10 and a Wyze Cam v3, which I got off Amazon for $34 USD.
Installing Agent DVR
The first step is to go to the ispyconnect.com download page. I'm doing a Windows install, so I select Agent DVR - Windows and hit the Download button. This downloads Agent_Setup_Windows.zip which needs to be extracted. The two files within the zip are install.exe and Setup.exe. As far as I can tell, these two files do the exact same thing.

So run install.exe as an administrator. To install Agent DVR, it needs access to your home network, so when the Windows Defender Firewall window pops up, hit Allow access.
Next on the Agent Setup Utility screen, there is an option to select the destination folder for installation, the local server port for Agent DVR, then some other installation options. I'm keeping all this default, and hit Next. If you select the install tray application option, a second Windows Defender Firewall window pops up requesting access.
Agent DVR launches in your browser at localhost:8090 and gives a series of Help options for getting started with Agent DVR. Hit OK.
Then a Language selection pops up. English is the default, so hit OK.
Setting up a Wyze Cam v3 with Agent DVR
Now to setup the camera. Go to the Server Menu, which is in the upper-left hand corner.
Then hit New Device.
From here, there's a page that lists all your current devices. Because there aren't any yet, it's blank. Hit the + button to bring up the New Device menu. Now select Video Source. I tried to use IP Camera Wizard, but I couldn't get my Wyze Cam v3 set up with that option, so Video Source it is!
Straight out of the gate, Agent DVR wants to know if you're going to want to use alerts with this camera, whether or not you want to record when motion is detected, if you want to reduce the resolution of the video, or if you want to record raw. I'm switching on Alerts and Record on Detect.
Next is the camera setup window.
The first thing to do is to change the Source Type to IP Camera. This brings up the Network Source window. I'm using a Wyze Cam v3 that I've setup to do RTSP, so I input the settings I created for my Wyze Cam. If you want to see how I set up my Wyze Cam v3, please check out my article, How to Setup Blue Iris and CodeProject.AI Server on Windows Using a Wyze Cam. Input the Username for the camera (my camera is called "eyespy"), the Password, and the Live URL. For the Live URL, I'm going to use the RTSP stream address, which looks something like rtsp://username:password@10.0.0.299/live where the username and password are the options you just input. Hit OK.
Then in the camera settings, give your camera a name (I call mine Eye Spy), and hit OK.
There it is! The Wyze Cam v3 is working with Agent DVR.
Getting CodeProject.AI Server Working with AgentDVR
Now it's time to get CodeProject.AI Server working with Agent DVR. If you haven't set up CodeProject.AI Server before, check out my article, How to Setup Blue Iris and CodeProject.AI Server on Windows Using a Wyze Cam. From Agent DVR, click on the Server Menu button. Then from the Configuration heading, select Settings.
Then from the General dropdown, select AI Settings.
Then click the ... button next to Configure.
Now input the URL for CodeProject.AI Server, which is http://localhost:32168/ and hit OK, then OK to accept the AI Server settings, OK to accept the AI Settings, and OK to exit the Agent DVR menu.
Launch the CodeProject.AI Server dashboard by putting http://localhost:32168/ in your browser, and make sure Object Detection (YOLO) is running.
Using CodeProject.AI Server and Agent DVR to Detect a Person
CodeProject.AI Server is set up and it's happily running. Now let's use it to detect an object and trigger an alert when that object is detected. I'm sitting in front of my camera, so I'll try and detect a person.
Go back to the camera settings by clicking the edit icon in the bottom left corner while on the Live Feed.
Then from the General dropdown, select Object Recognition.
Input the URL for CodeProject.AI Server http://localhost:32168/, put the Mode on Alert, make sure Object Recognition is enabled, then click the ... button in front of Configure.
The default Confidence level for Agent DVR object detection is 60, but I think this is too high. Change it to 50. I want Agent DVR to save a photo when a person is detected, so I toggle Photos to the On position. Then, in the Find list, I'm only looking for a person, so I remove everything else from the list, and hit OK, and OK again to accept the Object Recognition settings.
Now go back to the camera settings and from the General dropdown, select Detector.
Within the detector settings, make sure it is Enabled. Change the Detector type to "Simple". The Simple detector means that the AI detection will be triggered on motion. I want it to be real easy to detect me, so I put this setting to Simple and hit OK to accept the settings.
Time to set up some actions and alerts. Go back to the camera settings, and from the General dropdown, select Actions. Then click Add. From the If dropdown, select Object Found, and on the From dropdown, select Trigger Object Recognition. The camera should automatically be selected after this, but ensure the camera (in my case, Eye Spy) is in the Device section, then hit OK. Hit OK again to accept those actions.
Then we need to ensure Alerts are enabled. Go back to the camera settings, and from the General dropdown, select Alerts. Make sure Alerts are Enabled, and hit OK.
Finally, we need to filter our alerts. Go back to the camera settings, and from the General dropdown, select Alert Filter. This will help filter the alerts so that more "person" detections will come through. From the Find menu, ensure only person is listed, and hit OK.
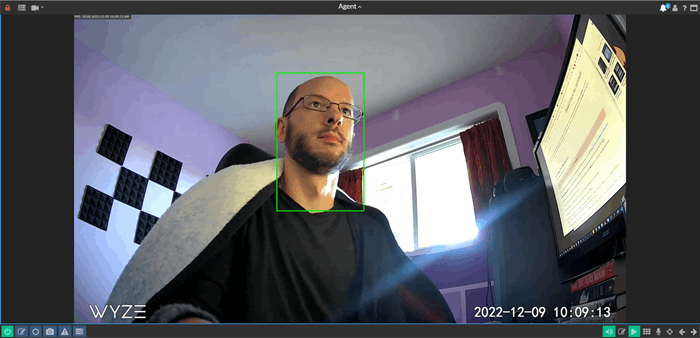
Go back to the live feed, and bam! Look at that alert notification in the corner!
Click on the Alert icon, and that's me! Person detected! You can see there is both a tv tag, and person tag. I suspect because my monitor is in the frame, it is also getting detected. I ran the camera feed while typing up the article and moving to and from my desk, and I was detected several more times. It's not 100%, which I'm sure could be modified in the settings, but person detection in Agent DVR using CodeProject.AI Server definitely works.
And that's everything. In this article, we setup Agent DVR, got it running with CodeProject.AI Server, and setup Agent DVR to trigger an alert when a person was detected.
If you have any questions, please feel free to ask them in the article forum below.
Sean Ewington is the Content Manager for CodeProject.
His background in programming is primarily C++ and HTML, but has experience in other, "unsavoury" languages.
He loves movies, and likes to say inconceivable often, even if it does not mean what he thinks it means.


 General
  News
News  Suggestion
  Question
  Bug
Bug  Answer
  Joke
Joke  Praise
  Rant
Rant  Admin
Admin 


