This article is a series of shell commands to enable VPN client on an OpenWRT router using openvpn and mwan3 packages, enabling VPN access on all LAN and WiFi connected devices automatically with a single tunnel. Some flash and initial configuration instructions are also in here. Warning - Works only with version 19.XX of OpenWRT.
Warning - Works only with version 19.XX of OpenWRT. Something in higher versions of mwan3 broke this implementation.
When a device connects to VPN using an app, it opens an encrypted tunnel to the VPN server, shown as the green line in illustration below. Any spies logging traffic cannot look inside the tunnel, making the communications secure. Red lines represent regular traffic which can be logged.
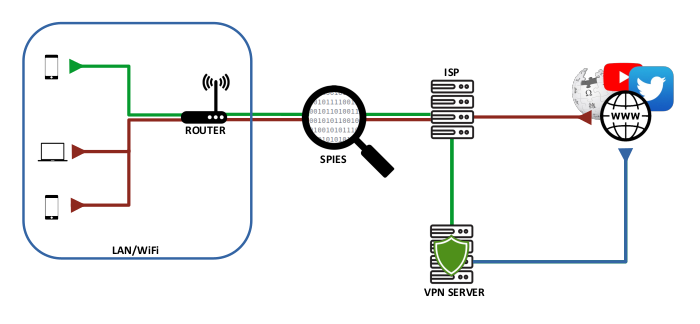
After configuring an OpenWRT router as described in this article, all LAN and WiFi connected devices will access the internet through one VPN tunnel opened by the router. This will be more efficient than individual devices connecting to VPN directly, as all VPN related processing is done on this dedicated device instead of on each connected device separately. This is illustrated in the diagram below.

Introduction
OpenWRT is a secure open source Linux based firmware compatible with many routers. It is easy to use and configure for many different applications. It has a lot of useful libraries in package manager opkg, of which we will use openvpn and mwan3 packages to create a multi-wan VPN router. VPN service providers usually provide OpenVPN configuration files for their servers. These *.ovpn files can be used to create a tunnel, which appears as ‘/dev/tun0’ in the OpenWRT device.
Once a working tunnel is setup, multi-wan (mwan3) and a new network can be configured to enable VPN for all LAN and WiFi connected devices. Read about mwan3 here. mwan3 allows for seamless switching between network interfaces, so that when the vpn connection fails or during command restarts, the network switches back to regular internet, so that our videos will keep playing, and will switch back the VPN network when it becomes available again.
In the following sections, the uci commands can be copy pasted into the OpenWRT shell, and some changes in the configuration pages using luci, and the router will be fully configured by the time you reach the last section.
Flashing OpenWRT
If your router does not have OpenWRT firmware, check if it is compatible with OpenWRT here. Find your firmware using this handy tool, and flash your router. This can be considered the hardest step in this article, and I suggest having an unbrick manual in hand. The configuration below was written for OpenWRT version 19.07.3, and should work fine on more recent versions. After the flash, connect your PC to one of the LAN ports, internet to WAN port of the router and reboot. ssh into the router with ssh root@openwrt.lan to enter the commands you will encounter in the following steps. You can access luci at http://openwrt.lan/cgi-bin/luci/.
Initial Configuration
The configuration after a fresh flash will contain network, dhcp and firewall settings for wan and lan interfaces by default. There are two firewall zones wan and lan. Usually, I change the lan interface address to 192.168.2.1, instead of the default 192.168.1.1, and this can be done using the below uci commands. You can follow additional instructions here.
uci set network.lan.proto='static'
uci set network.lan.ipaddr='192.168.2.1'
uci set network.lan.netmask='255.255.255.0'
uci commit network
/etc/init.d/network restart
The last command restarts the network, and then luci interface can be accessed at http://192.168.2.1 along with at http://openwrt.lan.
Enable WiFi
To enable WiFi, a new interface wif24 has to be created and the WiFi device has to be attached to this new interface. Run the following commands to setup the wifi24 network interface.
uci set network.wifi24='interface'
uci set network.wifi24.proto='static'
uci set network.wifi24.ipaddr='192.168.3.1'
uci set network.wifi24.netmask='255.255.255.0'

uci set dhcp.wifi24='dhcp'
uci set dhcp.wifi24.interface='wifi24'
Add the new interface to lan firewall zone.
uci add_list firewall.@zone[0].network='wifi24'

uci commit dhcp
uci commit network
uci commit firewall

/etc/init.d/firewall restart
/etc/init.d/network restart
At this point, we have created a network, but network device is not present.
This new interface can be associated it with a radio in luci at http://openwrt.lan/cgi-bin/luci/admin/network/wireless.
The luci interface status should look like the below at this point, after saving the configuration.
Test internet in LAN and WiFi connected devices before proceeding to the next step. Download a backup if you wish, using this page http://openwrt.lan/cgi-bin/luci/admin/system/flash so that you can quickly come back to this initial state.
Install Packages
Install the required packages from opkg:
opkg update
opkg install openvpn-openssl openvpn-easy-rsa luci-app-openvpn curl mwan3 luci-app-mwan3
This above command installs openvpn, mwan3 packages.
Create VPN Network Interface
A new network interface ovpn which will interface a tunnel device tun0 can be created by using the following commands.
uci set network.ovpn='interface'
uci set network.ovpn.proto='none'
uci set network.ovpn.ifname='tun0'

uci commit network
Add ovpn interface to wan firewall zone.
uci show firewall.@zone[1]
uci add_list firewall.@zone[1].network='ovpn'

uci commit firewall

/etc/init.d/firewall restart
/etc/init.d/network restart
Now that the network interface is setup, let us continue with configuring mwan3. We will open tunnel tun0 after configuring mwan3. Meanwhile, 'Network device is not present' will show up in luci interface page due to non-existent tun0.
Configure multi-wan (mwan3)
The default mwan3 configuration contains some dummy configuration, hence will be emptying the file before configuration.
rm /etc/config/mwan3
touch /etc/config/mwan3
Enter the following uci commands to create multi-wan that uses both wan and ovpn networks.
uci set mwan3.globals='globals'
uci set mwan3.globals.mmx_mask='0x3F00'
uci set mwan3.globals.rtmon_interval='5'

uci set mwan3.ovpn='interface'
uci set mwan3.ovpn.enabled='1'
uci set mwan3.ovpn.family='ipv4'
uci set mwan3.ovpn.initial_state='offline'
uci add_list mwan3.ovpn.track_ip='8.8.8.8'
uci add_list mwan3.ovpn.track_ip='8.8.4.4'
uci set mwan3.ovpn.track_method='ping'
uci set mwan3.ovpn.reliability='2'
uci set mwan3.ovpn.count='1'
uci set mwan3.ovpn.size='56'
uci set mwan3.ovpn.max_ttl='60'
uci set mwan3.ovpn.check_quality='0'
uci set mwan3.ovpn.failure_interval='5'
uci set mwan3.ovpn.recovery_interval='5'
uci set mwan3.ovpn.timeout='5'
uci set mwan3.ovpn.interval='5'
uci set mwan3.ovpn.down='3'
uci set mwan3.ovpn.up='3'

uci set mwan3.wan=interface
uci set mwan3.wan.enabled='1'
uci add_list mwan3.wan.track_ip='8.8.8.8'
uci add_list mwan3.wan.track_ip='8.8.4.4'
uci set mwan3.wan.family='ipv4'
uci set mwan3.wan.reliability='2'
uci set mwan3.wan.count='1'
uci set mwan3.wan.timeout='2'
uci set mwan3.wan.failure_latency='1000'
uci set mwan3.wan.recovery_latency='500'
uci set mwan3.wan.failure_loss='20'
uci set mwan3.wan.recovery_loss='5'
uci set mwan3.wan.interval='5'
uci set mwan3.wan.down='3'
uci set mwan3.wan.up='8'

uci set mwan3.wan_m1=member
uci set mwan3.wan_m1.interface='wan'
uci set mwan3.wan_m1.metric='2'
uci set mwan3.wan_m1.weight='3'

uci set mwan3.ovpn_m1=member
uci set mwan3.ovpn_m1.interface='ovpn'
uci set mwan3.ovpn_m1.metric='1'
uci set mwan3.ovpn_m1.weight='6'

uci set mwan3.wan_policy=policy
uci set mwan3.wan_policy.last_resort='default'
uci add_list mwan3.wan_policy.use_member='wan_m1'

uci set mwan3.default_policy=policy
uci set mwan3.default_policy.last_resort='default'
uci add_list mwan3.default_policy.use_member='ovpn_m1'
uci add_list mwan3.default_policy.use_member='wan_m1'

uci set mwan3.default_rule_v4=rule
uci set mwan3.default_rule_v4.dest_ip='0.0.0.0/0'
uci set mwan3.default_rule_v4.family='ipv4'
uci set mwan3.default_rule_v4.use_policy='default_policy'

uci commit mwan3
/etc/init.d/mwan3 restart
The mwan3 is configured at this point, you can see mwan3 status at http://openwrt.lan/cgi-bin/luci/admin/status/overview at the bottom of page. ovpn interface status will show as disabled, and opening a tunnel tun0 will fix that.
Reboot router with reboot if you can’t see the two interfaces. The next step is to open the tunnel tun0, so that ovpn interface starts working.
Creating the tunnel ‘tun0’
All information to start a tunnel is inside an *.ovpn file. Some additional options are to be added to this file, one of them being a line route-noexec so that openvpn client won’t make modifications to routing table, as routes are managed automatically by mwan3. Another is a line dev tun0 so that the tunnel opened will be named tun0.
Download ovpn File
I use NordVPN, hence can download an *.ovpn file from this page.
path=/etc/openvpn/server1.ovpn
ovpnurl=
https://downloads.nordcdn.com/configs/files/ovpn_legacy/servers/in101.nordvpn.com.udp1194.ovpn

curl --output $path $ovpnurl
Create Credentials File
echo "vpn_username" >> /etc/openvpn/credentials
echo "vpn_password" >> /etc/openvpn/credentials
Modify ovpn File
Now to add the required custom options (auth-user-pass, dev tun0 and route-noexec) to file, run the below commands:
if grep -F "auth-user-pass" $path
then
sed -i "/auth-user-pass/c\auth-user-pass /etc/openvpn/credentials" $path
else
echo -e "auth-user-pass /etc/openvpn/credentials\n$(cat $path)" > $path
fi

if grep -F "dev tun" $path
then
sed -i "/dev tun/c\dev tun0" $path
else
echo -e "dev tun0\n$(cat $path)" > $path
fi

if grep -F "route-noexec" $path
then
echo "already present in file..."
else
echo -e "route-noexec\n$(cat $path)" > $path
fi
Configure openvpn instance
Default openvpn configuration contains some dummy configuration, hence empty the file.
rm /etc/config/openvpn
touch /etc/config/openvpn
Now to create a new openvpn instance.
uci set openvpn.ovpn1=openvpn
uci set openvpn.ovpn1.config=$path
uci set openvpn.ovpn1.enabled='1'

uci commit openvpn
/etc/init.d/openvpn restart
After this step, you can access the openvpn instance at http://openwrt.lan/cgi-bin/luci/admin/vpn/openvpn. Enable and start this instance ovpn1.
In case the instance does not start: you can manually run openvpn command and check what's wrong.
openvpn --config $path
Testing and Verifying
You can now test the tunnel using ping -I tun0 8.8.8.8. mwan3 will now automatically detect ovpn as a working interface and will switch all traffic through it. Verify the change in public IP address on your connected devices.
Both the interfaces in mwan3 status in luci must be green at this point.
Status LED Configuration
You can use one of the available LEDs on the router to show the status of ovpn network. The LED can be configured turn on when ovpn interface is connected and turn off when disconnected. This will be handy to quickly show the status of the VPN connection.
The device’s LEDs are listed as files in this directory /sys/class/leds, they can be programmatically turned on and off using the below lines.
echo default-on > /sys/class/leds/<led_file>/trigger
echo none > /sys/class/leds/<led_file>/trigger
mwan3 has a notification script (/etc/mwan3.user) to help us run commands when interfaces managed by it go up or down. You can modify this script at http://openwrt.lan/cgi-bin/luci/admin/network/mwan/notify. Append the following lines to it.
if [ $ACTION == 'ifup' ]; then
if [ $INTERFACE == 'ovpn' ]; then
echo default-on > /sys/class/leds/<led_file>/trigger
fi
fi

if [ $ACTION == 'ifdown' ]; then
if [ $INTERFACE == 'ovpn' ]; then
echo none > /sys/class/leds/<led_file>/trigger
fi
fi
Prevent DNS Leak
The above configuration will leak dns requests through wan interface, and the sniffer can log the dns requests. To avoid this, enter the following commands. Check DNS leak test to confirm dns is not leaking.
uci set network.wan.peerdns='0'
uci commit network

/etc/init.d/network restart
Further Enhancements
As any number of interfaces can be managed by mwan3, like a USB 4G dongle that will act like the last resort if both wan and ovpn are down. We can also implement kill switch configuration so that when vpn is down, internet will go off, instead of falling back to unprotected internet. These things can be done by tweaking the mwan3 configuration and adding new policies.
I have also attached some config files in a zip here, in case that might help.
Other cleaner and more compatible (without mwan3) method of implementing VPN OpenWRT router here: Self-Healing Randomized VPN with Kill Switch in OpenWRT Router
History
- 1st March, 2021: Initial version
This member has not yet provided a Biography. Assume it's interesting and varied, and probably something to do with programming.


 General
  News
News  Suggestion
  Question
  Bug
Bug  Answer
  Joke
Joke  Praise
  Rant
Rant  Admin
Admin 


