Introduction
RichEdit is a Rich Text Format (RTF) handling Control from Microsoft with a long, albeit confusing history of more than 25 years. There are versions shipped with the Operating System and there are versions distributed with Microsoft Office. Versions distributed with the OS, come free because everybody has an OS to start with. So, programmers have at their disposal a Control that is able to produce formatted and aligned text at no additional cost and users are guaranteed to have it as well - hence its popularity.
Background
I am not going to digress into the history of the RichEdit Control, no matter how fascinating it might be, but I will list at the bottom of the article all its versions since since Windows NT and Office 2002. I am not going to digress as well into the difficulties and lack of documentation for many of its features - it is indeed difficult to master its intricacies.
This article is a follow up inspired by Murray Sargent's 2012 blog on RichEdit 8.0 Image Support (1). The blog write-up is old, but deserves attention because after searching throughout the internet, I could not find a single example of how things can be implemented.
Until RichEdit 8.0 (let's continue calling it 8.0 to be coherent with the blog), we could insert .BMP images into the RTF text through a complicated OLE mechanism. Although complicated, and never properly documented as well, it does work. Still, .BMP images don't support compression and don't have a transparent alpha channel while RichEdit 8.0 supports .PNG, .JPG and .GIF.
In addition to that, the procedure we are going to use is much less complicated than the OLE-based one for .BMP images. So, you have a reason to stick with me and continue reading.
Using the Code
I decided to roll up my sleeves and make a demo - in Assembly Language (MASM) (2)! I understand most people these days have some difficulties with M(ASM), but I will explain all major steps in order to make it easy to convert to any other programming language - if you wish, of course.
To build the source code, without changes and with a minimum of fuss and annoyances, you will need the MASM32 SDK downloadable free from http://www.masm32.com/download.htm.
From the two methods mentioned in Murray Sargent's Blog, I opted for the EM_INSERTIMAGE message method.
So, let's start!
1. Create a Dialog Box
The demo starts by creating a Dialog Box from a console application (after hiding the console window which is irrelevant for the demo and distracting).
main PROC
    INVOKE GetConsoleWindow
    INVOKE ShowWindow, eax, 0

    INVOKE GetModuleHandle, NULL
    mov hInst, eax

    Dialog  0, \
            "Courier New",8, \
            WS_OVERLAPPED or WS_SYSMENU or DS_CENTER, \
            0, \
            0,0,200,200, \
            1024
    CallModalDialog hInst, 0, DlgProc, NULL

    (...)
main ENDP
Dialog and CallModalDialog are macros from the MASM32 SDK. Dialog builds a template at runtime and CallModalDialog creates a modal dialog box from that template and makes a call to DialogBoxIndirectParam.
2. Fill in the Dialog Box
In the Dialog Box Procedure initialization, we call functions to create our RichEdit and two buttons and to handle a few other details.
DlgProc PROC hwndDlg:HWND, uMsg:UINT, wParam:WPARAM, lParam:LPARAM
LOCAL rc:RECT
LOCAL tempWidth : DWORD
LOCAL tempHeight : DWORD
SWITCH uMsg
CASE WM_INITDIALOG
INVOKE SetWindowText, hwndDlg, TEXT_(".PNGs images in RichEdit")
INVOKE LoadIcon,hInst,TEXT_("MAINICON")
INVOKE SendMessage,hwndDlg,WM_SETICON,ICON_BIG,eax
INVOKE CreateRichEdit, hwndDlg, 10, 10, 200, 200, hInst
mov hEdit, eax
INVOKE SendMessage, hEdit, EM_SETBKGNDCOLOR, 0, 0
mov cf.cbSize, SIZEOF(CHARFORMAT)
mov cf.dwMask, CFM_COLOR
mov cf.dwEffects, 0
mov cf.yHeight, 200
mov cf.yOffset, 0
RGB 0,255,255
mov cf.crTextColor, eax
mov cf.bCharSet, ANSI_CHARSET
mov cf.bPitchAndFamily, DEFAULT_PITCH or FF_DONTCARE
INVOKE SendMessage,hEdit,EM_SETCHARFORMAT,SCF_ALL, ADDR cf
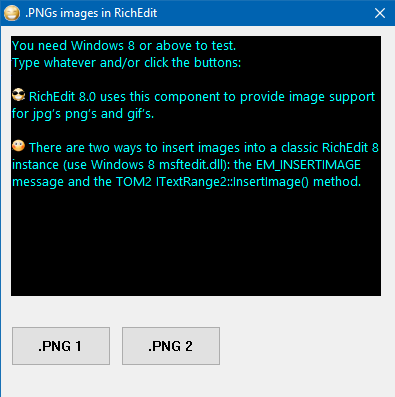
INVOKE CreateButton1, hwndDlg, 10, 240, 90, 30, hInst
mov hButton1, eax
INVOKE CreateButton2, hwndDlg, 100, 240, 200, 30, hInst
mov hButton2, eax
3. Create our Rich Edit
This requires a call to the LoadLibrary function to load Msftedit.dll, and after that, we create our RichEdit control with a call to CreateWindowsEx function specifying "RICHEDIT50W" (known as the MSFTEDIT_CLASS) as the window class.
CreateRichEdit PROC hwndOwner:HWND, x:SDWORD, y:SDWORD, w:SDWORD, h:SDWORD, hinst:HINSTANCE
INVOKE LoadLibrary, TEXT_("Msftedit.dll")
.IF eax==0
ret
.ENDIF
INVOKE CreateWindowEx, 0, TEXT_("RICHEDIT50W"),
TEXT_("You need Windows 8 or above to test.",13,10,
"Type whatever and/or click the buttons:",13,10,13,10),\
WS_CHILD OR WS_VISIBLE OR WS_VSCROLL OR WS_TABSTOP
OR ES_LEFT OR ES_MULTILINE OR ES_WANTRETURN,\
x, y, w, h,\
hwndOwner, NULL, hinst, NULL
ret
CreateRichEdit ENDP
4. Clicking the Buttons
When one of the buttons is pressed, the focus is set to the Rich Edit and our insertEmoticon function is called.
This function is the heart of the demo and it does the following:
- Picks the image which is a custom resource of type
RT_PNG. - Creates a
stream object which implements the IStream interface. - Stores the image into the
stream object. - Sends a message with the
EM_INSERTIMAGE message. This replaces the selection with a blob that displays the image, if nothing is selected, inserts the blob after the caret. - That's it, but we used a few more instructions to move the caret past the image.
insertEmoticon PROC png : PTR
LOCAL rcRes : HRSRC
LOCAL hResData : HGLOBAL
LOCAL _pIStream : PTR
LOCAL sizeOfRes : DWORD
LOCAL rip : RICHEDIT_IMAGE_PARAMETERS
LOCAL NewCharRange : CHARRANGE
LOCAL dwStart : DWORD
LOCAL dwEnd : DWORD
INVOKE FindResource, 0, png, TEXT_("RT_PNG")
.IF eax
mov rcRes, eax
INVOKE LoadResource, 0, rcRes
mov hResData, eax
INVOKE SizeofResource, 0, rcRes
mov sizeOfRes, eax
INVOKE CreateStreamOnHGlobal, 0, TRUE, aDDr _pIStream
coinvoke _pIStream, IStream, Write, hResData, sizeOfRes, 0
INVOKE RtlZeroMemory, aDDr rip, sizeof rip
mov rip.xWidth, 350
mov rip.yHeight, 350
TA_BASELINE equ 24
mov rip._type, TA_BASELINE
mov eax, TEXT_("Nice Emoticon")
mov rip.pwszAlternateText, eax
mov eax, _pIStream
mov rip.pIStream, eax
EM_INSERTIMAGE equ WM_USER + 314
INVOKE SendMessage,hEdit,EM_INSERTIMAGE ,0, aDDr rip
INVOKE SendMessage, hEdit, EM_SETSEL, 0, -1
INVOKE SendMessage, hEdit, EM_GETSEL, aDDr dwStart, aDDr dwEnd
inc dwEnd
INVOKE SendMessage, hEdit, EM_SETSEL, dwEnd, dwEnd
INVOKE SendMessage, hEdit, EM_REPLACESEL, TRUE, 0
coinvoke _pIStream, IStream, Release
.ENDIF
ret
insertEmoticon ENDP
List of RichEdit Controls
This is a table listing all versions (except minor/build number changes due to updates) of the RichEdit Control since Windows NT and Office 2002 (also known as Office XP or Office 10).

The InsertImage Method
The TOM2ITextRange2::InsertImage() method is relatively more complicated than the EM_INSERTIMAGE method, in particular for people that has some difficulties with COM technologies (and who has not?). However, it is more powerful and integrates seamlessly with the other parts of the TOM (Text Object Model) framework.
I produced a simple demo where a text is loaded into a RichEdit control (from Windows 8.0 or later).
Then you press the bottom-left button and spaces are replaced with .PNG images as expected.
Both the source code and the built demo are attached.
References
Update History
- 4th April, 2019 - Initial release
- 6th April, 2019
- Table of all
RichEdit Control releases since Windows NT/Office 2002 - Reformatted code
- Improved code to advance the caret after image insertion
- 11th April, 2019 - Added a Demo for the other method mentioned in Murray Sargeant's blog -the TOM2ITextRange2::InsertImage() method. This demo is in C++, it may be easier to follow then.
Notes
(1): Despite, Murray Sargent's statement, this works on Richedit 7.5 under Windows 8.0.
(2): On the 11th April update, I produced a C++ demo for the other method mentioned in blog.
Jose Pascoa is the owner of AtelierWeb Software (http://www.atelierweb.com). We produce security and network software and mixed utilities since 1999. The first program I published (in a BBS) was a MS-DOS utility, had the size of 21 KB and was done in Assembly Language. Nowadays, my low level languages are more likely to be "C", "C++" and "Delphi" rather than Assembly Language but I still like it. I have nothing against more fashionable languages like C# and technologies like WPF, actually I have played with them and published software with them.


 General
  News
News  Suggestion
  Question
  Bug
Bug  Answer
  Joke
Joke  Praise
  Rant
Rant  Admin
Admin 


