Index
1. Background
2. Android Flat File Records
2.1 Setting Up Environment for Local Storage
2.1.1 Starting With APP
2.1.2 Setting up device for debugging
2.1.3 Creading App Directory
2.2 Flat File Record Insert, Update, Delete, Read
2.2.1 Uploading a Flat File in Android Device
2.2.2 Reading File Content
2.2.3 Reading File Content As Tokens
2.2.4 Adding New Record In File
2.2.5 Deleting a Record from the File
2.2.6 Updation of Flat File Record
2.2.7 Android Flat File Record Access Usage
2.3 Simple Android App to check positivity in a given statement
2.4 Packing the Flat File Record in the .apk File
2.4.1 Unpacking a File from assets folder to Sdcard App Directory
3. XML Record for Android
3.1 Basics of XML recorcords, their advantage, limitations and applicability
3.2 Operations on XML Records
3.2.1 Setting Up XML Record File
3.2.2 Reading Records from XML File
3.2.3 Extracting Record Metadata from XML File
3.2.4 Insert New Record
3.2.5 Delete XML Record
3.2.6 Update Record
3.3 Summery of Local XML Record Handling
4. SQLite Database
4.1 SQLite Basics
4.1.1 SQLite Introduction
4.1.2 SQLite Technical Features
4.2 Creating SQLite Database and Tables
4.2.1 Creating SQLite Database
4.2.2 Deploying and Testing Database
4.2.3 Select Query
4.2.4 Insert Query
4.2.5 Delete Operation on SQLite
4.2.6 Update Operation on SQLite
4.3 End Note About SQLite database
5. Shared Preferences
5.1 Introduction and Technical Specification
5.2 Record Management in Shared Preferences
5.2.1 Creating and Removing "Data Record" in Shared Preferences
5.2.2 Insert Method
5.2.3 Select Method ( Fetching all rows)
5.2.4 Delete Method
5.2.5 Update Method
6. Fetching Data From Web
6.1 Accessing Raw HTML Data Using Android Native Methods
6.2 Android Threading and AsyncTask Revisited
6.2.1 AsyncTask
6.2.2 Executor
6.3 Practical Application of Raw HTML Web file reading
6.4 Parsing and Extracting Information from Real Web pages
7. Working With WebServices
7.1 Writing ASP.Net Web Services Consumable by Android
7.2 Consuming Web Service by Android
8. Getting Opinion Mining To Work
9. Conclusion
In this tutorial our focus is mainly to understand data handling in Android. Data could be flat files or relational data which can be stored locally in SqlLite database, XML data and so on. We also intend to learn data exchange with remote servers over web services to understand how remote methods can be used used or how SQL Server can be used to store data remotely using a middleware service. Data handling in Android can be pretty much summed up using following diagram.
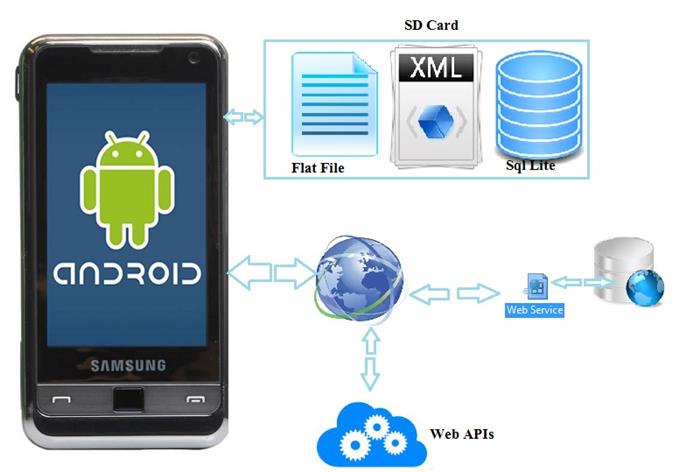
Figure 1.1: Data Access in Android
So in this article we will learn each one of these data accessing techniques. As usual, independently seeing what each part does never makes it an intuitive learning. A better approch is always taking an App into consideration and learning each of these techniques in the process of building the app.
In this tutorial we will go along with an application called OpinionMining which should fetch Web Data and then perform an Opinion Mining on the data to tell you about the positivity of the Page. We will use HTML parsing to fetch data from MyBB powerd community websites. On the process we will learn data handling of different record management techniques in Android as well as web services.
So let's start with the App step by step and let's learn the fundamentals in each step.
2. Android Flat File Records
In Windows/ Linux system you have a fixed file system and you can access the files/directories using absolute path, relative address or even URI. This is little different in Android. You need to understand that there are basically two types of Memory in Phone/Mobile devices: Phone memory which is always comparatively low and extendible memory which in most cases is a SD card. Some of the devices also support expandible memory which means there is a provision for user to add a secondary memory. Those who are familier with Linux should know that external devices such as CD ROM/ Card Readers are loaded as a node in file system like dev/tty0 etc. It is almost similar in Android. But as different manufacturers may use different configureation, it is never advisable to use absolute file paths in Android. As our ultimate goal here also is to develop an app that we can readily publish, we will learn local file access in Android that should abstract underneath hardaware and is common for all devices.
So as usual let us get started with a new Android project and let us call the App OpinionMining.
Figure 2.1: Android App Setup
As we have already learnt in our earlier tutorial Article 6 - Beginner’s Guide to Organizing/Accessing Android Resource that Google play does not allow you to submit an app with com.example extension as it is reserved, you must select an appropriate package name ( ideally should contain your publisher name in Google play and the app name). In order for your app to be available to wide range of devices and at the same time to leverage the intuitiveness of the higher Android APIs.
Keep rest everything as default and complete the process of creating the app. It will create a project with a frame layout namely activity_main whose frame will be present in fragment_main . For this particular application we are not interested in frame layout. So open fragment_main.xml, copy it's xml content and replace the xml content of activity_main as shown in following figure 2.2.
Figure 2.2 Updating activity_main to become relative layout rather than frame layout
Now when you build project you will see several errors in MainActivity.java. That is because we are converting a Framelayout to a Relative layout. So open MainActivity.java and remove the section as shown in Figure 2.3.
Figure 2.3 Removing fragmentManager instance part from MainActivity
Now scroll down and remove the PlaceholderFragment class.
Figure 2.4 Remove PlaceholderFragment class
Note, if you already have Relativelayout created by default then you need not to worry about the above steps. Once this process is done, your project is error free and you are ready for the next step, i.e. to start compiling and running the app.
However at this moment we must emphesize that in this tutorial we are going to do a lot of real time stuff which is not possible to check out in Emulator. Hence we will spend couple of minutes to set our real Android device to run our App. Next subsection will guide you through to setup your device for debugging instead of emulator. This subsection is added in this tutorial as I feel debugging in real device is really an important aspect of understanding data handling for Android which also involves data exchange over internet.
2.1.2 Setting up device for debugging
As you have selected Android 4 as minimum API requirement, I would assume that you are having a device which is running atleast Android 4.0. Android higher versions do not readily support developer option. You can enable the developer option in most of the Android 4.0 devices from Setting->Developer Options-> Usb Debugging On as shown in figure 2.5
|
Figure 2.6 : Setting up Android Device for debugging and running the app
In still later versions like Android 4.2 and above you might not see the developer option as it is hidden in the main interface to prevent an accidental change in the phone. In such devices you need to bring the developer option to visibility by first opening Settings-> About and then tapping the option 7 times. Some of Galaxy series phones hides About section in More tab. In such devices You can activate developer option by tapping Settings->More Tab-> About seven times.
| |
Once your device is enabled for USB debugging, you should Install Google USB Driver for Android devices. Once all the setup is appropriately done, plug in your device to system through cable.
Now go to your Eclipse environment and click on DDMS located at top right corner beside Debug and Java tabs of the IDE. You will see your device on the left list. If you click on the camera icon you will see the snapshot of the home screen of thedevice. If the device is locked, open the lock to see the option.
2.6 DDMS View in the Eclipse
To go back to your code mode , you can select java tab.
Android devices by default do not come with any File Browsers. You need to download app for viewing the content of the folders. As we will be using different data and we need to verify data by manually uploading/downloading/modifying and checking it with Android, I would prefer you to download a good File Browser app from Google Play . I am using File Manager for it's free and does what we need to do with files particularly as developer. But you can go for any file manager of your choice. Once we are done with installing file manager, we can view our file system as shown in figure bellow.
Figure 2.7: File System of Android Device
Using FileManager you can create any new directory either in Root or inside any other directory. However just like windows apoplications where a directory is created by the app installer which contains all the app data, we should create a directory specific to the App where all the read-writable data ( of any type) should be stored. There are few Read only resources like images, assets which will not be changed by user operations. Such resources can be placed inside Eclipse project directories ( Read more about Android Resources ) . But for user data, you should definately look to have a public directory.
You can easily select one of the readily available directory or you can create a custom directory for the app. The second option is more viable as it abstracts the app data from other user data.
Now let us assume that we want to create a directory by name OpinionMining somewhere in Android file system. Several data could be stored, manipulated and altered within this directory. Then the app should check if the directory exists, if not then it should create the directory.
For this you can create a File Object relative to the directory of your app and then check if the directory exists , if not create it. We want to perform the task of checking for the directory and creating it if absence before any other operations. Therefore we will use the code inside onCreate method of main activity after the constructor is called. So our onCreate method looks like:
@Override
protected void onCreate(Bundle savedInstanceState) {
super.onCreate(savedInstanceState);
setContentView(R.layout.activity_main);
try
{
Log.d("Starting", "Checking up directory");
File mediaStorageDir = new File(Environment.getExternalStoragePublicDirectory(Environment.DIRECTORY_PICTURES), "OpinionMining");
if (! mediaStorageDir.exists())
{
if (! mediaStorageDir.mkdir())
{
Log.e("Directory Creation Failed",mediaStorageDir.toString());
}
else
{
Log.i("Directory Creation","Success");
}
}
}
catch(Exception ex)
{
Log.e("Directory Creation",ex.getMessage());
}
}
Environment.getExternalStoragePublicDirectory() returns a File object to the path specified as parameter Type. Observe here that we are trying to locate a Directory named "OpinionMining" inside Picture Directory. You can create your App directory inside other public directories like Alarms, Downloads, Music, Movies. You can get the whole list when you remove '.' from
Environment.DIRECTORY_PICTURES
and populate the options as shown in figure 2.8
Figure 2.8: Public Directory options for creating App directory
Save, right click on the Project OpinionMining in Eclipse and select Run As->Android Application . Didn't you expect the App to create a directory successfully inside the Pictures directory? But it won't, leaving you with a debug message as shown in 2.9.
Figure 2.9: Debugging Error while creating direcoty
This message shows that directory creation had failed even though there was no exception. It also shows the path of the new directory would have been : storage/emulated/0/Pictures/OpinionMining. You can open your file manager and cross verify the path and you will know that there is absolutely no problem with the path. Here Filemanager app comes handy as it shows you the actual path of the directories which are helpful at the time of debugging.
Coming back to the error, when you see that there is no exception and that path is created, you have to understand that such errors are generally related to Permission errors. While working with external directories, you need to set permission for the app. You can set WRITE_EXTERNAL_STORAGE permission in use permission section of AndroidManifest.xml as shown in figure 2.10.
Figure 2.10 Setting the permission for directory write access
Alternatively, you can edit AndroidManifest.xml and include the following code before <application> Section.
<uses-permission android:name="android.permission.WRITE_EXTERNAL_STORAGE"/>
Now when you save and run your application, you will see 'Directory Creation" "Success" Message in the bottom LogCat window and will also see OpinionMining directory inside Pictures directory.
Figure 2.11 App Directory Created by the APP
First let us learn the specificities of accessing flat file from Android. To keep up with our OpinionMining app, let us create a notepad file by name OpinionData.txt. It's Contents as as shown in bellow figure 2.12.
Figure 2.12 OpinionData.txt File
It is no rocket science to understand what we are trying to do here. We have created a file which has two columns. A row contains an opinion word and it's corresponding weight separated by TAB. You can also Download OpinionData.txt if you so wish.
Remember to check that the cursor is in the next line to record. If it is not, press enter so that your cursor comes to next new line. It is important for Inserting record purpose.
We will first manually upload the file to newly created OpinionMining directory using USB directory browser and will then read the contents from Android. You can browse the phone from your PC and paste the file in appropriate directory. If the newsly created directory is not visible in PC Directory browser then unplug your device and plug it back.
Figure 2.13 Data File manually loaded into the directory.
There is an option to do it from Eclipse too. Go to DDMS view and select File Explorer Tab. You will see the Android File System. Drag and drop your OpinionData.txt inside mnt->sdcard as shown in figure bellow.
2.14 Uploading External file to device from Eclipse
One of the things you would notice is that this particular view hides all the directories like Alarms, Download, DCIM from user. Therefore uploaded file will be present in the root of sdcard as seen in the FileManager snap shot.
Now for accessing the file content, we shall create a new class called AndroidFlatFileAccess and abstract all the file related operations in the class.
To start with, let us create a static ReadFile(String path) method which should take the file path as input argument and return the content of the file as string.
package com.integratedideas.opinionmining;
import java.io.BufferedReader;
import java.io.File;
import java.io.FileReader;
import java.io.IOException;
public class AndroidFlatFileAccess
{
public static String ReadFile(String filePath)
{
File file = new File(filePath);
StringBuilder text = new StringBuilder();
try {
BufferedReader br = new BufferedReader(new FileReader(file));
String line;
while ((line = br.readLine()) != null) {
text.append(line);
text.append('\n');
}
}
catch (IOException e)
{
}
return text.toString();
}
}
Remember we already had a code in onCreate method of MainActivity class for checking and creating App directory. We will test if our file access is working or not simply using Log.i(tag,text) command whose result will be available in the LogCat window.
if (! mediaStorageDir.exists())
{
Log.d("Trying to Create Directory", "App Directory Does not exists");
if (! mediaStorageDir.mkdir())
{
Log.e("Directory Creation Failed",mediaStorageDir.toString());
}
else
{
Log.i("Directory Creation","Success");
}
}
else
{
String filePath=Environment.getExternalStoragePublicDirectory(Environment.DIRECTORY_PICTURES).getPath();
              filePath=filePath+"/"+"OpinionMining/OpinionData.txt";
Log.i("Checking File Path", AndroidFlatFileAccess.ReadFile(filePath));
}
}
catch(Exception ex)
{
Log.e("Directory Creation",ex.getMessage());
}
Observe an additional else part.
String filePath=Environment.getExternalStoragePublicDirectory(Environment.DIRECTORY_PICTURES).getPath();
filePath=filePath+"/"+"OpinionMining/OpinionData.txt";
The above two lines of code creates String path of OpinionData.txt. First we obtain the path to public directory and then with this we append the path of App directory i.e. OpinionMining followed by the file OpinionData.txt. The most important thing to observe here is the use of "/" ( Forward Slash) as directory separator instead of "\" ( Back Slash) that we use for windows file system. Android being based on Linux explains this well.
Once the file path is obtained ReadFile() method is called and result is displayed with Log.i. Now when you save and run your project, you will see logcat result as fiigure 2.15. It is quite obvious that every line is displayed with new logcat information.
Figure 2.15: LogCat view showing the content of our file
Now for any serious data handling we have to understand that in FlatFile each row represents a record. Each column represents attributes of a record. Therefore we must also have a method that can return the content of file as a double array where first array dimension stores the record or the row and the second dimension stores the columns ( or tokens ).
Here is the method ReadFileTokens created inside AndroidFlatFileAccess class.
public static String[][] ReadFileTokens(String filePath,int noColumns)
{
File file = new File(filePath);
StringBuilder text = new StringBuilder();
ArrayList<String[]> al=new ArrayList<String[]>();
try {
BufferedReader br = new BufferedReader(new FileReader(file));
String line;
String [] row=new String[noColumns];
while ((line = br.readLine()) != null)
            {

                row=line.split("\t");
                al.add(row);
            }
}
catch (IOException e)
{
}
String [][]retArray=new String[al.size()][noColumns];
        return al.toArray(retArray);
}
At the time of reading the file you do not know ( probably you may know, but it is always wise that you have no prior information about total records) the number of records or lines. Therefore we will take the advantage of ArrayList class of java which is in every aspect is similar to .Net ArrayList class except for the fact that unmarshalling needs a variable of specific type. An ArrayList object can store any number of records as any Linked list should do. All you have to do is to specify the type of independent records. Though this particular file has two columns, other applications may have files with different number of columns. Therefore we send noColumns columns as argument specifying number of columns this specific record should have.
ArrayList<String[]> al=new ArrayList<String[]>();
The reason for declaring String variable row outside the while loop is to boost the performance. For large files, creating and destroying a variable for every loopping is never a good programming practice. Finally we modify the While loop we had written for ReadFile method, by adding a line to separate tokens based on Tab and then assigning the tokens to row variable. variable row is then added to al in each loop.
while ((line = br.readLine()) != null)
{
row=line.split("\t");
al.add(row);
}
We finally want to unmarshall the array list object and return suitable array which is double string array here. For unmarshalling, you need to declare a variable of appropriate type ( not necessory to initialize the variable) and use the variable as template for unmarshalling.
String [][]retArray=new String[al.size()][noColumns];
return al.toArray(retArray);
We update the else part inside onCreate method from which we had earlier tested ReadFile method. First we invoke ReadFileTokens() method with filePath and number of columns( which is two here) as arguments.
Log.i("Checking File Path", "---------------");
               String[][] data=AndroidFlatFileAccess.ReadFileTokens(filePath,2);
               for(int i=0;i<data.length;i++)
               {
                   Log.i(data[i][0], data[i][1]);
               }
Following is the LogCat output for TokenWise File reading.
Figure 2.16: File Content Read as Tokens
After file reading is successfull, let us now shift our focus to adding record to file. Any data record will be added as a new row. Therefore the Insert method can take one line as input and can append it at the end of the file.
Here is the Insert method which does exactly same.
public static int Insert(String filePath,String recordRow)
{
try {
FileWriter f = new FileWriter(filePath,true);
f.write(recordRow);
f.flush();
f.close();
return 1;
}
catch (IOException e)
{
return -1;
}
}
As you can see, we are using a FileWriter object to write a string in the file. The most important thing to remember here is to use true as second argument which suggests that the FileWriter has append permission. Note that without append=true, Your existing content will be washed off from the file.
Result of adding a new word 'Pathetic' is shown in figure 2.17.
Figure 2.17: Result of Appending New Record in File
Delete record logic can be derived from the logic of Insert, token wise selection, line wise data selection combined with simple linear search. We will send a search token which could be a value corresponding to any columns of any row. Our method should search for the token in each column for every independent rows and finally should delete the entire row in which a column value matchess with the search term.
Delete can be performed by selecting all the rows from the file barring the row with matching search term into a variable and then writing back the content in the file in Non Append Mode ( append=false in File constructor). The code is as bellow.
public static int DeleteRecord(String filePath,int noColumns,String searchTerm)
{
File file = new File(filePath);
String text = "";
int matched=0;
ArrayList<String[]> al=new ArrayList<String[]>();
try {
BufferedReader br = new BufferedReader(new FileReader(file));
String line;
String [] row=new String[noColumns];
while ((line = br.readLine()) != null)
{
row=line.split("\t");
boolean flag=false;
for(int i=0;i<noColumns;i++)
{
if(row[i].toLowerCase().trim().equals(searchTerm.toLowerCase().trim()))
{
flag=true;
matched++;
}
}
if(!flag)
{
text=text+line+"\n";
al.add(row);
}
}
br.close();
}
catch (IOException e)
{
}
if(matched==0)
{
return -1;
}
String [][]retArray=new String[al.size()][noColumns];
retArray=al.toArray(retArray);
try {
FileWriter f = new FileWriter(filePath,false);
f.write(text);
f.flush();
f.close();
return matched;
}
catch (IOException e)
{
return -1;
}
}
Here is the result of Deleting record with Word Nice.
Figure 2.18: Result of Record Deletion from File
In Updation process we intend to search a token for selecting the row and intend to replace the content of the row with new content. So our inputs are a) Search term and b) new value for the row. This logic can be derived as as the delete logic. The only change needed is instead of "Not Copying" the matched row, replace it by new data.
public static int UpdateRecord(String filePath,int noColumns,String searchTerm, String newUpdatedRow)
{
File file = new File(filePath);
String text = "";
int matched=0;
ArrayList<String[]> al=new ArrayList<String[]>();
try {
BufferedReader br = new BufferedReader(new FileReader(file));
String line;
String [] row=new String[noColumns];
while ((line = br.readLine()) != null)
{
row=line.split("\t");
boolean flag=false;
for(int i=0;i<noColumns;i++)
{
if(row[i].toLowerCase().trim().equals(searchTerm.toLowerCase().trim()))
{
flag=true;
matched++;
}
}
if(!flag)
{
text=text+line+"\n";
}
else
{
text=text+newUpdatedRow+"\n";
}
al.add(row);
}
br.close();
}
catch (IOException e)
{
}
if(matched==0)
{
return -1;
}
String [][]retArray=new String[al.size()][noColumns];
retArray=al.toArray(retArray);
try {
FileWriter f = new FileWriter(filePath,false);
f.write(text);
f.flush();
f.close();
return matched;
}
catch (IOException e)
{
return -1;
}
}
It is quite easy to identify the difference between the update and the delete file. It is in the data writeback part where we are replaceing old data with new data for update instead of not considering the data as in the case of delete.
if(!flag)
{
text=text+line+"\n";
}
else
{
text=text+newUpdatedRow+"\n";
}
The result of replacing the row containing Pathetic -2 with Patheticity -3 is as shown in figure bellow.
Figure 2.18 Result of Record Update in Flat Files
In Insert, Update and and Delete part we have not presented the usage to leave you with some thought so that you can try using the methods. Well, if you face any problems, here is how the methods were used from the else part in onCreate method in MainActivity class.
String filePath=Environment.getExternalStoragePublicDirectory(Environment.DIRECTORY_PICTURES).getPath();
filePath=filePath+"/"+"OpinionMining/OpinionData.txt";
AndroidFlatFileAccess.DeleteRecord(filePath, 2, "nice");
AndroidFlatFileAccess.Insert(filePath, "Pathetic\t-2\n");
AndroidFlatFileAccess.UpdateRecord(filePath, 2, "pathetic", "Patheticity\t3\n");
Log.i("Checking OpinioData.txt Contents:", AndroidFlatFileAccess.ReadFile(filePath));
Log.i("Checking File Path", "---------------");
String[][] data=AndroidFlatFileAccess.ReadFileTokens(filePath,2);
for(int i=0;i<data.length;i++)
{
Log.i(data[i][0], data[i][1]);
}
Using Log.i for displaying the result is not a graceful GUI option to be frank. But main aim of Section 2.2, i.e. Android Flat File Record Access is to guide you through the process of using flat file system as a light weight database in Android. The access techniques has no relation with any GUI controls. Therefore this section is explained with minimum GUI. You can download AndroidFlatFileAccess class and use it in any other applications.
Light weight Flat file databases are immensely helpful in games where yu can update the score and statistics using Flat File Record. You can collect user statistics of apps in flat files. You can use flat file system as logs and so on.
So far we have learnt every possible things about working with flat files and flat file database. Now let us come back to the theme of the App: i.e. to be able to detect opinion of a statement fetched over internet. Before we dig deep into the techniques of fetching web data, let us make a simple UI, where user will enter a text in a text box and will submit a button to check for the opinion. We must have a method for detecting opinion of the statement.
Now Opnion mining is not a simple string matching stuff. It has it's own algorithm and automata. But as we are restricted to utilize our file access knowledge with GUI, we will restrict ourself to one of the basic forms of mining technique: String matching.
Let us create a class called MineOpinions so that we can update it's methods and skeleton at a later stage once we progress with the app. The class must have a database of words and their corresponding weights. The class must have a search method which can return the number of occourances of a word in a given text. Then it should have a method that accepts the text, search for Opinion database words and updates the weight sum.
Here is our simple opinion mining class.
package com.integratedideas.opinionmining;
import java.util.ArrayList;
import java.util.StringTokenizer;
import android.util.Log;
public class MinePolarity
{
public String[][] OpinionDatabase=null;
public MinePolarity(String[][]database)
{
OpinionDatabase=database;
}
public int SearchInDatabase(String tok)
{
for(int i=0;i<OpinionDatabase.length;i++)
{
if(tok.toLowerCase().trim().equals(OpinionDatabase[i][0].toLowerCase().trim()))
{
return Integer.parseInt(OpinionDatabase[i][1].trim());
}
}
return 0;
}
public int SimpleMine(String text)
{
StringTokenizer st = new StringTokenizer(text, ".\n\t ,:();");
int score=0;
while(st.hasMoreTokens())
{
String s=st.nextToken();
Log.i("In Simple Mine",s);
try{
score+=SearchInDatabase(s);
}catch(Exception ex)
{
}
}
return score;
}
}
It does not require any advanced state of logic to know what is happening here. When we call the SimpleMine method with a text, the method first tokenize the text using all possible delimeters using StringTokenizer class. Al the tokens are searched in the database which was created at the time of calling the constructor of this class. The database format is same as ReadFileToken method return type format (i.e. String[][]) to make the calling easy. Search method implements simple linear search.
You might have noticed the use of trim() method in many places. Let me tell you that many a times Android controls appends truncating characters with String. Somethimes user might use two spaces more than one space between two words. Using trim() removes all these unnecessory characters and ensures that no garbage is present in the string being processed. It is always advisable to use trim method specially in searching, string to integer conversion etc where the extra characters ( sometimes also called null characters) might cause exception and might force the application to close.
We will first test the functioning using LogCat.
String[][] datas=AndroidFlatFileAccess.ReadFileTokens(filePath,2);
MinePolarity mp=new MinePolarity(datas);
Log.i("Records Obtaind","Loading Database");
String testString="I am a good boy";
int score=mp.SimpleMine("I am a good boy");
if(score>0)
{
Log.i("Polarity of: "+testString+": ","Positive with score="+score);
}
else
{
if(score<0)
{
Log.i("Polarity of: "+testString+": ","Negative with score="+score);
}
else
{
Log.i("Polarity of: "+testString+": ","Nutral with score="+score);
}
}
Opinion mining process will analyze the score. If the score is positive, it is obviously positive opinion, if it is negative, the opinion is also negative. A neutral opinion is one where score is neither positive nor negative, i.e. 0.
Figure 2.20: Result of Opinion Polarity Mining
As you expected, the result of Opinion of the string "I am a good boy" will be Positive. You can change the string and test the result.
Having done all the hard work, it is finally time to setup our GUI and see if things works as smoothly in GUI mode or not.
So first checkout the UI as in figure 2.21. We used a TextView where we will display the result of opinion testing, an EditText is used to obtain input from user, and a button to trigger the mining process.
Figure 2.21 Simple GUI for Testing Opinion Mining Process
The updated code of activity_main.xml is as given bellow.
<RelativeLayout xmlns:android="http://schemas.android.com/apk/res/android"
    xmlns:tools="http://schemas.android.com/tools"
    android:layout_width="match_parent"
    android:layout_height="match_parent"
    android:paddingBottom="@dimen/activity_vertical_margin"
    android:paddingLeft="@dimen/activity_horizontal_margin"
    android:paddingRight="@dimen/activity_horizontal_margin"
    android:paddingTop="@dimen/activity_vertical_margin"
    tools:context="com.integratedideas.opinionmining.MainActivity$PlaceholderFragment" >

    <EditText
        android:id="@+id/edInput"
        android:layout_width="wrap_content"
        android:layout_height="wrap_content"
        android:layout_alignParentLeft="true"
        android:layout_alignParentTop="true"
        android:layout_marginLeft="34dp"
        android:layout_marginTop="25dp"
        android:ems="10"
        android:inputType="textMultiLine"
    android:lines="8"
    android:minLines="6"
    android:gravity="top|left"
    android:maxLines="10"
     >

        <requestFocus />
    </EditText>

    <Button
        android:id="@+id/btnOpinionTest"
        android:layout_width="wrap_content"
        android:layout_height="wrap_content"
        android:layout_below="@+id/edInput"
        android:layout_centerHorizontal="true"
        android:text="@string/opinion_test" />

    <TextView
        android:id="@+id/tvResult"
        android:layout_width="wrap_content"
        android:layout_height="wrap_content"
        android:layout_below="@+id/btnOpinionTest"
        android:layout_centerHorizontal="true"
        android:layout_marginTop="33dp"
        android:text="@string/hello_world" />

</RelativeLayout>
Having designed the UI, it is time to declare the associated variables in MainActivity and add the event listener for the button
Declare following variables within the class.
MinePolarity mp=null;
    EditText edInput;
    TextView tvResult;
    Button btnOpinion;
Initialize the UI variables after call to setContentView in onCreate method.
edInput=(EditText)findViewById(R.id.edInput);
        tvResult=(TextView)findViewById(R.id.tvResult);
        btnOpinion=(Button)findViewById(R.id.btnOpinionTest);
        btnOpinion.setOnClickListener(this);
Initialize mp instance in else part where you have earlier tested all the file operations.
mp=new MinePolarity(datas);
Update the onClick method so that whenever button is clicked and onClick method is called, App collects data from edInput, passes to SimpleMine method and displays the result in tvResult.
@Override
public void onClick(View arg0)
{
String testString=edInput.getText().toString();
int score=mp.SimpleMine(testString);
if(score>0)
{
tvResult.setText("Positive with score="+score);
}
else
{
if(score<0)
{
tvResult.setText("Negative with score="+score);
}
else
{
tvResult.setText("Nutral with score="+score);
}
}
And if all goes smoothly as they should, you will get the desired result.
Figure 2.22: Result of Opinion Mining with GUI
So far we are doing great. We have been able to upload a text record file to one of the Android directories. Insert, Delete, Update, View methods are implemented. We tested the methods using LogCat. Then we developed a Simple OpinionMining class which is part of our larger goal and then from GUI tested the result.
Now just uninstall your App and delete OpinionMining directory you created. Would your App run?
If you test your App after deleting OpinionMining directory, when you tap on the Opinion button, your app will crash because there is no OpinionData.txt file and because there is no database.
So ideally you want the text file to reside in your apk and while testing the directory, it must also test for the existance of OpinionData.txt in that directory. If the database file does not exists, then the app must copy the file from apk to the app directory. In other words we want to pack our flat file record with the apk itself.
My article on Android Resource Management will give you a good idea about how to manage resources. As the data here is a text file, we can place it inside Asset directory. However as will all other android resources, the asset name must be small letter. So we upload "opiniondata.txt" file inside the asset directory.
Figure 2.23: Placing the flat file record inside assets folder for distribution
We want the app to open the asset as stream and copy it in our project directory. You might need such a method for different situations and assets. Therefore I have decided to create the logic as an Independent method inside AndroidFlatFileAccess class by name CopyResourceFromAssetToSdcardDirectory
public static int CopyResourceFromAssetToSdcardDirectory(InputStream srcFileStream, String dstFile){
try{
File f2 = new File(dstFile);
InputStream in = srcFileStream;
OutputStream out = new FileOutputStream(f2);
byte[] buf = new byte[1024];
int len;
while ((len = in.read(buf)) > 0){
out.write(buf, 0, len);
}
in.close();
out.close();
}
catch(Exception ex)
{
return -1;
}
return 1;
}
As assets can be opened as InputStream, i have preferred the input parameter to be InputStream type. dstFile is the path to OpinionMining/Opiniondata.txt which is where the opiniondata.txt should be located.
Now as discussed unpack the asset record file at the start of the App where we check for the existance of the directory.
if (! mediaStorageDir.exists())
{
Log.d("Trying to Create Directory", "App Directory Does not exists");
if (! mediaStorageDir.mkdir())
{
Log.e("Directory Creation Failed",mediaStorageDir.toString());
}
else
{
Log.i("Directory Creation","Success");
String filePath=Environment.getExternalStoragePublicDirectory(Environment.DIRECTORY_PICTURES).getPath();
filePath=filePath+"/"+"OpinionMining/OpinionData.txt";
InputStream is =getResources().getAssets().open("opiniondata.txt");
AndroidFlatFileAccess.CopyResourceFromAssetToSdcardDirectory(is, filePath);
}
}
Now our application is ready for distribution. You can pack the apk and distribute it.
But sometimes the database might be corrupted. Sometimes you may want to flash an old file and replace it with a new one or smetimes you may just want to delete a record file completely from your device. In the next subsection we present method for deleting file from your device.
2.4.2 Deleting a file from File System
Deletion is simple. All we need to do is initialize a File object with the file path and then delete the file by calling delete() method of the File class. Here the file path is the same absolute path that we have used for all other file operations.
public static int DeleteFile(String filePath)
{
    try
    {
        File file = new File(filePath);
        boolean deleted = file.delete();
        if(deleted)
        {
            return 1;
        }
        else
        {
            return -1;
        }
    }catch(Exception ex)
    {
        return -1;
    }

}
Here also to keep similarity with all other operations, we are rreturning an integer. This choice comes from SQL methods which returns integer numbers representing whether any row is effected or not and if effected, how many rows have been effected. You can very well design your methods to return boolean values. But always returning a value is a good thing to do. It informs your calling part about the status of the operation.
Download FlatFile_Record_Simple_Opinion_Mining.zip which is complete project till this section. You can play around with the project, may be add new Intent for adding, removing records.
In previous flat file record system we were able to create a generic class that can handle pretty much any flat file database ( a single table to be honest). Such generic implementations are very important when you want to go about app development. You need to have amunation for different situations and such implementations always help. They are like plug and play code. You import them in any project and it works. In previous section, we worked with flat file records where data is delimited by tab. The reason is such a data can be easily exported to sql table or can be converted to excell document. Thus our objective is not only to know how to do stuff but also to be able to generalize the concept for larger usage.
XML is a very important structured data handler. XML is also like flat files where one file holds one particular table. But the advantage with XML is that it supports nesting. Suppose you want to create a record with person's education. In flat file you can only specify one education par row ( par record). So you will preferrably use the last education. But as XML supports nesting and heirarchy you can use multiple educations with tag under education field. But if there is not nexting, flat records will always consume lesser space than their xml counterpart as in xml for every record, column names are to be specified twice.
However one of the major advantage with xml is that it is very much platform independent and you have good xml parser in every modern programming language. Web services also returns their data as xml. But in this section we are largely concerned about XML as local resource. Knowledge we acquire in this section will be helpful when we go for fetching data from web.
in XML, record rows are specified as a node and column data are nested within the row node. Let us construct the XML associated with our opinion data. Let us call this OpinionXmlData.xml
  1  <?xml version="1.0" encoding="utf-8" standalone="yes"?>
  2  <OpinionWordTable>
  3             <OpinionWord>
  4                <Word>Good</Word>
  5               <Weight>1</Weight>
  6             </OpinionWord>
  7                  <OpinionWord>
  8                        <Word>Bad</Word>
  9                        <Weight>-1</Weight>
 10                   </OpinionWord>
 11  </OpinionWordTable>
It can be easily tracked that that the above xml file contains a table called OpinionWordTable. Each items in this table are called OpinionWord. A row item contains two columns by name Word and Weight. However looking at the xml file you might want to say why on earth would we be using such a file when we have already learnt to work flat file records. Our flat file record corresponding to this two row data will be much compact in size.
To really understand where XML holds an edge, look at the following xml OpinionXmlData_with_Phonetics.xml:
="1.0"="utf-8"="yes"
<OpinionWordTable>
<OpinionWord>
<Word>Good</Word>
<Weight>1</Weight>
<Phonetics>
<P1>Gud</P1>
<P2>Gd</P2>
</Phonetics>
</OpinionWord>
<OpinionWord>
<Word>Bad</Word>
<Weight>-1</Weight>
<Phonetics>
</Phonetics>
</OpinionWord>
</OpinionWordTable>
You can see that first word has two phonetics where as the second words has none. There could be more complex nesting strctures which are easily handled by xml.
However in order to keep the learning simple and on par with the simplicity of Flat file handling we will restrict ourselves to non nested OpinionXmlData.xml and at the end of the section discuss methods to handle complex data by xml.
First Download opinionxmldata.zip, Unzip and upload the opinionxmldata.xml to the assets folder of your project in Eclipse. Using File Manager, delete the existing sdcard/Pictures/OpinionMining folder from your device. Now update the part of code in MainActivity.xml where we check for the existance of directory and if not present we created OpinionMining direcory, also we had copied opiniondata.txt from assets folder to the App folder. Add the code for copying opinionxmldata.xml from assets folder to the app folder using CopyFile method we had already developed.
if (! mediaStorageDir.exists())
{
 Log.d("Trying to Create Directory", "App Directory Does not exists");
    if (! mediaStorageDir.mkdir())
    {
        Log.e("Directory Creation Failed",mediaStorageDir.toString());


    }
    else
    {
        Log.i("Directory Creation","Success");
        //////////////////////////////
        String filePath=Environment.getExternalStoragePublicDirectory(Environment.DIRECTORY_PICTURES).getPath();
           filePath=filePath+"/"+"OpinionMining/OpinionData.txt";
        InputStream is =getResources().getAssets().open("opiniondata.txt");
        AndroidFlatFileAccess.CopyResourceFromAssetToSdcardDirectory(is, filePath);

        //////////////// Now Copy The XML File/////////////////////////////

        filePath=Environment.getExternalStoragePublicDirectory(Environment.DIRECTORY_PICTURES).getPath();
           filePath=filePath+"/"+"OpinionMining/OpinionXMLData.xml";

           is =getResources().getAssets().open("opinionxmldata.xml");
     AndroidFlatFileAccess.CopyResourceFromAssetToSdcardDirectory(is, filePath);
        ///////////////////////////////////////////////////////////////

    }
Copying the xml file section is similar to that of flat file copying. Once run, your device will have OpinionMining folder recreated in Picture directory and the directory will now have two files: OpinionData.txt OpinionXmlData.xml as shown in figure 3.1.
Figure 3.1 XML File is stored in the OpinionMining Folder inside Pictures in SD card
Needless to say that though XML data has only two rows, it's size is much more than that of it's flat file record counterpart.
The problem with XML records is that because it supports nesting and complex data records, extracting the records isn't all that simple. XML is tag based data, therefore extracting the record is all about parsing the xml data. Before we present complete generic method for reading record rows of non nested data type, let us write a simple method to understand how exactly xml works.
Let us create a class named AndroidXMLRecordAccess where we will put all our xml record accessing techniques. Let us create a simple method called UnderstandXmlParsing(String filePath) to do what the name suggests: i.e. understanding the whole process of xml records.
public static void UnderstandXMLRecords(String filePath)
{
String data=AndroidFlatFileAccess.ReadFile(filePath);
Log.i("'Data Read",data);
XmlPullParserFactory factory = null;
XmlPullParser xpp = null;
try{
factory = XmlPullParserFactory.newInstance();
            factory.setNamespaceAware(true);
            xpp = factory.newPullParser();
xpp.setInput(new StringReader(data));
int eventType = xpp.getEventType();
while (eventType != XmlPullParser.END_DOCUMENT)
{
if (eventType == XmlPullParser.START_DOCUMENT)
{
Log.i("Start document","START_OF_XML_DOCUMENT");
}
else if (eventType == XmlPullParser.START_TAG)
{
Log.i("Start tag ",xpp.getName());
}
else if (eventType == XmlPullParser.END_TAG)
{
Log.i("End tag ",xpp.getName());
}
else if(eventType == XmlPullParser.TEXT)
{
Log.i("Data:",xpp.getText());
}
eventType = xpp.next();
}
}catch(Exception ex)
{
}
}
XMLParsing will be performed on a string data. Therefore the first step is to read the xml file content in a string. Remember we have already developed a method for this in our File access section. So we will utilize our generic method to pull xml file contents in a string variable name data.
String data=AndroidFlatFileAccess.ReadFile(filePath);
XMLPullParserFactory is used to instantiate parsing instance. We need to specify if the document has a namespace specification or not: it is the first line of xml. Once factory instance is initialized, it is used to instantialized an instance of XMLPullPerser. Once instantiated, the perser object is given the data variable containing the content of xml file through setInput() method.
factory = XmlPullParserFactory.newInstance();
factory.setNamespaceAware(true);
xpp = factory.newPullParser();
The parser now acts as a Recordset object common to JDBC. next() Method loads the next token and returns the token type. Token types are classified as START_TAG, END_TAG , START_DOCUMENT, TEXT.
But the problem is <OpinionWordTable>,<OpinionWord>,<Word>,<Weight> all of these tags will be classified as START_TAG and their respective closing tags will be classified as END_TAG tag. Contents between START_TAG and END_TAG are classified as Text. Thus though the XmlPullPerser object can retrive xml tokens and their types, it can not return you row data or for that matter the metadata of the record ( i.e. Table name, row or record name, column name).
Result is as shown in figure 3.2.
Figure: 3.2 Result of calling of UnderstandXmlParsing
Now we need to first understand to extract the metadata and then pull the result based on the metadata. So let us have variables tableName, rowName, columns as three variables which are String,String and ArrayList<String> respectively. We expect to obtain OpinionWordTable as tableName, OpinionWord as rowName and {Word,Weight} as columns. Once this information is with us we can look for rowName in START_TAG, if found, store all the TEXT in an ArrayList<String> object say singleRow till END_TAG for rowName is found.
Typecast the singleRow to String[columns.size()] as we have information about columns. Now add this information into an ArrayList<String[]> which will hold the record rows, let's say allData. When the END_DOCUMENT is reached, typecast allData to String[][] array with the help of a template String[allData.size()][columns.size()] . allData.size() returns number of rows that are being read and columns.size() ofcourse returns the number of columns.
Here is the complete method which can read any XML flat file record, irrespective of number of columns or type of columns.
public static String[][]ReadXMLRecords(String filePath)
{
ArrayList<String[]>allData=new ArrayList<String[]>();
ArrayList<String>singleRow=new ArrayList<String>();
String tableName="";
String rowName="";
ArrayList<String>columns=new ArrayList<String>();
boolean columnTracking=false;
String data=AndroidFlatFileAccess.ReadFile(filePath);
Log.i("'Data Read",data);
XmlPullParserFactory factory = null;
XmlPullParser xpp = null;
try
{
factory = XmlPullParserFactory.newInstance();
factory.setNamespaceAware(true);
xpp = factory.newPullParser();
xpp.setInput(new StringReader(data));
int eventType = xpp.getEventType();
while (eventType != XmlPullParser.END_DOCUMENT)
{
try{
if (eventType == XmlPullParser.START_DOCUMENT)
{
Log.i("Start document","START_OF_DOCUMENT");
}
else if (eventType == XmlPullParser.START_TAG)
{
if(tableName.length()<1)
{
tableName=xpp.getName().trim();
singleRow=new ArrayList<String>();
Log.i("Table Name",tableName);
}
else
{
if(tableName.trim().equals(xpp.getName().trim()))
{
singleRow=new ArrayList<String>();
}
else
{
if(rowName.length()<1)
{
rowName=xpp.getName().trim();
columnTracking=true;
Log.i("Row Name",rowName);
}
else
{
if(rowName.equals(xpp.getName().trim()))
{
singleRow=new ArrayList<String>();
}
else
{
if(columnTracking)
{
columns.add(xpp.getName().trim());
}
}
}
}
}
}
else if (eventType == XmlPullParser.END_TAG)
{
if(rowName.equals(xpp.getName().trim()))
{
if(columnTracking)
{
columnTracking=false;
Log.i("Columns",columns.get(0)+" ,"+columns.get(1));
}
String [] row=new String[columns.size()];
row=singleRow.toArray(row);
allData.add(row);
singleRow=new ArrayList<String>();
Log.i("ROW DATA:"+row[0],row[1]);
}
if(tableName.equals(xpp.getName().trim()))
{
Log.i("All DONE","----------------------");
String [][] xmlData=new String[allData.size()][columns.size()];
xmlData=allData.toArray(xmlData);
return (xmlData);
}
}
else if(eventType == XmlPullParser.TEXT)
{
if(xpp.getText().trim().length()>=1)
                singleRow.add(xpp.getText());
}
eventType = xpp.next();
}
catch(Exception ex)
{
String [][] xmlData=null;
xmlData=allData.toArray(xmlData);
return (xmlData);
}
}
}
catch (Exception ex)
{
Log.i("Exception happened",ex.getMessage());
return null;
}
return null;
}
It is interesting to see that extraction of the metadata is limited to first instance only. That is we will extract tableName, rowName and columns only once. For complex data you can modify this method and look for metadata of each reacord and extract the record accordingly.
One of the problems with Android XMLParser is that in the TEXT, it tends to pick new line characters, tab, blank spaces, everything. In order to prevent any garbage data being read we use following criteria.
if(xpp.getText().trim().length()>=1)
singleRow.add(xpp.getText());
You can test removing the if condition. You may observe plenty of garbage new line and blank character data.
Now for testing, we go back to our MainActivity and add the testing part from the section which we used to test our file operations.
String filePathXML=Environment.getExternalStoragePublicDirectory(Environment.DIRECTORY_PICTURES).getPath();
               filePathXML=filePathXML+"/"+"OpinionMining/OpinionXMLData.xml";


               Log.i("Checking XML", "---------------");
               String[][] data=AndroidXMLRecordAccess.ReadXMLRecords(filePathXML);
               for(int i=0;i<data.length;i++)
               {
                   Log.i(data[i][0], data[i][1]);
               }
               }
The result is shown in figure 3.3
Figure 3.3: Result of XML Record Access
The generic nature of this method allows us to virtually pull any singletone xml record. In later sections we will work with pulling XML data from web. This method will come really handy in such cases.
In many applications ( like one discussed in section 3.2.4) we need to have the table Metadata. We have already printed the metadata here, but let us write a more structured method for getting it. For fetching the metadata let us first declare a class called RecordMetaData so that we can use it's object for passing/returning the metadata between methods and classes.
public class RecordMetaData
{
    public String Tablename="";
    public String RowName="";
    public String[]Columns=null;
    public RecordMetaData()
    {
        Tablename="";
        RowName="";
        Columns=new String[1];
    }
    public RecordMetaData(int noColumns)
    {
        Tablename="";
        RowName="";
        Columns=new String[noColumns];
    }

}
Our method GetRecordMetaData should return an object of this class. We already know how to extract the metadata. So this method is just a modified version of the previous method that we developed, only change should be that here we are not concerned to read TEXT tag here.
public static RecordMetaData GetRecordMetaData(String filePath)
{
String tableName="";
String rowName="";
ArrayList<String>columns=new ArrayList<String>();
RecordMetaData rm=new RecordMetaData();
boolean columnTracking=false;
String data=AndroidFlatFileAccess.ReadFile(filePath);
XmlPullParserFactory factory = null;
XmlPullParser xpp = null;
try
{
factory = XmlPullParserFactory.newInstance();
factory.setNamespaceAware(true);
xpp = factory.newPullParser();
xpp.setInput(new StringReader(data));
int eventType = xpp.getEventType();
while (eventType != XmlPullParser.END_DOCUMENT)
{
try{
if (eventType == XmlPullParser.START_DOCUMENT)
{
Log.i("Start document","START_OF_DOCUMENT");
}
else if (eventType == XmlPullParser.START_TAG)
{
if(tableName.length()<1)
{
tableName=xpp.getName().trim();
Log.i("Table Name",tableName);
}
else
{
if(tableName.trim().equals(xpp.getName().trim()))
{
}
else
{
if(rowName.length()<1)
{
rowName=xpp.getName().trim();
columnTracking=true;
Log.i("Row Name",rowName);
}
else
{
if(rowName.equals(xpp.getName().trim()))
{
}
else
{
if(columnTracking)
{
columns.add(xpp.getName().trim());
}
}
}
}
}
}
else if (eventType == XmlPullParser.END_TAG)
{
if(rowName.equals(xpp.getName().trim()))
                     {
                         if(columnTracking)
                          {
                         columnTracking=false;
                         rm=new RecordMetaData(columns.size());
                         rm.RowName=rowName;
                         rm.Tablename=tableName;
                         String [] colArray=new String[columns.size()];
                         colArray=columns.toArray(colArray);
                         rm.Columns=colArray;
                         Log.i("Columns",columns.get(0)+" ,"+columns.get(1));
                          }

                     }
}
else if(eventType == XmlPullParser.TEXT)
{
}
eventType = xpp.next();
}
catch(Exception ex)
{
return rm;
}
}
}
catch (Exception ex)
{
Log.i("Exception happened",ex.getMessage());
return rm;
}
return rm;
}
The most important section is the part where the object of RecordMetaData object is instantiated.
if(rowName.equals(xpp.getName().trim()))
{
if(columnTracking)
{
columnTracking=false;
rm=new RecordMetaData(columns.size());
rm.RowName=rowName;
rm.Tablename=tableName;
String [] colArray=new String[columns.size()];
colArray=columns.toArray(colArray);
rm.Columns=colArray;
Log.i("Columns",columns.get(0)+" ,"+columns.get(1));
}
}
The result of Metadata testing is as given bellow.
Figure 3.4 Result of MetaData fetching Method
With this information we can now proceed towards other operations like Insert, Delete and Update.
Inserting or adding new record is one of the most important part of database/record management. Inserting new data is similar to Updating data in file records. You pull all the data, add the extra data and then writeback everything to file. However it is important to know that unlike Files,XML is tag based. So unlike files where insert is a simple append operation, in case of XML, it is like update where old information needs to be flushed and new information needs to be added.
It is important to understand that new record must be within <rowName></rowName> tag. Each columns further should be enclosed within appropriate column name tags. Finally all the records must be enclosed within <tableName></tableName> tag which should be put inside a xml document. In order to do it successfully, we need complete table Metadata which we have already obtained using previous subsection.
Let us first check through the complete logic of InsertRecord() Method:
1. InsertRecord() method must take a String[] containing new data that you want to insert and the xml file path.
2. Within the method first it should obtain the metadat in a variable rm and existing data in variable data.
3. Now open the XMl file for writing. Remember not to inter exchange 2 and 3 as opening the file for writing will prevent it from opening in read mode by metadata extraction and record extraction methods.
4. Steps for writing data:
  WRITE  START_DOCUMENT

/* First Writeback Existing Data*/

                  WRITE START_TAG for TABLE_NAME

                              LOOP: i=0 to data.length()

                                   WRITE START_TAG for ROW_NAME

                                           LOOP:j=0 to rm.Columns.length

                                                WRITE START_TAG for COLUMN_NAME[j]

                                                WRITE TEXT data[i][j]

                                                 WRITE END_TAG for COLUMN_NAME[j]

                                                          END

                                                    WRITE END_TAG for ROW_NAME


                                             END

/*Existing Data is Written*/

/* Add New Record*/

                   WRITE START_TAG for ROW_NAME

                                 LOOP:j=0 to rm.Columns.length
                                    WRITE START_TAG for COLUMN_NAME[j]
                                    WRITE TEXT newRecord[j]
                                   WRITE END_TAG for COLUMN_NAME[j]

                                 END
                    WRITE END_TAG for ROW_NAME


/* New Record Addition Over*/

                      WRITE END_TAG for TABLE_NAME

 WRITE END_DOCUMENT
The reason for presenting this algorithm is because it is easy to understand the process of new XML writeback. And finally based on above logic we have our InsertRecord method.
public static int InsertRecord(String filePath,String[] newRow)
{
try
{
RecordMetaData rm=AndroidXMLRecordAccess.GetRecordMetaData(filePath);
String[][]data=AndroidXMLRecordAccess.ReadXMLRecords(filePath);
FileOutputStream fos = new FileOutputStream(filePath);
XmlSerializer xmlSerializer = Xml.newSerializer();
StringWriter writer = new StringWriter();
xmlSerializer.setOutput(writer);
xmlSerializer.startDocument("UTF-8", true);
xmlSerializer.startTag(null, rm.Tablename);
for(int i=0;i<data.length;i++)
{
xmlSerializer.startTag(null, rm.RowName);
for(int j=0;j<rm.Columns.length;j++)
{
xmlSerializer.startTag(null, rm.Columns[j]);
xmlSerializer.text(data[i][j]);
xmlSerializer.endTag(null, rm.Columns[j]);
}
xmlSerializer.endTag(null, rm.RowName);
}
xmlSerializer.startTag(null, rm.RowName);
for(int j=0;j<rm.Columns.length;j++)
{
xmlSerializer.startTag(null, rm.Columns[j]);
xmlSerializer.text(newRow[j]);
xmlSerializer.endTag(null, rm.Columns[j]);
}
xmlSerializer.endTag(null, rm.RowName);
xmlSerializer.endTag(null, rm.Tablename);
xmlSerializer.endDocument();
xmlSerializer.flush();
String dataWrite = writer.toString();
fos.write(dataWrite.getBytes());
fos.close();
}catch(Exception ex)
{
return -1;
}
return 1;
}
You can observe that InitializeVariable section appears after fetching metadata and records. You can interexchange this sections to see the effect. Obvioudly you will get NullPointerException, but still it is worth to test it out. The reason is because both Reading Metadata and Reading Record methods need to open the file in read mode which will not be allowed by Android(or for that matter any programming environment) once you have the file opened for writing.
Having developed the method, it is time for testing and we would try to add the Word Pathetic with weight -3 to the record.
AndroidXMLRecordAccess.InsertRecord(filePathXML, new String[]{"Pathetic","-3"});
Would update your record with new row [Pathetic -3] which is shown in Figure 3.5.
Figure 3.5 Result of Addition of New Record in XML Database
Delete record method for XML record will be similar to Insert method. The only difference is that instead of a complete row, we will send a search term. The method should check for this search term in all column values for a record. If for any column it matches, it must not write back that column. Finally when all records are written back into the file, the rows matching the search terms will not be present. The method must also return the number of rows being deleted.
public static int DeleteRecord(String filePath,String searchTerm)
{
int totAffected=0;
try
{
RecordMetaData rm=AndroidXMLRecordAccess.GetRecordMetaData(filePath);
String[][]data=AndroidXMLRecordAccess.ReadXMLRecords(filePath);
FileOutputStream fos = new FileOutputStream(filePath);
XmlSerializer xmlSerializer = Xml.newSerializer();
StringWriter writer = new StringWriter();
xmlSerializer.setOutput(writer);
xmlSerializer.startDocument("UTF-8", true);
xmlSerializer.startTag(null, rm.Tablename);
for(int i=0;i<data.length;i++)
{
boolean tobeIncluded=true;
for(int j=0;j<rm.Columns.length;j++)
{
if(data[i][j].toLowerCase().trim().equals(searchTerm.toLowerCase().trim()))
{
tobeIncluded=false;
}
}
if(tobeIncluded)
{
xmlSerializer.startTag(null, rm.RowName);
for(int j=0;j<rm.Columns.length;j++)
{
xmlSerializer.startTag(null, rm.Columns[j]);
xmlSerializer.text(data[i][j]);
xmlSerializer.endTag(null, rm.Columns[j]);
}
xmlSerializer.endTag(null, rm.RowName);
}
else
{
totAffected++;
}
}
xmlSerializer.endTag(null, rm.Tablename);
xmlSerializer.endDocument();
xmlSerializer.flush();
String dataWrite = writer.toString();
fos.write(dataWrite.getBytes());
fos.close();
}catch(Exception ex)
{
return totAffected;
}
return totAffected;
}
For Testing, I just removed the word pathetic which I added as previous example and added new word Great.
AndroidXMLRecordAccess.DeleteRecord(filePathXML, "pathetic");
 AndroidXMLRecordAccess.InsertRecord(filePathXML, new String[]{"Great","4"});
Figure 3.6 : Result of deletion of record ( Word 'Pathetic is' removed)
Updating record is similar to delete record. Here we must specify searchTerm as well as the new row data. In delete we do not include the row matching with the search term, where as in Update method we need to write alternative row for a row whose any of the column matches with the search term.
public static int UpdateRecord(String filePath,String searchTerm,String[] newRow)
{
int totAffected=0;
try
{
RecordMetaData rm=AndroidXMLRecordAccess.GetRecordMetaData(filePath);
String[][]data=AndroidXMLRecordAccess.ReadXMLRecords(filePath);
FileOutputStream fos = new FileOutputStream(filePath);
XmlSerializer xmlSerializer = Xml.newSerializer();
StringWriter writer = new StringWriter();
xmlSerializer.setOutput(writer);
xmlSerializer.startDocument("UTF-8", true);
xmlSerializer.startTag(null, rm.Tablename);
for(int i=0;i<data.length;i++)
{
boolean tobeReplaced=false;
for(int j=0;j<rm.Columns.length;j++)
{
if(data[i][j].toLowerCase().trim().equals(searchTerm.toLowerCase().trim()))
{
tobeReplaced=true;
}
}
if(!tobeReplaced)
{
xmlSerializer.startTag(null, rm.RowName);
for(int j=0;j<rm.Columns.length;j++)
{
xmlSerializer.startTag(null, rm.Columns[j]);
xmlSerializer.text(data[i][j]);
xmlSerializer.endTag(null, rm.Columns[j]);
}
xmlSerializer.endTag(null, rm.RowName);
}
else
{
xmlSerializer.startTag(null, rm.RowName);
for(int j=0;j<rm.Columns.length;j++)
{
xmlSerializer.startTag(null, rm.Columns[j]);
xmlSerializer.text(newRow[j]);
xmlSerializer.endTag(null, rm.Columns[j]);
}
xmlSerializer.endTag(null, rm.RowName);
totAffected++;
}
}
xmlSerializer.endTag(null, rm.Tablename);
xmlSerializer.endDocument();
xmlSerializer.flush();
String dataWrite = writer.toString();
fos.write(dataWrite.getBytes());
fos.close();
}catch(Exception ex)
{
return -1;
}
return totAffected;
}
Observe the bold else section. This is where Delete and Update method differs. In update you can see we put newRow instead of data for a row whose column value matches with searchTerm.
You can test the UpdateRecord method in following way:
AndroidXMLRecordAccess.UpdateRecord(filePathXML,"good" ,new String[]{"Gud","3"});
As you can see,I altered ["Good" 1] with ["Gud" "3"] by searching with term "good". The search is made insensitive by converting both search term and column values to lower case in searching part.
Figure 3.7 Result of XML Record Updation
You can test the method for other test cases like one where more than one row is affected and so on.
In section 3.2 we have seen the ways to aceess local xml record. The methods of XML record access is bit more complicated than their flat file counterparts. But as XML files are platform independent and supports complex data types, they are suitable in many applications, especially where data is not frequently changed and data size is not huge. Large data will consume significant resources which is not advisable for mobile devices as they consume plenty of battery. XML is therefore a good option for storing configurations.
Flat files can get easily corrupted if a single space or tab is misplaced in the record. In such cases the whole record will not work. However XML is protected from such failures. Any significant error may cause a parse failure which can be tracked through exception handler.
Data santity checking is more compact in the case of XML records than the case of flat file records. The technique developed for local XML data handling can be used to parse even remote XML files with little tweaks.
On and all we have developed a light weight generic XML database system the way we had developed file access system. This XMl class can be used for any XML record of non complex( non nested) records.
There are several tutorial online which provides good insight about SQLite. As such the term may not be new to even beginner Android programmer. SQLite is basically a light weight relational database system. The independent isolated database can be used to manipulate local data the same way that we have used XML and flat files for.
In which scenerios should SQLite be used? Take for instance of a game that supports multiple player ( not multiplayer) to access the game from same device. Each player may have different levels and preferenmces. Different configurations may be different tables: fr example there could be tables by name: settings, scores, preferences etc which can be all linked through {PRIMARY-FOREIGN_KEY} relationship.
We may think of light weight accounting package which a businessman can use to note daily expanses. When the record grows higher beyond supported size limit of the device, data can be backup over cloud .
SQLite is secured by default which means data can not be directly manipulated by mistake or by intention as in the case of Flat file or XML files. Say for instance a friend of yours is playing with your mobile and finds the OpinionData.txt file. He opens it in text editor and adds [is 100]. It is easy to assume the result of any opinion testing!
SQLite also supports stored procedues and transactions. So professional DB designers will feel much "secure" with their job while working with this database. This is same as whenever a codeproject developer sees a great C# article his eyes are light up.
So before getting started with SQLite, here are few things to know and keep in mind which will help you decide in favor of SQLite when selecting a database is concerned.
So we understand that SQLite can be used for high volume data transactions and for relational data.
Now as there are plenty of tutorial already, what new are we going to learn here? Any data access on the line of JDBC are very table specific. SQL queries as a matter of fact depends upon the table, attributes, keys and so on. So rather than learning how to access SQLite database in Android, we will try to create a Generic class which can be used by any SQLite applications.
1) SQLite is Android specific, i.e. this database is not interoperable with other relational databased like MySQL. Flat Files and XML are very much interoperable. Their data can be imported and exported to and from any other database.
2) SQLite supports ACID properties. If you are a database programmer, this is the first thing you learn, if you are not database programmer, there is no harm in learning Atomicity, Consistency, Isolation, Durability properties of database.
3) Fortunately or Unfortunately the database supports only four datatypes: TEXT(Similar to Java String), INTEGER ( the non decimal integer number), REAL (like float/double data type of java), BLOB ( binary data storage for media like images, music). Any other data types needs to be converted to any of these types based on suitability. That shouldn't be too much of a problem for most of the data that mobiles access. You may face problem with date type data as lot of real queries works with data, especially selecting records in a date range. If you ever want to have a table where you want to extract a touple based on date range, you can anytime create three fields vix day,month,year corresponding to a date data. It may not be too elegant, but trust me it helps to keep the data types smaller.
4) SQLite supports PRIMARY_KEY and REFERENCE_KEY .
5) If a column is created as INTEGER PRIMARY_KEY then it is autoincreamented if we store NULL to the column.
6)It does not enforce data type constraints. Data of any type can (usually) be inserted into any column. You can put arbitrary length strings into integer columns. The datatype you assign to a column in the CREATE TABLE command does not restrict what data can be put into that column. Every column is able to hold an arbitrary length string other than INTEGER PRIMARY KEY which can only hold 64 bit signed INTEGER. This feature is called TYPE AFFINITY. The database uses the datatype which was specified at the time of creating a table more or less as hint. So if you have a Column declared as Integer and you put a value "12", it converts it to integer 12 and save. If you try to store "we are part of lovely world" in the column , it just stores the string as it can not convert the string to number.
7) SQLite supports Parallelism or Concurrency in true sense. This is a feature by means of which multiple processes or apps can access the same database simultaneously. But only one process can have WRITE( INSERT,UPDATE,DELETE) permission at a given instance of time. Consistency property ensures that a READ is performed only after WRITE, if both arrive simultaneously.
8) SQLite is serverless which means no separate service runs as server , so there is nothing called starting and stopping the database. This is more or less plug and play like other two types of database systems discussed so far.
9) SQLite Data is Persistent. i.e. Data does not get flushed even after App is closed.
4.2 Creating SQLite Database and Tables
Having bit of knowledge about what SQLite is and isn't and having seein it's edge over Flat File and XML records, it is finally time to start with the first step: Creating a SQLite database.
Recall that for both flat files and for xml records we created the file in our PC and then we uploaded. However as storage and data handling is entirely different in SQLite, creating such a database is no straight forward task like the other two.
SQLite database can be created in two ways: Using Program or using SQLite Browser. SQLiteBrowser is a software that allows you to create and test the database offline in your PC. As this is a GUI driven software just like MS-Access, we will first go with this easy option and will turn our focus towards creating database using our APP as another subsection.
First Download SQLiteBrowser(Free)
Install it which takes hardly a minute or two. The best thing: It is so simple that you do not require any training on this.
Before we proceed, let us have a table which is our OpinionXMLData equivalent. We want to create a database called OpinionSQLiteDatabase . The database contains a table called OpinionDataTable Which is of type {No,Word,Weight} where number is primary key integer, word is TEXT type and Weight is of type REAL.
Figure 4.1 Creating Database in SQLite Browser
For creating the database, just select New Database option. Select a directory where you want to save the database ( I am saving it on desktop). Give the appropriate name and just say save like Figure 4.1.
Once your database is created, create the OpinionDataTable by selecting Create Table Option and then keep adding fields using Add Field option. As discussed we use No, Word and Weight fields with appropriate datatype. Also we make No PRIMARY key by selecting PK checkbox.
Creatinon of table is shown in Figure 4.2
4.2 Creating Table in SQLite database
For our OpinionMining, we really don't want any primary key, but I have added this extra field to demonstrate the capabilities of the primary key in SQLite.
Figure 4.3 Inserting values in table from Query
For inserting data into the table, you ned to select Execute SQL tab and execute appropriate INSERT query as shown in figure 4.3. After typing the query in the browser click on the |> icon as shown in the figure. The result of the query will be displayed at the bottom of the window as query status.
We now want to see the primary key constraint of the database. If you try to insert {1,'Bad',-3} you will see an error as No=1 violates the primary key constraint as the table already have No=1 for Word='Good'
Figure 4.4 Primary Key constraint Violation Example
In section 4.1.2 we learnt that the primary key will act as auto increament if inserted NULL. You can validate this as shown in figure 4.5.
Figure 4.5 Auto Increament of Primary key field for NULL data
Finally you can browse the data in the table from Browse Data tab. You can see in figure 4.6 that No=2 is automatically stored for row with Word='Bad'
Figure 4.6 : Browse Data Option in SQLite validating all the INSERT queries
Having created a database, it is time to put it inside our project. The resulting App must deploy the database in the device while running for the first time in a same way that the app had performed for flat file and xml. There are again two options: To kep the database in INTERNAL storage like data directory as in DDMS view ( as figure 2.14). However as we have done with all our other options, we would like to keep it EXTERNAL, in the OpinionMining folder in Pictures directory of our SDCARD.
Do remember to save and close your SQLite Browser before uploading the database to assets folder.
Before that, save your OpinionSQLiteDatabase into assets directory of the project ( ofcourse prefer small letters in the name). See our asst directory structure in figure 4.7
Figure 4.7: Loading SQLite database in assets folder of the project
Ok, now we are ready to work with the database. The first task is to store the database inside device which we call deployment. Once deployed, we can proceed with our Generic class which can literally handle any SQLite database and tables.
As usual we proceed with creating a class called SQLiteDatabaseAccess and make the class to extend android.database.sqlite.SQLiteOpenHelper
Once you create the class, it would prompt you to implement unimplemented methods, go ahead with default. You will have your class something like bellow.
public class SQLiteDatabaseAccess extends SQLiteOpenHelper
{
public SQLiteDatabaseAccess(Context context)
{
super(context, DB_NAME, null, 1);
}
@Override
public synchronized void close() {
super.close();
}
@Override
public void onCreate(SQLiteDatabase arg0) {
}
@Override
public void onUpgrade(SQLiteDatabase db, int oldVersion, int newVersion) {
}
}
I have added DB_NAME which ofcourse is undeclared as of yet. But nothing to worry, we shall see how this works.
Right now our first task is to take the database from assets folder and place it in device. There are basically two choices:
1) You can place the database inside data/data/ folder of your device.: If you want to use this option then your database path variable say DB_PATH should be something as bellow
public static String DB_PATH = "/data/data/com.integratedideas.opinionmining/databases/";
Note that database inside data folder has to be in data/data/COMPLETE_APP_PACKAGE/databases format. One of the things you would really want to do as developer is check the data offline for verifying and debugging like we did for flat file and xml record option. However if your device is not rooted then you can't visualize the data from DDMS.
2) Second option of database deployment is in /Pictures/OpinionMining folder which we have been using throughout this app. In order to avoid rooting the device and ease of debugging, we shall stick to this option, in which case our DB_PATH variable would be
public static String DB_PATH = "/storage/emulated/0/Pictures/OpinionMining/";
Now you can always update the path from test part. Rather than hardcoding the DB_PATH variable, you can obtain a Path as we have done from other record handling.
Let us declare a database name variable called DB_NAME as we want a generic solution for SQLite data handling. Again we will keep it public static which can be updated from outside.
public static String DB_NAME = "OpinionSQLiteDatabase";
So now the destination path is DB_PATH+DB_NAME . Done miss the trailing / in path variable. Incase you don't use it, your destination file for deployment would be DB_PATH+"/"+DB_NAME.
Remember for copying the file we had opened source file as an FileInputStream object? We would do the same thing here too.
myContext.getAssets().open(DB_NAME.toLowerCase());
Where myContext is the context of the MainActivity as only from an Activity class we can access getAssets() method. Therefore we must have a Context object called myContext which should be instantiated with the instance of the MainActivity.
Our logic for Copying the database from assets to OpinionMining database would be to first check if the database is present in the deployment place and if not we shall perform the copying.
Unlike file access having anyfile name with the database name is not sufficient, we should check for database santity check which can be done by opening and closing the database.
Let's complete our class.
package com.integratedideas.opinionmining;
import java.io.FileOutputStream;
import java.io.IOException;
import java.io.InputStream;
import java.io.OutputStream;
import java.util.ArrayList;
import android.content.ContentValues;
import android.content.Context;
import android.database.Cursor;
import android.database.sqlite.SQLiteDatabase;
import android.database.sqlite.SQLiteException;
import android.database.sqlite.SQLiteDatabase.CursorFactory;
import android.database.sqlite.SQLiteOpenHelper;
import android.util.Log;
public class SQLiteDatabaseAccess extends SQLiteOpenHelper
{
public static String DB_PATH = "/storage/emulated/0/Pictures/OpinionMining/";
public static String DB_NAME = "OpinionSQLiteDatabase";
private SQLiteDatabase db;
private final Context myContext;
public SQLiteDatabaseAccess(Context context)
{
super(context, DB_NAME, null, 1);
this.myContext = context;
}
public void createDataBase() throws IOException{
boolean dbExist = checkDataBase();
Log.i("Does Database Exists?",""+dbExist);
if(dbExist){
}else{
this.getReadableDatabase();
Log.i("Default Database Creation","SUCCESS");
try {
Log.i("PREPARING TO COPY DATA","Initializing CopyDatabase");
copyDataBase();
} catch (IOException e) {
throw new Error("Error copying database");
}
}
}
private boolean checkDataBase(){
SQLiteDatabase checkDB = null;
try{
String myPath = DB_PATH + DB_NAME;
checkDB = SQLiteDatabase.openDatabase(myPath, null, SQLiteDatabase.OPEN_READONLY);
}catch(Exception e){
}
if(checkDB != null){
checkDB.close();
}
return checkDB != null ? true : false;
}
private void copyDataBase() throws IOException{
InputStream myInput = myContext.getAssets().open(DB_NAME.toLowerCase());
String outFileName = DB_PATH + DB_NAME;
OutputStream myOutput = new FileOutputStream(outFileName);
byte[] buffer = new byte[1024];
int length;
while ((length = myInput.read(buffer))>0){
myOutput.write(buffer, 0, length);
}
Log.i("Database Deployment","Database Created Successfully");
myOutput.flush();
myOutput.close();
myInput.close();
}
}
So createDatabase is the method we need to call which would call checkDatabase method to see if the database exists in the deployment place or not. If already present, it does nothing, else it calls copyDatabase method to copy database from source assets folder to /Pictures/OpinionMining folder of the sdcard. createDatabase method in every respect is Similar to CopyFiles() method we had developed for deploying flat file. checkDatabase on the otherhand opens a database instance located in deployment location using SQLiteDatabase.openDatabase. If the database is present and is workable, then it will return a workable instance of database. Otherwise it shall return null.
Having done all the hardwork, it's time to test the database access.
String filePathDatabase=Environment.getExternalStoragePublicDirectory(Environment.DIRECTORY_PICTURES).getPath();
SQLiteDatabaseAccess.DB_PATH=filePathDatabase;
SQLiteDatabaseAccess db=new SQLiteDatabaseAccess(this);
db.createDataBase();
You can check your through your file manager that a new file by name OpinionSQLiteDatabase is deployed inside your OpinionMining folder. When you open the file in text editor you will see data like figure 4.8
Figure 4.8: SQLite database in Text Editor
As SQLite database is not exactly your flat file, you can't see any meaningful data. But you can still figure out the inserted Strings and the Query.
So our first task of deplying the database is successfull.
If you have already checked out other Tutorials in internet about SQLite, you might have a preemptive mind of how to declare Some classes specific to your table schema and or how to declare some adapter. if you are a beginer you would surely hate to follow any of those stuff and if you are a pro you might have been searching for something easy so that you can reuse the code irrespective of the table schema. After stumbling upon to this particular tutorial of codeproject you would really thank your luck that you spent time reading and checking out the article. Because what we will learn here will be a truely easy way of database handling which will be very much generic. Meaning: the methods can be used for almost all the tables irrespective of their fields or data type of the fields.
public String[][] ReadTable(String tableName)
{
db=SQLiteDatabase.openDatabase(DB_PATH + DB_NAME, null, SQLiteDatabase.OPEN_READONLY);
Cursor dbCursor = db.query(tableName, null, null, null, null, null, null);
String[] columnNames = dbCursor.getColumnNames();
ArrayList<String[]>allData=new ArrayList<String[]>();
String[] singleRow=new String [columnNames.length];
dbCursor.moveToFirst();
do
{
for(int i=0;i<columnNames.length;i++)
{
singleRow[i]=dbCursor.getString(i).trim();
}
allData.add(singleRow);
singleRow=new String [columnNames.length];
}while(dbCursor.moveToNext());
db.close();
String [][]data=new String[allData.size()][columnNames.length];
data=allData.toArray(data);
return data;
}
Here first we open the instance of database in READONLY mode as our intention is to read the data only.db.query() queries the database with table name. Rest of the parameters are for the coulmns whose data you want to fetch, selection column, criteria for selection column, groupby, having and orderby respectively. As our intention is to pull every row, we will pass null in all the other fields.
The query result is returned in a Cursor object. This is like a recordset object where we can traverse and select one touple in every traversal. Interestingly Cursor object also returns the column names. So before looping we store the column names which helps us fetching column wise data for a row.
singleRow array has the size same as columnNames array. for one loop, we loop through all columns and extract the value in singleRow. singleRow records are then added into allData ArrayList object. So irrespective of the size of number of rows, we can fetch them
After every record is fetched in ArrayList object , we typecast it to String[][] using
String[allData.size()][columnNames.length]
Thus we finally can return a double array for a table where first dimension is for rows( records) and the second dimension stores the column values for the rows.
It's testing and result is presented in next subsection along with Insert Query. But before we go into Insert section we need to discuss about complex queries. SQLite is supposed to be a relational database. So it is quite obvious that in many practical purposes, you might have to pull data by linking several tables. How to fetch such data using our generic method?
The answer is you can't because this is really a generic implementation of "Select * from" @tableName implementation. However you need not worry. Android provides a wonderful method called rawQuery for SQLiteDatabase object where you can pass an entire raw SQL query string as argument. So you can call the method using db object as follows:
db.rawQuery("select * from OpinionDataTable where abs(Weight)>1 order by Word", null;)
I leave it to reader to develop another generic method that performs this. All you need to do is to change the ReadTable method db.query part.
We can frankly design a table independent( well almost) insert query. You might ask how is it possible with different data types? Please recall Type Affinity Property of SQLite database which we discussed in 6) in 4.1.2. So we know we can put string agsint any datatype and SQLite will convert it automatically. You don't trust me? You can verify using SQLite Browser or can head staright towards our most amazing Insert method that holds true for almost all SQLite datatypes.
public int InsertRecord(String tableName,String []newData)
{
db=SQLiteDatabase.openDatabase(DB_PATH + DB_NAME, null, SQLiteDatabase.OPEN_READONLY);
Cursor dbCursor = db.query(tableName, null, null, null, null, null, null);
String[] columnNames = dbCursor.getColumnNames();
db.close();
ContentValues values = new ContentValues();
for(int i=0;i<columnNames.length;i++)
{
values.put(columnNames[i], newData[i]);
}
db=SQLiteDatabase.openDatabase(DB_PATH + DB_NAME, null, SQLiteDatabase.OPEN_READWRITE);
db.insert(tableName, null, values);
db.close();
return 1;
}
SQLite insert Contents into data tables. Contents are like Key-Value pairs. key is the column name and value is the corresponding value you want to store. Threfore firstly we need to build a ContentValues object which is essentially a list of Contents. As we need the column names first, we open the database in read only mode and execute db.query. It's result is obtained in a Cursor object which returns the column names. the column names and their corresponding value selected from the array.
Once your content is ready, open the database in read-writable mode and writeback the new Content using insert method. It is as simple as that.
Now you can see we can pass new row data as String array irrespective of their data type. So even though No is INTEGER, Weight is REAL, we can pass String value for them.
Both the Insert followed by Select query is can be teste in following way:
db.InsertRecord("OpinionDataTable", new String[]{"4","Pathetic","-3"});
                   Log.i("Displaying Content of Table:----","OpinionDataTable");
                   String[][]data=db.ReadTable("OpinionDataTable");

                for(int i=0;i<data.length;i++)
                {
                    String s="";
                    for(int j=0;j<data[i].length;j++)
                    {
                    s=s+data[i][j]+"-";
                    }
                    Log.i(""+i,s);
                }
If you are interested to check AutoIncreament property, pass null, in place of "4" in InsertRecord call.
Finally we can see the result in LogCat as bellow:
4.9 Result of InsertRecord and ReadTable with Type Affinity Proof
Let us device a method that would perform a generic delete based on a search term.
Say for instacne I provide a search term called "good", the query for above table should automatically become,
"delete from OpinionDataTable where No='good' OR Word='good' OR Weight='good' "
Focus on the where clause here. If the table schema is something different, the query should be automatically updated. We can delete a row ( or any sets of row matching criteria) by calling delete method through SQLiteDatabase object. It takes three parameters, first being the table name, second is the where clause and third one are the arguments to where clause.
Remember while specifying WHERE clause ( the second argument) you need not specify the keyword WHERE, rather you must frame the string as a term containing the rest of the part.
So call to delete for above query would be
db.delete( tableName,"No='good' OR Word='good' OR Weight='good' ",null);
But do remember that 'good' is merely a data related to this example. In reality we do want to use a variable called searchTerm as against good.
In that case the query would look like:
db.delete( tableName,"No='"+searchTerm+"' OR Word='"+searchTerm+"' OR Weight='"+searchTerm+""' ",null);
But this doesn't look elegant. Does it? Beside you may not always want to send String. Secondly for a large set of columns framing such query is tedious. Then?
The method delete supports a third argument which is the argument for the search term. So use a wild card ? in the search term whereever you want to place a variable and pass a String array or array of any suitable data type. So our query becomes:
db.delete( tableName,"No=? OR Word=? OR Weight=? ",new String[]{"good","good","good",});
But our goal is not table specific delete method but a more general delete method that can be used against any table. So we need to dynamically frame the second and third term for the query. From the above structure for the method call it is clear that the second term should provide the wild card ? with every column names. Then it should create an array of String with size same as number of columns and append the search term as many number of times in the array as we see the String array containing three 'good' for table with three columns.
Here is our method.
public int DeleteRecord(String tableName,String searchTerm)
{
db=SQLiteDatabase.openDatabase(DB_PATH + DB_NAME, null, SQLiteDatabase.OPEN_READONLY);
Cursor dbCursor = db.query(tableName, null, null, null, null, null, null);
String[] columnNames = dbCursor.getColumnNames();
db.close();
String WHERE="";
String []args=new String[columnNames.length];
for(int i=0;i<columnNames.length-1;i++)
{
WHERE=WHERE+columnNames[i]+"=? OR ";
args[i]=searchTerm;
}
WHERE=WHERE+columnNames[columnNames.length-1]+"=?";
args[columnNames.length-1]=searchTerm;
db=SQLiteDatabase.openDatabase(DB_PATH + DB_NAME, null, SQLiteDatabase.OPEN_READWRITE);
int n=db.delete(tableName, WHERE, args);
db.close();
return n;
}
A test with deleting previously added "Pathetic" followed by adding a new Word "Worst" aith AutoIncreament facily is as shown bellow:
db.DeleteRecord("OpinionDataTable", "Pathetic");
db.InsertRecord("OpinionDataTable", new String[]{null,"Worst","-3"});
Figure 4.10 Result of Delete on SQLite Database
The update method of SQLiteDatabase class in Android has following structure:
update(table, contentValues, whereClause, whereArgs)
We know what is Content Values from our Insert method and we also know how to frame where clause from Delete query. So Update is essentially a combination of Insert and delete methods. The structure of our generic method is as usual with two parameter: one the search term and the second one is a String array specifying the values for the updated row as we have done for flat file and xml update methods.
Here is our method:
public int UpdateRecord(String tableName,String searchTerm, String[]updateRow)
{
db=SQLiteDatabase.openDatabase(DB_PATH + DB_NAME, null, SQLiteDatabase.OPEN_READONLY);
Cursor dbCursor = db.query(tableName, null, null, null, null, null, null);
String[] columnNames = dbCursor.getColumnNames();
db.close();
String WHERE="";
String []args=new String[columnNames.length];
for(int i=0;i<columnNames.length-1;i++)
{
WHERE=WHERE+columnNames[i]+"=? OR ";
args[i]=searchTerm;
}
WHERE=WHERE+columnNames[columnNames.length-1]+"=?";
args[columnNames.length-1]=searchTerm;
ContentValues values = new ContentValues();
for(int i=0;i<columnNames.length;i++)
{
values.put(columnNames[i], updateRow[i]);
}
db=SQLiteDatabase.openDatabase(DB_PATH + DB_NAME, null, SQLiteDatabase.OPEN_READWRITE);
int n=db.update(tableName,values, WHERE, args);
db.close();
return n;
}
Testing could be done in following ways:
db.UpdateRecord("OpinionDataTable","Good" ,new String[]{"1","Great","5"});
There is an important point that you must remember here. In Insert you could run away by passing null to Primary key field by utilizing it's auto increament property. However in update method, you need to specify accurate data. Needless to say the query does not accept null for primary key field. But you can notice that Type Affinity still holds and we can pass "1" instead of numeric 1 for the INTEGER primary key No field.
Figure 4.11 Result of Update Query
SQLite database section has walked you through probably the easiest ways of SQLite data handling. The section tried to help you build methods that are more general and plug and play i.e. suitable for almost any table or database that you want to work with. We have tested the methods using LogCat. The parameters that we passed depends largely on the state of the database. You can Download OpinionMining_SQLite_Test.zip and test the methods. I also urge you to build GUI and attach the method calls from GUI triggers to see the results more appropriately.
Shared Preferences are what the name suggests, i.e. a means of sharing preferences. Between whom? Between apps but note SharedPreference can share data only between two apps with one's package name being child or same as other.
If you want App B to be able to access App A's preferences the package name of App B must be a child of App A's package name (e.g. App A: com.example.pkg App B: com.example.pkg.stuff)
"Shared Preferences" is a light weight database system by means of which data can be shared across apps. It is essentially a {KEY, VALUE} data system which is used as a global database by Android. We can add new fields, we can update/ delete fields or can get the value for specific fields.
As we understood that "Shared Preferences" provides a single instance of the global database to all apps. Thus there is nothing like deployment of the database. The "database" or the "storage" ( if we are given the relaxation to use either of the terms) is deployed with the device, all you have to do is obtain it's instance and keep using. Therefore it is probably the easiest of all the storage and data access techniques we have discussed so far.
So what are the features of this? Where we can use it and where we can't? What are the drawbacks?
1) Shared Preferences allows only one value par key. Therefore it can be thought of as a single row -single column database. So by no stretch of imagination we can store our opinion table using Shared Preferences in a straight way. But you can save the table as a single delimeted string by implementing methods to extract the delimeted rows and columns. However such data storage would require fully qualified parser design the way we designed it for flat file records. This is what we will attempt to do in this section.
2) Shared Preferences can be used for simple, quick and efficient storage of game scores, app preferences like themes etc by user.
3) Shared Preferences provides an option of creating App specific node ( similar to creating database). All the data of the current app can be stored in this node.
4) Shared Preferences are not Multi-Process ( currently). Which means there is no concurrency. If two apps request for access of Shared Preferences, one that arrives first will be served, the other has to wait. Therefore this is not very elegant.
5) Shared Preferences does not support Type Affinity. i.e. It expects an Integer value for a key created to keep Integer value.
6) Android has some limit specifications on amount of internal memory apps can access. For instance 2.3 desires minimum 100Mb data allocation by the device to app data, which has grown to 512Mb for Android 4.3. So Though internal storage could be a restriction in older device, for newer devices it is rarely a problem.
With these points in mind let us go for the implementation.
Though Shared Preferences is KEY-VALUE pair, we shall implement fully qualified record management with Shared Preferences. The advantage of this approch is that once you are ready with RecordManagement system, you can use the developed method generically. If you wish you can always have a record with one row and one column which acts as single KEY-VALUE pair. On the other hand you can also use the methods for more broader data defination and schema.
Like other record handling techniques, we will start by creating a Class for Shared Preferences to handle the operations. Let us call the class as SharedPreferencesRecordAccess. We would assume the SharedPreference Node as Database ( This is to keep up with the schema and data definition we are working with). As we already know that there is a Single instance of SharedPreference in a device. This instance can be accessed using the App Context. Therefore the class must have a Context object initialized with the context of the app from MainActivity.
There are two types of data operations on SharedPreferences: WRITE and READ. A SharedPreferences object can be used to obtain the instance of node specific Shared Instances. If the node is not present, Android will create the node and will return a handle to the object of SharedPreferences. android.content.SharedPreferences.Editor object can be use to write/modify/delete data in the Shared Preferences node. This editor object must be initialized by calling edit() method through SharedPreferences object.
So our Class looks something like this:
package com.integratedideas.opinionmining;

import java.util.ArrayList;

import android.content.Context;
import android.content.SharedPreferences;
import android.content.SharedPreferences.Editor;
import android.util.Log;

public class SharedPreferencesRecordAccess
{
    public Context context;
    public String DB_NAME="OpinionMiningSP";
    private SharedPreferences sp=null;
    private Editor spEditor=null;
    public SharedPreferencesRecordAccess(Context context)
    {

        this.context=context;
        sp = context.getSharedPreferences(DB_NAME, 0);
        spEditor = sp.edit();
    }
    public SharedPreferencesRecordAccess(Context context,String dbName)
    {
        this.DB_NAME=dbName;
        this.context=context;
        sp = context.getSharedPreferences(DB_NAME, 0);
        spEditor = sp.edit();
    }

}
Note that we are using a SharedPreferences node by name OpinionMiningSP which can be thought as Database name or Record name if SharedPreferences is visualized as a Data/Record management system. OpinionMiningSP may have several records where each record can be viewed similar to a database table. As SharedPreferences is a KEY-VALUE pair storage, Record name ( or Table name) will be used as key. A node can have multiple keys. So We can have multiple tables inside a single node. VALUE can be String, Integer, Double, Binary and so on. As we intend to store entire table as a delimeted format, we will work with only STRING values here.
There are two constructors which are self explanatory. The Object of SharedPreferences class is initialized to access the SharedPreferences of the current app context and spEditor can write on the instance.
Our table will be of form Figure 2.12 with First row being Column names and every row is stored as new line. Every column elements are TAB ('\t') delimeted.
CreateDatabaseTable method creates a KEY in the node whose value is a record. For simplicity in technical understanding we consider this as table. For creating table we pass an Instance of RecordMetaData class we had developed in our XML record access section. As in this case we do not need to provide a name for independent rows, we need not assign any values to RowName variable of the class. Here is the implementation of the method.
public int CreateDataTable(RecordMetaData rm)
{
if(sp.getAll().containsKey(rm.Tablename))
{
Log.i("Shared Preferences","Table Exists");
return 0;
}
else
{
String value="";
for(int i=0;i<rm.Columns.length;i++)
{
value=value+"\t"+rm.Columns[i];
}
value=value+"\n";
spEditor.putString(rm.Tablename, value);
spEditor.commit();
Log.i("Shared Preference","Table Created");
}
return 1;
}
The line
if(sp.getAll().containsKey(rm.Tablename))
obtains a list of all the keys for current SharedPreference Context and searches the table name in the keys. If found than that means the table already exists and it does not create table.
Else it prepares to store the columns separated by '\t' as initial value for key which is nothing but the table name. Observe the use of "\n" at the end of the string containing tab separated column names. This is to allow next record to easily fit into the blank row the cursor is in.
SharedPreferences is a Persistent storage. To make any changes Persistent, you need to comit the changes. PutString method checks if a key by the given names exists, if exists, it overrites the value. If no key by the given name exists than putString creates a new key by given name and stores the value.
spEditor.putString(rm.Tablename, value);
spEditor.commit();
This method can be tested from MainActivity using LogCat.
SharedPreferencesRecordAccess sp=new SharedPreferencesRecordAccess(this);
                   RecordMetaData rm=new RecordMetaData(2);
                   rm.Tablename="OpinionSPTable";
                   rm.Columns=new String[]{"Word","Weight"};
                   sp.CreateDataTable(rm);
You might sometimes want to remove old table to create a new one with new data definition. You may also want to remove a table to recreate it. Such a process flushes all previous data.
spEditor.remove(KEY_NAME) can delete a key from current shared preference context. When a key is deleted, automatically it's value is also flushed. Hence our implementation for RemoveDatabase is:
public int RemoveDataTable(RecordMetaData rm)
{
if(sp.getAll().containsKey(rm.Tablename))
{
spEditor.remove(rm.Tablename);
spEditor.commit();
return 1;
}
else
{
Log.i("Shared Preference","Table Does not exists in deletion");
return 0;
}
}
We first check for the existance of the record type or table. If present then remove the tableName KEY and comit the changes which will flush the table or record.
We have already created OpinionDataTable record with two columns. How to insert data? For inserting, first we need to fetch existing data as string. Then we need to add new row. New row is a string formed by concatinating the elements of input parameter array called newData which is nothing but column elements for the row.
public int InsertRecord(String tableName,String [] newData)
{
if(sp.getAll().containsKey(tableName))
{
String data="";
data=sp.getString(tableName, data);
for(int i=0;i<newData.length;i++)
{
data=data+newData[i]+"\t";
}
data=data.trim();
data=data+"\n";
spEditor.putString(tableName, data);
spEditor.commit();
return 1;
}
return 0;
}
Observe the For loop here. You can see that every token is added and a tab is appended. In that way after the last token which is the last column element of the new record, there will be an extra tab. We remove this by using trim(). Once trimmed, a new line character is appended so that next record can sit in the next line. As usual, you can see sp is used for getting the data and spEditor is used for writing back the data. Also notice that like previous cases any write operation calls for comit at the end.
Insert method can be tested by:
sp.InsertRecord(rm.Tablename, new String[]{"Great","2" });
sp.InsertRecord(rm.Tablename, new String[]{"Bad","-1" });
public String[][] ReadRecord(String tableName)
{
if(sp.getAll().containsKey(tableName))
{
String data="";
data=sp.getString(tableName, data);
String [] rows=data.split("\n");
String [][]allData=new String[rows.length][rows[0].split("\t").length];
for(int i=0;i<rows.length;i++)
{
Log.i("Length="+rows.length,"Index="+(i-1));
try{
String[] singleRow=rows[i].split("\t");
for(int j=0;j<allData[i].length;j++)
{
allData[(i)][j]=singleRow[j];
}
}catch(Exception ex)
{
}
}
String [][]myData=new String[allData.length-1][allData[0].length];
for(int i=0;i<myData.length;i++)
{
for(int j=0;j<myData[i].length;j++)
{
myData[i][j]=allData[i+1][j];
}
}
return myData;
}
else
{
return null;
}
}
ReadRecord returns String[][] just like our other data access methods. We first obtain the data ( entire string value stored against the Key table name) into a String called data. First we split this using wildcard "\n". The process returns number of rows including 0'th row which is our column names. We now loop through this array and in turn split every array element using '\t' we now obtain another array which is row array corresponding to current row number. We put the data in allData variable which is a double array. However we do not want to return column names as our data. Therefore we declare another array by name myData which has size one less than that of allData. We copy data from allData to myData barring the first row which are column names.
For testing, use the same format that we have used for all our record categories.
String [][]data=sp.ReadRecord(rm.Tablename);

                      for(int i=0;i<data.length;i++)
                      {
                          String s="";
                          for(int j=0;j<data[i].length;j++)
                          {
                          s=s+data[i][j]+"-";
                          }
                          Log.i(""+i,s);
                      }
Delete method derives it's logic from Delete method of the flat file record. First we need to extract all the data. The method will be given a searchTerm. All it needs to do is linear search the searchTerm in all columns of all the rows and mark the row where it is dound. Copy the data in a temporary ArrayList as we do not know in how many rows, the pattern would be dound. Finally convert the ArrayList into string with same delimeted pattern and write back as value against the key which is table name, overriting existing value. Followit with comit to make the changes persistent. The method should return number of rows being deleted.
public int DeleteRecord(String tableName,String searchTerm)
{
int matched=0;
String s="";
if(sp.getAll().containsKey(tableName))
{
String data="";
data=sp.getString(tableName, data);
String [] rows=data.split("\n");
String[][]record=new String[rows.length][rows[0].split("\t").length];
for(int i=0;i<rows.length;i++)
{
Log.i("Length="+rows.length,"Index="+(i-1));
try{
String[] singleRow=rows[i].split("\t");
for(int j=0;j<record[i].length;j++)
{
record[(i)][j]=singleRow[j];
}
}catch(Exception ex)
{
}
}
for(int i=0;i<record.length;i++)
{
boolean shouldInclude=true;
for(int j=0;j<record[i].length;j++)
{
if(record[i][j].trim().toLowerCase().equals(searchTerm.trim().toLowerCase()))
{
shouldInclude=false;
}
}
if(shouldInclude)
{
for(int j=0;j<record[i].length;j++)
{
s=s+record[i][j]+"\t";
}
s=s.trim();
s=s+"\n";
}
else
{
matched++;
}
}
}
spEditor.putString(tableName, s);
spEditor.commit();
return matched;
}
As we have already seen that update method is Delete existing record and insert new record, we can design an update method simply by utilizing delete and insert method. First call delete with the searchTerm, if a record was deleted, then insert the new row. If no record was deleted that means WHERE clause is not satisfied, in such a case, no need to insert new record.
public int UpdateRecord(String tableName,String searchTerm,String[] updateRow)
    {
        int i=DeleteRecord(tableName, searchTerm);
        if(i>0)
        {
            i=InsertRecord(tableName, updateRow);
            return i;
        }
        else
        {
            return 0;
        }

    }
Finally everything can be checked as:
   SharedPreferencesRecordAccess sp=new SharedPreferencesRecordAccess(this);
   RecordMetaData rm=new RecordMetaData(2);
   rm.Tablename="OpinionSPTable";
   rm.Columns=new String[]{"Word","Weight"};
   sp.RemoveDataTable(rm);
   sp.CreateDataTable(rm);
   sp.InsertRecord(rm.Tablename, new String[]{"Great","2" });
   sp.InsertRecord(rm.Tablename, new String[]{"Bad","-1" });

   String [][]data=sp.ReadRecord(rm.Tablename);

       for(int i=0;i<data.length;i++)
       {
           String s="";
           for(int j=0;j<data[i].length;j++)
           {
           s=s+data[i][j]+"-";
           }
           Log.i(""+i,s);
       }
   int n=sp.DeleteRecord(rm.Tablename, "Bad");
sp.InsertRecord(rm.Tablename, new String[]{"Good","2" });
   sp.UpdateRecord(rm.Tablename, "Good",new String[]{"Awesome","2" });
   data=sp.ReadRecord(rm.Tablename);

       for(int i=0;i<data.length;i++)
       {
           String s="";
           for(int j=0;j<data[i].length;j++)
           {
           s=s+data[i][j]+"-";
           }
           Log.i(""+i,s);
       }
The result of Record management using Shared Preferences is shown in following figure.
Figure 5.1 : Record Management Using Shared Preferences
You can Download OpinionMining_SharedPreferences_Test.zip and test the methods we developed in this section.
Till now we have learnt data access techniques in Android using Flat File, XML, SQLite and Shared Preferences. We have tried to understand which type of data or record management techniques to be used under what circumstances. We have understood where the databases must be deployed and pros and cons of internal and external storage. Further we have considered a single example of OpinionMining data table as seen all the sections which gives us a very good idea about performances and coding complexities. For all the mechanisms we have created generic methods which can be reused with minimum effort by different data definitions and schema. Though ReadRecord method is only of our concern, we have created an entire framework for all In-Device data management service. We also tested flat file access with UI based opinion management. I leave it to the reader to test the same method using all other techniques. I also advise the beginers to create UI forms called Intents for all the four types of methods we learnt and then check connect our developed methods with UI.
Having seen local data storage, we would now move our focus towards Online data access using WebServices
Web data can be mainly categorized into : 1) Fetching Raw HTML Content 2) Fetching Content from a Cloud Service using APIs like Twitter or Facebook and 3) Accessing data from WebServices. and 4) Fetching XML data like RSS Feed. Each of these techniques has their own applications, pros and cons. For instance HTML data may be quite helpful for fetching content from technical forums ( like myBB) with minimalistic text. This technique along with Text to speech can be used as a great tool for apps which presents websites as speech document.
Facebook, Google Drive, Twitter, Dropbox, Skydrive and services similar to these exchange messages using RESTful web services which can be parsed using JSON. WebServices allowed a great way of achiving interoperability across devices and platforms.
All of these data handling requires the device to have internet connectivity. In order to allow the device to access network, you need to enable Use Permission internet as shown in figure 6.1
Figure 6.1 : Enabling INTERNET permission for your app.
With this prerequisite we shall now move ahead with data handling from web.
Web data is communicated over broadly two protocols: HTML and XML protocol. In our XML section we noticed that because XML is a tag based document management, We need to parse the document. Parsing is a process of extracting appropriate information from tags.
HTML contents are further divided into text and multimedia contents like images. A typical HTML page has several tags which varies from website to website. These tags ranges from css tags to classes in a CMS system. None the less when we obtain the html document, we need to parse it to separate any meaningful information from the document.
A webpage can be obtained in Android using simple HTTP request-response pair. There are other methods too which we shall see in due course.
We would also progress towards our ultimate goal of Building an Opinion Mining system. Before we proceed let us make certain changes in our UI to incorporate an EditText for handling URL and a button for triggering fetching of the page. We will first fetch the page inside our edInput and then take the help of opinion button to get the opinion of the data.
Figure 6.2 Modified Layout
You can also change your layout simply by replacing your activity_main.xml code with following.
<RelativeLayout xmlns:android="http://schemas.android.com/apk/res/android"
    xmlns:tools="http://schemas.android.com/tools"
    android:layout_width="match_parent"
    android:layout_height="match_parent"
    android:paddingBottom="@dimen/activity_vertical_margin"
    android:paddingLeft="@dimen/activity_horizontal_margin"
    android:paddingRight="@dimen/activity_horizontal_margin"
    android:paddingTop="@dimen/activity_vertical_margin"
    tools:context="com.integratedideas.opinionmining.MainActivity$PlaceholderFragment" >

    <EditText
        android:id="@+id/edUrl"
        android:layout_width="match_parent"
        android:layout_height="wrap_content"
        android:layout_alignLeft="@+id/edInput"
        android:layout_alignParentTop="true"
        android:layout_marginTop="62dp"
        android:layout_marginRight="66dp"
        android:ems="10"
        android:inputType="text|textUri" >

        <requestFocus />
    </EditText>

    <TextView
        android:id="@+id/tvResult"
        android:layout_width="wrap_content"
        android:layout_height="wrap_content"
        android:layout_below="@+id/btnOpinionTest"
        android:layout_centerHorizontal="true"
        android:layout_marginTop="34dp"
        android:text="@string/hello_world" />

    <EditText
        android:id="@+id/edInput"
        android:layout_width="match_parent"
        android:layout_height="wrap_content"
        android:layout_alignParentLeft="true"
        android:layout_centerVertical="true"
        android:layout_marginLeft="17dp"
        android:ems="10"
        android:gravity="top|left"
        android:inputType="textMultiLine"
        android:lines="8"
        android:maxLines="10"
        android:minLines="6"
        android:scrollbarStyle="outsideOverlay"
        android:scrollbars="vertical" />

    <Button
        android:id="@+id/btnOpinionTest"
        android:layout_width="wrap_content"
        android:layout_height="wrap_content"
        android:layout_below="@+id/edInput"
        android:layout_centerHorizontal="true"
        android:layout_marginTop="20dp"
        android:text="@string/opinion_test" />

    <Button
        android:id="@+id/btnUrlGo"
        style="?android:attr/buttonStyleSmall"
        android:layout_width="wrap_content"
        android:layout_height="wrap_content"
        android:layout_alignBottom="@+id/edUrl"
        android:layout_alignRight="@+id/edInput"
        android:text="@string/Go" />

</RelativeLayout>
Now let us declare two variables by name btnUrlGo and edUrl in MainActivity.java to represrnt the respective layout components. btnUrlGo will be added MainActivity class's setAction liistener so that when the button is clicked, it triggers the code of onClick(View arg0).
Declare following variables in the MainActivity class
Button btnUrlGo;
    EditText edUrl;
Initialize them after call of super inside onCreate method of mainActivity class.
edUrl=(EditText)findViewById(R.id.edUrl);

btnUrlGo=(Button)findViewById(R.id.btnUrlGo);

btnUrlGo.setOnClickListener(this);
Let us now twek the code of onClick to be able to trigger fetching web page when Go button is clicked and trigger OpinionMining when Opinion Test button is clicked.
@Override
public void onClick(View arg0)
{
Button b=(Button)arg0;
if(b.getText().toString().trim().equals("Go"))
{
try
{
String url=edUrl.getText().toString().trim();
String s="RESULT OF HTTP METHOD";
edInput.setText(s);
}catch(Exception ex)
{
edInput.setText(ex.getMessage());
}
}
else
{
String testString=edInput.getText().toString();
int score=mp.SimpleMine(testString);
if(score>0)
{
tvResult.setText("Positive with score="+score);
}
else
{
if(score<0)
{
tvResult.setText("Negative with score="+score);
}
else
{
tvResult.setText("Nutral with score="+score);
}
}
}
Just like all our other functionalities, let us Create a new class for handling we related data. Let us call this class HTMLRawDataReader find a better name if you can. I am sticking to Raw because it warns me of "Black Magic".
Let us have a simple method called FetchWebDataUsingRequestResponse which should use Android native services to return us a raw web page.
public class HTMLRawDataReader
{
    HttpClient client = new DefaultHttpClient();
    HttpGet request = null;
    public static String RSLT="START";

    public String FetchWebDataUsingRequestResponse(String url)
    {
        request=new HttpGet(url);
        try
        {

            HttpResponse response = client.execute(request);
            BufferedReader reader = new BufferedReader(new InputStreamReader(response.getEntity().getContent()));
            String line;
            StringBuilder str = new StringBuilder();
            while((line = reader.readLine()) != null)
            {
                str.append(line);
            }

           return str.toString();

        }
    catch(Exception e)
    {
        return e.getMessage();

    }


    }
}
FetchWebDataUsingRequestResponse accepts a URL from user and initialize an object of HttpRequest with the url. Then using a HttpClient object it obtains HttpResponse corresponding to the request by invoking execute method. The response content is read in a buffer reader. Lastly using a StringBuilder we convert the response content to string and return.
Let us now simply call this method from onClick method where we had already reserved a placeholder for invoking this.
    Button b=(Button)arg0;
        if(b.getText().toString().trim().equals("Go"))
        {
            try
               {
                String url=edUrl.getText().toString().trim();
                HTMLRawDataReader hrd=new HTMLRawDataReader();
                String s=hrd.FetchWebDataUsingRequestResponse(url);
                edInput.setText(s);

               }catch(Exception ex)
               {
                   edInput.setText(ex.getMessage());
               }


        }
Now save, rebuild and run your application. Type a url like http://www.codeproject.com. What you see?
I know, you don't see anything. That is because from Android API 9 onwards Android has prevented calling any network service from main thread. So?
Don't worry, we have a work around for this! Just add following two lines after variable initialization in onCreate method of MainActivity.
StrictMode.ThreadPolicy policy = new StrictMode.ThreadPolicy.Builder().permitAll().build();
StrictMode.setThreadPolicy(policy);
This simply bypass the constraint applied by Android. Now when you run you will see output like following scree.
Figure 6.3 Result of Fetching Web Data Using Http Request-Response
Although our tweak helps us obtain the result, you might have noticed that UI literally hangs between generating the request to obtaining the response in Edit text. This is one of the major drawback of calling any Network services ( Or for that matter any resource intensive services) from main thread.
Before we perform any other network related operations, we must find a solution for this problem. The next section helps you doing just that.
The reason for covering this topic under web data access is that this is probably one concept where multi threading and background execution of job is most important.
AsyncTask is a Helper class around threading which enables background execution of method. But before you jump with joy for discovering solution for your blocking tasks remember AsyncTask is meant to be light weight and should be used only when the waiting period is say couple of seconds. In case of more extenssive processes, Android offers you classes like Executor and ThreadPoolExecutor.
A MainThread can have an inner class that extends AsyncThread class. This gives three overridden methods called: doInBackground ,onPostExecute and onPreExecute. doInBackground method is one from which you can call the resource intenssive methods like our FetchWebDataUsingRequestResponse method. Once the method is completed, the code block automatically goes to onPostExecute which can access the UI components. So once the result is available, this method can update the result in UI.
Let us create an Inner class in MainActivity called AsyncWebMethodInvoker and make it extend AsyncTask. from doInBackground we shall call the remote method. in onPreExecute we will put a message in textView about probable waiting and after the task is completed, we shall assign the result to edInput.
private class AsyncWebMethodInvoker extends AsyncTask<Void, Void, Void> {
@Override
protected Void doInBackground(Void... params) {
try
{
webResult=hrd.FetchWebDataUsingRequestResponse(url);
}catch(Exception ex)
{
}
return null;
}
@Override
protected void onPostExecute(Void result)
{
edInput.setText(webResult);
tvResult.setText("task Completed");
}
@Override
protected void onPreExecute() {
tvResult.setText("Please be patient.. Operation may take time");
}
}
Where webResult, hrd and url variables are declared in the class in order for our Async class to be able to access them.
String url="";
HTMLRawDataReader hrd=null;
String webResult="";
When Go button is clicked, from within event handler we will instantiate an instance of our async class and call execute() method which should invoke doInBackground process automatically.
url=edUrl.getText().toString().trim();
hrd=new HTMLRawDataReader();
AsyncWebMethodInvoker awm=new AsyncWebMethodInvoker();
awm.execute();
Now when you execute the code, you will see a nice, smooth and elegant execution of app.
Figure 6.4 Invoking Remote method using AsyncTask
As we discussed at the begining of this section that AsyncTask is more of a thread helper and more suitable for light weight application. If you observe carefully you will find another problem. AsyncTask basically does not send any message between preExecute and postExecute. So UI thread is unaware of the status of the method. Also it is very important to know that one AsyncTask object can execute precisely one background task. For multiple tasks, you need to have multiple objects par task.
It is not always a clean programming practice to have one object par method invocation. In such cases an Executor comes handy.
Now imagine that you are downloading an image and you want to show the progress of the download process. In such situations, AsyncTask just just does not meet our requirement. Does it? In such cases, it is wise to use Android's Concurrent Execution services. For updating a progressbar or a counter throughout the period of waiting you can take the help of a Timer.
Now let us check out how to call Network methods using good ol java thread support.
An Executor can execute multiple submitted tasks parallely ( concurrently to be more accurate). By definition executor can execute several tasks asynchronously. However asynchronous implementation is not mandatory. By default initialization of Executor intoduces an inline run() method which can be used to immidiately execute a task. Let us call our FetchWebDataUsingRequestResponse method using Executor.
Executor exe=new Executor() {
@Override
public void execute(Runnable command) {
url=edUrl.getText().toString().trim();
String s=hrd.FetchWebDataUsingRequestResponse(url);
edInput.setText(s);
} };
exe.execute(null);
When you call execute(null), it calls the run() method of the particular instance. When you want to call multiple different methods simultaneously, you can use following structure.
exe.execute(new Runnable() {
@Override
public void run() {
}
});
There are other good services in Android that helps designing good background execution and multithreading. However for simplicity of our current discussion, we will restrict our background and concurrent execution to only AsyncTask and Executor.
When you look at the text, you do not really feel good. Because this text comes with all tags, encoding, css and what not. Then why did we learn it? Because you can keep plain html in your site and allow the data to be fetched by the app. You can design light weight suit to publish messages or update App policy or important notification.
Here we are desparate to see how our OpinionMining works. Isn't it? Alright if you are so eager to test what we are trying to do, let's test it the.
I created a test html only for you guys
Update the onClick method of opinion testing part as bellow.
String filePath=Environment.getExternalStoragePublicDirectory(Environment.DIRECTORY_PICTURES).getPath();
filePath=filePath+"/"+"OpinionMining/OpinionData.txt";
String[][] datas=AndroidFlatFileAccess.ReadFileTokens(filePath,2);
mp=new MinePolarity(datas);
String testString=edInput.getText().toString();
int score=mp.SimpleMine(testString);
if(score>0)
{
tvResult.setText("Positive with score="+score);
}
else
{
if(score<0)
{
tvResult.setText("Negative with score="+score);
}
else
{
tvResult.setText("Nutral with score="+score);
}
}
Which is nothing new really, we are just initializing the object of MinePolarity class with our flat file database. You must verify other datatabases. Type the above url in url text box of your app. Fetch data and test opinion.
Figure 6.5 Result of Real Opinion Testing from Web Data
This screen clears many things. Firstly it tells us what final outcome we are expecting of oue app, secondly it gives us a hint as how we can use html without any tags for remotely pushing messages in our apps.
We have already learnt how to handle plain html files from web. But what about dealing with real web pages? Can we extract meaningful information out of it? For dealing with meaningful information, we need good parser.
Jsoup is one of the exceptional stable and good parser I have come accross. forparsing real web pages we will use Jsoup. Firstly please download Jsoup Jar
Unzip and drag the jar file into the lib directory of your Android project as shown in figure 6.6.
Figure 6.6 Configuring to work with Jsoup
Now build your project once and you are ready with HTML parsing.
For this example we will consider Mybb which is a free and popular forum CMS. One of the fasinating feture of this CMS is it provides a light ( Archieve mode) for every website along with the main links. you can open any website "powered by mybb" and look for Light Archieve Mode. Here is one such example:
http://community.mybb.com/archive/index.php?thread-158687.html
HTML parsing will be different for different websites as every site will use diffrent tags for the text part. For understanding what we need to extract, right click on the web page and look for the tags that encloses message or text of your interest.
For above example here is the screenshot of the page source.
Figure 6.7 Page Source of a MyBB Light Site
As you can see that in order to fetch the message, we need to parse a class with name message. Let us develop a method in our HTMLRawDataReader by name ParseHTMLPageWithJsoupForMyBBLight which should take a url, check if it is a mybb archieve site, if so will parse the messages.
Here is the implementation of the method
public String ParseHTMLPageWithJsoupForMyBBLight(String url)
{
try
{
if(!(url.contains("archive")&&url.contains("thread-")))
{
return "not mybb lite site";
}
Document document = Jsoup.connect(url).get();
Elements elements=document.getElementsByClass("message");
String s="";
for(Element ele: elements)
{
s =s+ ele.text();
}
return s;
}
catch(Exception e)
{
return e.getMessage();
}
}
Jsoup.connect(url).get() return a Jsoup Document, which like any tagged Document parsers contains elements. All the elements of message class is separated. Then the code loops through the elements and appends the text part of the elements into a string.
Here is the amazing result of it:
Figure 6.8 Result of HTML Parsing
So you see as and when we update our opinion database to contain real opinion terms with weights and update the algorithm a little, we should be able to find the opinion of any web page of MyBB Lite sites. You can also add fun stuff like Speaking out the content of the using speech synthesis and so on.
A WebService is essentially a web method which can be called from another web service, web page, windows form, mobile applications. Therefore a web service is a middleware which can be easily used as cross platform business logic development. A webservice releases the service interface using WSDL . The client ( or the calling method) can pass parameters as xml and can obtain result as serialized XML data.
As you know Serialization is a process of marshelling a complex datat type like a structure data as a stream and then unmarshelling it on the receiver side. Data like images and videos are not serializable. Such data needs to be converted into string before communicating over web services.
In this section we will learn two things: first how to fetch data from web services, secondly some strategy of writing ASP.Net web service supporting Android.
Some three years back I had written an article on Calling ASMX WebService from Android . Technology has changed a great deal over the years but the technique still remains same.
Most of the tutorials you see around Internet shows you how to call Celcious to Farenhite or currency converter web service. But our aim and objective is to come up with good web based opinion mining system right? So rather than using those useless web services which you will never ever use in your life, we will shift our focus on developing WebService taking into consideration the fact that an Android application will consume it. We will then show how to consume such services.
One might be little surprised as what on earth one needs to know how to write a service for Android? All we want to do is learn some Android basics. Isn't it? If you have stumbled upon to this tutorial, or have managed to read this section, then there is a good reason for me to believe that you are not doing it merely as a high school home work. I am pretty sure that all you want to do is learn real usage and power of web services and how an Android App can be given awesome features using such services. Right?
So what we will do here is go on and offer the real time Opinion Database through our web service and then allow it to be consumed by android application. We will then test our opinion mining system on real html data.
Before we process, here are few points that would be helpful when you work with real web services. And before you look into this section, you must check out some awesome codeproject tutorial about data handling by web services. As our role is restricted to cover Android specific service interface, we would assume that you already know the basics of Asp.Net web services.
1) There is nothing in Android called DataGrid. Therefore when you want a service for Android, always use DataReader object in your database query. A DataReader object can be loooped and independent elements of a record can be accessed. When you want to return whole table, return a String[][] Just as we have done in all the above data related Sections. To make it more simpler for the client, if you can encode String [][] as a single string and can decode that in Android client, it would be more simpler.
2) DateTime pattern of .Net is different from that of Java. Therefore it is important to use DateTime as string object in your .Net web service. If your database field is strictly Date format, then you perform the conversion in the web service rather than leaving it to the client.
3) It is difficult to cast and serialize the data of Class objects.
For instance you have a class called
class Employee

{

string EmpName;

string Eno;

DateTime JoinDate;

}
Then don't write a web method that either accepts an object of this class as argument or return an instance as return data. Though it is not impossible to cast an object of classes, maintaining such a code is really a pain. No book will teach you this, but trust me on this.
It is easy to use String[] to transfer fields of a class. perform object initialization differently in your web service and client rather than leaving the transport layer to handle it.
4) If you want Android to access images from .Net web services, then you can use Image to Base64String conversion. Android can unmarshall a Base64String into an Image and vice versa easily.
5) Core Android utility classes can convert any data into string and convert any data type to string simply by concatinating it with string. Therefore you can develop web services in .Net which mainly deals with String data. Android will be most comfortable with such data.
For the sake of this article I have used a part of SentiStrength dataset and loaded into my site's SqlServer.
So here is our web service for SentiWords:
<%@ WebService language="C#" class="SentiWordProvider" %>

using System;
using System.Web.Services;
using System.Xml.Serialization;

public class SentiWordProvider {

    [WebMethod]
    public String SentiDataset() {
        string connectionString = "server=\'-,1234\'; user id=\'USER_ID\'; password=\'PASSWORD" +
            "\'; database=\'technicalresearch\'";
        System.Data.IDbConnection dbConnection = new System.Data.SqlClient.SqlConnection(connectionString);

        string queryString = "select * from OpinionDb";

        System.Data.IDbCommand dbCommand = new System.Data.SqlClient.SqlCommand();
        dbCommand.CommandText = queryString;
        dbCommand.Connection = dbConnection;

        dbConnection.Open();
        System.Data.IDataReader dataReader = dbCommand.ExecuteReader(System.Data.CommandBehavior.CloseConnection);

string s="";
        while(dataReader.Read())
        {
        s=s+dataReader[0].ToString()+"#"+dataReader[1].ToString()+"\n";
        }

        return s;
    }

}
Observe that we are using a DataReader object to extract a qruery result returned by command object. We are looping through data and convering the whole table into a single string. Every column is separated by # and rows are separated by new line character '\n'.
Here is the result of testing the web service locally:
Figure 7.1 Result of SentiDataset WebService run in localhost
Remember you can not test this web service once it is deployed in the server.
Don't worry if you do not have a web server to test this. I have provided this web service for every one to test!
You can create a Service reference from whichever language/platform you want and use the service. Do not forget to give credit to this article and SentiStrength.
The architecture and design of this web service must surely justify this section!
Any web data which is encapsulated in tags like xml and HTTP needs parser. Correct? As web service interacts data with XML, it also requires parser right? Yes it does and as I mentioned before Ksoap still remains one of the best options of using web services. You can download Ksoap jar file from here>>
One of the interesting fact is that Ksoap is helpful not only for Android applications, but it's java version is equally stable and you can use this library to consume Asp.Net web service in java applications.
Once you have downloaded Ksoap library, load it to libs folder as shown by following figure and clean and build your project. One thing you must remember that while dragging jar files into your lib folder Eclipse asks you about option of linking to file or copying file. Always select copying files and not linking files.
Figure 7.2 Loading KSoap Library with Project
Let us now develop an Android class to handle all SOAP operations. Let's see our class called CallSoap.
package com.integratedideas.opinionmining;
import java.sql.Date;
import java.util.StringTokenizer;
import org.ksoap2.SoapEnvelope;
import org.ksoap2.serialization.PropertyInfo;
import org.ksoap2.serialization.SoapObject;
import org.ksoap2.serialization.SoapSerializationEnvelope;
import org.ksoap2.transport.HttpTransportSE;
public class CallSoap
{
public static String SOAP_ACTION = "http://tempuri.org/SentiData";
public static final String WSDL_TARGET_NAMESPACE = "http://tempuri.org/";
public static final String SOAP_ADDRESS = "http://grasshoppernetwork.com/SentiData.asmx";
public CallSoap()
{
}
public String GetSentiData()
{
OPERATION_NAME = "SentiDataset";
Object response=null;
SoapObject request = new SoapObject(WSDL_TARGET_NAMESPACE,OPERATION_NAME);
SoapSerializationEnvelope envelope = new SoapSerializationEnvelope(
SoapEnvelope.VER11);
envelope.dotNet = true;
envelope.setOutputSoapObject(request);
HttpTransportSE httpTransport = new HttpTransportSE(SOAP_ADDRESS);
try
{
httpTransport.call(SOAP_ACTION, envelope);
response = envelope.getResponse();
}
catch (Exception exception)
{
response=response+"Here it is"+exception.toString();
}
return response.toString();
}
}
Let us now go inside GetSentiData method. OPERATION_NAME is the name of the WebMethod that you want to call WSDL_TARGET_NAMESPACE is always http://tempuri.org by default if not otherwise specified. But how do you know if anything else is specified or not. Before writing client for any WebService, click on the service to get it's WSDL description. WSDL description for our SentiDataset method.
POST /SentiData.asmx HTTP/1.1
Host: grasshoppernetwork.com
Content-Type: application/soap+xml; charset=utf-8
Content-Length: <font class="value" style="color: rgb(0, 0, 139);">length</font>

<?xml version="1.0" encoding="utf-8"?>
<soap12:Envelope xmlns:xsi="http://www.w3.org/2001/XMLSchema-instance" xmlns:xsd="http://www.w3.org/2001/XMLSchema" xmlns:soap12="http://www.w3.org/2003/05/soap-envelope">
  <soap12:Body>
    <SentiDataset xmlns="http://tempuri.org/" />
  </soap12:Body>
</soap12:Envelope>
HTTP/1.1 200 OK
Content-Type: application/soap+xml; charset=utf-8
Content-Length: <font class="value" style="color: rgb(0, 0, 139);">length</font>

<?xml version="1.0" encoding="utf-8"?>
<soap12:Envelope xmlns:xsi="http://www.w3.org/2001/XMLSchema-instance" xmlns:xsd="http://www.w3.org/2001/XMLSchema" xmlns:soap12="http://www.w3.org/2003/05/soap-envelope">
  <soap12:Body>
    <SentiDatasetResponse xmlns="http://tempuri.org/">
      <SentiDatasetResult><font class="value" style="color: rgb(0, 0, 139);">string</font></SentiDatasetResult>
    </SentiDatasetResponse>
  </soap12:Body>
</soap12:Envelope>
Look for xmlns which is nothing but the namespace. As you can see, here it is http://tempuri.org Preceeding word to xmlns is the SOAP method. Here as you have designed the service you know it's return type and arguments. But if you are not the owner of the web service and using a third party service then knowledge of parameters from wsdl description always helps.
Coming back to our method, we construct a SoapRequest object using namespace and the method.
SoapObject request = new SoapObject(WSDL_TARGET_NAMESPACE,OPERATION_NAME);
A SoapEnvelope will carry SoapRequest and SoapResponse over the transport layer. As in above WSDL description you can see that top of the file mentions version 1.1. So SOAP Envelope must also be told about the version. Importantly it must be told that it is handling C# WebMethod.
Call the WebMethod to get response as object.
httpTransport.call(SOAP_ACTION, envelope);

response = envelope.getResponse();
On a side note, consider you have WebMethod with arguments where you have send some parameter. How would your Android method be changed?
In order to accomodate properties you need to add them in following ways
PropertyInfo pi=new PropertyInfo();
        pi.setName("variable1");
      pi.setValue(VALUE1_FROM_SOME_ANDROID_UI_ELEMENT);
      pi.setType(String.class);
      request.addProperty(pi);

pi=new PropertyInfo();
      pi.setName("variable2");
      pi.setValue(VALUE2_FROM_SOME_ANDROID_UI_ELEMENT);
      pi.setType(String.class);
      request.addProperty(pi);
Where variable1 and two are two arguments to web method which might look something like bellow
[WebMethod]

public String MyWebMethod(String variable1, String Variable2){

return "Some String";

}
You may use another WebService to test argument passing
http://grasshoppernetwork.com/NewFile.asmx
It provides you with an Add method and Encrypt and Decrypt method which you can use freely.
Now it's time to test this. What we are going to do is call this method from within OpinionMining Button , obtain the returned string and then format it to a String[][]. Initialize MiningPolarity class object using String[][] as we have done earlier to test the opinion mining data of Community Forum Site powerd by MyByy in lite Archive mode. We will use an Executor to call our service. The advantage with executor is as you declare and initialize it's object, the void run and it's body is automatically created. So it is low effort, high return.
Executor exe =new Executor() {
@Override
public void execute(Runnable command)
{
CallSoap cs=new CallSoap();
webResult=cs.GetSentiData();
}
};
exe.execute(null);
Log.i("Database",webResult);
String [] rows=webResult.split("\n");
String [][]datas=new String [rows.length][2];
for(int i=0;i<rows.length;i++)
{
datas[i]=rows[i].split("#");
}
mp=new MinePolarity(datas);
We first split the obtained string based on new lines. This is number of records we have. We then split the rows using "#" to extract the Word and the Weight column entities of each row. Result of a debugging session shows the returned result, splitting it into rows in LogCat and preparing String[][] array in debugger pp up.
Figure 7.3 Result of unmarshelling Web Service result of String to String[][]
And here is the result of real time opinion mining.
Figure 7.4 Result of Opinion Mining with Real Dataset
So far we have learnt almost all possible record management in Android as well as fetch and parsing records from web. Though the topic should have very well ended by now but our craze and apetite to see a cool App seeing the day of light is really important. So we shall move ahead and improve our opinion mining task which is currently nothing but counting positive and negative words.
So let's start with some simple sentences. Type "I am good and the world is great" in the input box. Now find opinion.
It will show positive with score 10 with following trace LogCat in SimpleMine method.
Figure 8.1 Trace of Opinion Polarity mining of "I am good and the world is great"
Not search "I am not good and the world is not great". You expect it to be negative right? But it shows positive because all SimpleMine method does is look for Positive and Negative terms. Because the method is Stateless, it does not know what was previous word. Now we will incorporate a simple rule that if "not" or "no" appears before a word that matches polarity, we are going to alter the polarity.
So we keep storing the tokens in a list till an opinion term occours. Then we check if word not or no is present or not in those tokens, if so we alter the polarity and then free the list.
Following is our modified SimpleMine method.
public int SimpleMine(String text)
    {
        text=text.toLowerCase().trim();

        StringTokenizer st = new StringTokenizer(text, ".\n\t ,:();");

        int score=0;
        ArrayList<String> prevTokens=new ArrayList<String>();
        while(st.hasMoreTokens())
        {
            String s=st.nextToken().trim();
            Log.i("In Simple Mine",s);
            try{

            int i=SearchInDatabase(s);
            if(i!=0)
            {
            if(prevTokens.contains("not") ||prevTokens.contains("no"))
            {
                i=i*-1;
            }
            }
            Log.i(s, ""+i);
            score+=i;
            if(i!=0)
            {
                prevTokens.clear();
            }
            else
            {
                prevTokens.add(s);
            }
            }catch(Exception ex)
            {

            }
        }
        return score;

    }
And now when you check "I am no good and world is not great" you will get precise polarity that you expected. i.e. Negative with score -10.
What if not does not appear immidiately before opinion word?
"I am not at all good and the world is not good". Observe there is an "at all" after not, but the result is still perfect. That is because we are not finding a token before opinion word but rather all the tokens.
Now what if I want to test
"I am bad but world is too good a place." Observe the usse of too here. What I want to say is that the word nice is weighted. Such terms should increase the weight of the polarity word, but the absolute value of polarity must remain [0-5].
So we search for weighting term absolutely before the current polarity word and if present we shall increase the weight of the term. But this test must appear before testing for preceeding not such that not can take into account of the decision.
So here goes another change in our SimpleMine method if current word is an opinion word.
if(i!=0)
            {

                if(prevTokens.size()>0)
                {
            if(prevTokens.get(prevTokens.size()-1).equals("too") ||prevTokens.get(prevTokens.size()-1).equals("very")||prevTokens.get(prevTokens.size()-1).equals("really")||prevTokens.get(prevTokens.size()-1).equals("honestly"))
            {
                int j=Math.abs(i);
                j=j*2;
                if(j>5)
                {
                    j=5;
                }
                if(i<0)
                {
                    i=j*-1;
                }
                else
                {
                    i=j;
                }
            }    }
            if(prevTokens.contains("not") ||prevTokens.contains("no"))
            {
                i=i*-1;
            }
            }
Lastly, we use n't with many verbs to alter the polarity like isn't, doesn't, couldn't and so on. Appearance of such a word invariably alters the opinion than if the word had not appear.
For example "It isn't looking good" is a negative polarity sentence where as "it is looking good" is positive polarity.
So we write a simple Linear Search method which can loop through elements of an ArrayList<String> and check if the string is ending with "n't" for not. If so in main logic part we will alter the polarity.
boolean SearchForNt(ArrayList<String> words)
{
    if(words.size()<1)
    {
        return false;
    }
    for(int i=0;i<words.size();i++)
    {
        if(words.get(i).endsWith("n't"))
            return true;
    }
    return false;

}
And our overall SimpleMine() method which is no more really simple goes as bellow.
public int SimpleMine(String text)
    {
        text=text.toLowerCase().trim();

        StringTokenizer st = new StringTokenizer(text, ".\n\t ,:();");

        int score=0;
        ArrayList<String> prevTokens=new ArrayList<String>();
        while(st.hasMoreTokens())
        {
            String s=st.nextToken().trim();
            Log.i("In Simple Mine",s);

            try{

            int i=SearchInDatabase(s);
            if(i!=0)
            {

                if(prevTokens.size()>0)
                {
            if(prevTokens.get(prevTokens.size()-1).equals("too") ||prevTokens.get(prevTokens.size()-1).equals("very")||prevTokens.get(prevTokens.size()-1).equals("really")||prevTokens.get(prevTokens.size()-1).equals("honestly"))
            {
                int j=Math.abs(i);
                j=j*2;
                if(j>5)
                {
                    j=5;
                }
                if(i<0)
                {
                    i=j*-1;
                }
                else
                {
                    i=j;
                }
            }    }
            if(prevTokens.contains("not") ||prevTokens.contains("no"))
            {
                i=i*-1;
            }
            if(SearchForNt(prevTokens))
            {
                i=i*-1;

            }
            }
            Log.i(s, ""+i);
            score+=i;
            if(i!=0)
            {
                prevTokens.clear();
            }
            else
            {
                prevTokens.add(s);
            }
            }catch(Exception ex)
            {

            }
        }
        return score;

    }

}
Let's finally test with a real web address!
Figure 8.2 Opinion Polarity Mining On Real MyBB Page
Download OpinionMining_Final_Project.zip to play through and develop it as a great app.
In this tutorial we have designed a simple but powerful Opinion Polarity mining tool in Android. The Algorithm isn't without flaws but does a good work generally to give you correct result about Opinion and sentiment of a web page. However importantly we learn't several data handling techniques in Android. Flat File, XML, Shared Preferences, SQLite were the data( or record) management techniques covered in this tutorial. For every record management we tried to develop generic methods which can act as plug and play for your other applications. For example you can not have virtually anydatabase and you can work with them in any of the covered database management techniques without much effort or change in code. This is most fascinating aspect of this tutorial. So you not only learn record handling for an example database but you really saved yourself from wasting time in future to modify the methods for a different data definition.
I have tried to cover every tip and trick possible or that came in my mind while covering the topics. But I am sure there might be more. I will be looking forward to hear from you about your suggestions to incorporate in future updates of the article.
This article is the result of years of work in Android. I have tried to provide solutions in most easy and understandable way for the beginers. In every topic I have tried to answer "Why" and "When" along with "How". So this article not only teaches you how to do stuff but at the same time tells you why to use a particular concept and when to use them. Technically most sophisticated code isn't the objective of this article, but simplicity of the code is. While writing I repeatedly asked myself will I understand the content of this section if I was a novice Android programmer having only working knowledge of Android and updated contents accordingly.
I have provided Code "Upto" almost each section so that you can analyze a particular section. You can do several things like creating a local database of Opinion words once you obtain it for the first time from the web.
I would want to conclude this article with a hope that this makes learning databases really easy for you. Happy coding and happy learning.
gasshopper.iics is a group of like minded programmers and learners in codeproject. The basic objective is to keep in touch and be notified while a member contributes an article, to check out with technology and share what we know. We are the "students" of codeproject.
This group is managed by Rupam Das, an active author here. Other Notable members include Ranjan who extends his helping hands to invaluable number of authors in their articles and writes some great articles himself.
Rupam Das is mentor of Grasshopper Network,founder and CEO of Integrated Ideas Consultancy Services, a research consultancy firm in India. He has been part of projects in several technologies including Matlab, C#, Android, OpenCV, Drupal, Omnet++, legacy C, vb, gcc, NS-2, Arduino, Raspberry-PI. Off late he has made peace with the fact that he loves C# more than anything else but is still struck in legacy style of coding.
Rupam loves algorithm and prefers Image processing, Artificial Intelligence and Bio-medical Engineering over other technologies.
He is frustrated with his poor writing and "grammer" skills but happy that coding polishes these frustrations.


 General
  News
News  Suggestion
  Question
  Bug
Bug  Answer
  Joke
Joke  Praise
  Rant
Rant  Admin
Admin 


