With the web getting more and more interactive, JavaScript frameworks is becoming a must in every web project (unless you want to code it yourself). There are a lot to choose from like Ember, Knockout, Backbone, Agility, Kendo UI, etc. and it’s all up to you what's the most compatible framework depending on your requirement, there is no right or wrong framework, it's all a matter of preference like us, we prefer Angular JS and Kendo UI most of the time.
That means I am not here to discuss what the best framework is but I am here to show how to use Angular JS with our current MVC application and it was surprisingly easy.
Before we start this one, make sure that you are already using WebApi (ApiControllers) if not, read this article first as it explains why.
Now let's start by adding Angular Core to your project using NuGet.
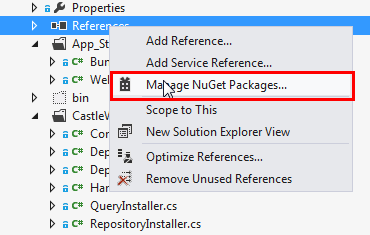
Search for Angular, then install:

Once installed, add the Angular minified JS to your Bundle if you are using BundleCollection.
Or if not, just add the script reference just before you close the head section of your HTML. Now, you are ready to use it. Let's now create your ApiControllers that will be used by Angular.
Let's say you have a simple table with two fields which is called Equipment, this table will contain a simple information whether an Equipment is available or not. This means we only have four columns/fields which are the EquipmentId, Name, Quantity and IsDiscontinued, this is now how your view model would look like:
public class EquipmentsViewModel
{
    [DisplayName("Equipment Id")]
    public int? EquipmentId { get; set; }

    [DisplayName("Name")]
    [StringLength(255)]
    public string Name { get; set; }

    [DisplayName("Quantity")]
    public int Quantity { get; set; }

    [DisplayName("Is Discontinued")]
    public bool IsDiscontinued { get; set; }
}
Now let's create Get, Post and Delete methods on your ApiController which will be called by the Angular Controller that you will be building. You will notice we already have Queries and Tasks in place which takes care of the Data Gathering and the Business Processes at the back-end. You need to make sure it will be as generic as this as possible so when you create your Angular Controller, it will be easy.
public class EquipmentsApiController : ApiController
{
    private readonly IEquipmentsQuery equipmentsQuery;
    private readonly ICommandProcessor commandProcessor;

    public EquipmentsApiController(
    IEquipmentsQuery equipmentsQuery,
    ICommandProcessor commandProcessor)
    {
        this.equipmentsQuery = equipmentsQuery;
        this.commandProcessor = commandProcessor;
    }

    public IEnumerable<EquipmentsViewModel> Get()
    {
        var result = equipmentsQuery.GetAll();
        return result;
    }

    public EquipmentsViewModel Get(int id)
    {
        var result = equipmentsQuery.Get(id);
        return result;
    }

    [Transaction]
    public void Post(EquipmentsViewModel viewModel)
    {
        if (ModelState.IsValid)
        {
            var command = new SaveOrUpdateEquipmentCommand(
            viewModel.EquipmentId,
            viewModel.Name,
            viewModel.Quantity,
            viewModel.IsDiscontinued
            );

            if (ModelState.IsValid)
            {
                commandProcessor.Process(command);
                viewModel.EquipmentId = command.EquipmentId;
            }
        }
    }

    public void Delete(int id)
    {
        var command = new DeleteEquipmentCommand(id);
        commandProcessor.Process(command);
    }
}
I hope this looks straightforward, the get executes queries while the post and delete executes Business Processes you defined. Don’t forget you also need the normal MVC controllers to show your Form, in this example, we create one called CreateOrUpdate and it will cater to inserting or updating data. You will notice if there is an id parameter that is passed, it adds to the view models so we know on the client side which is a create event or update.
public class EquipmentsController : Controller
{
    public ActionResult CreateOrUpdate(int? id)
    {
        var viewModel = new EquipmentsViewModel
        {
            EquipmentId = id
        };
        return View("Form", viewModel);
    }
}
Now let's build your Angular controller that will work with the ApiController above and any ApiController following the same naming convention as above. You can give this any file name you want, just don’t forget to include this on your Bundle.
function () {
var yourWebApp = angular.module('yourWebApp', []);
yourWebApp.controller('getRequest', function($http, $scope) {
$scope.loading = true;
$scope.addMode = false;
$scope.editMode = false;
$scope.returnMessage = "";
$scope.thisControllerName = "";
$scope.data = [];
$scope.getType = function(x) {
return typeof x;
};
$scope.init = function(controllerName, id) {
$scope.thisControllerName = controllerName;
if (id != "") {
$scope.id = id;
$scope.controllerName = controllerName;
$http.get('/api/' + $scope.controllerName + 'Api/' + $scope.id).success(function(data) {
$scope.data = data;
$scope.loading = false;
$scope.editMode = true;
})
.error(function() {
$scope.error = "An Error has occured getting list";
$scope.loading = false;
});
} else {
$scope.addMode = true;
}
};
$scope.reset = function() {
$scope.data = [];
};
$scope.save = function(isValid) {
if (isValid) {
$http.post('/api/' + $scope.thisControllerName + 'Api/',
$scope.data).success(function(data) {
$scope.returnMessage = "Your request has been posted successfully";
if (!scope.editMode) {
$scope.data = [];
$scope.modelForm.$setPristine();
}
$scope.loading = false;
})
.error(function() {
$scope.returnMessage = "An Error has occured getting list";
$scope.loading = false;
});
}
};
});
}})();
Finally, let's build the forms and based on the MVC controller, it should be called Form.cshtml (and don’t mind the bootstrap classes, I have not bothered removing it for this demo).
@model YourWebApp.Web.Mvc.Controllers.ViewModels.Equipments.EquipmentsViewModel
@{
    ViewBag.Title = "Equipments";
    Layout = "~/Views/Shared/_Layout.cshtml";
}

<form name="modelForm"
ng-controller="getRequest as data" ng-init="init('Equipments',
'@(Model.EquipmentId)')"
ng-submit="save(modelForm.$valid)" novalidate class="container-fluid" >
    <h2>Equipments</h2>
    <div class="row">
        <div class="form-group col-sm-6">
            @Html.LabelFor(m => m.Name)
            <input type="text"
            ng-model="data.Name" class="form-control" required ng-maxlength="255">
        </div>

        <div class="form-group col-sm-6">
            @Html.LabelFor(m => m.Quantity)
            <input type="number"
            ng-model="data.Quantity" class="form-control" required>
        </div>

        <div class="form-group col-sm-6 wrap-row">
            @Html.LabelFor(m => m.IsDiscontinued)
            <div class="row">
                <div class="col-xs-1">
                    <input type="checkbox" ng-model="data.IsDiscontinued" />
                </div>
                <div class="col-xs-11">Is Discontinued?</div>
            </div>
        </div>
    </div>
    <div class="button-container">
        <button class="btn btn-primary"
        type="submit" ng-show="editMode">Save</button>
        <button class="btn btn-primary"
        type="submit" ng-show="addMode">Create</button>
        <button class="btn btn-link" type="reset"
        ng-click="reset()" ng-show="addMode">Reset</button>
        {{returnMessage}}

    </div>
</form>
Now let's draw some visual lines on how each element relates to each other and this is where the Angular JS magic happens. First let's see how the Form relates to the Angular Controller.
I think I don’t need to further explain, those lines should be clear enough how they map together.
And this is how the Angular Controller relates to the ApiController.
Now all you need is to configure and register this additional route which you can do in your Global.asax, this route will be then used by AngularController route to the correct ApiController.
configuration.Formatters.JsonFormatter.SupportedMediaTypes.Add(new MediaTypeHeaderValue("text/html"));
configuration.Routes.MapHttpRoute(
        "DefaultApi",
        "Api/{controller}/{id}",
        new { id = RouteParameter.Optional }
    );
Finally, you need to add the following attribute on your html tag, usually it's in your _Layout.html file.
<html ng-app="yourWebApp">
You’re all finished now you can try it, so if you want to create a new entry based on the MVC controller above, you need to go to:
- http://localhost:9999/Equipments/CreateOrUpdate
or if you want to update an Entry, you can do something like this:
- http://localhost:9999/Equipments/CreateOrUpdate/1
Easy, isn’t it?


 General
  News
News  Suggestion
  Question
  Bug
Bug  Answer
  Joke
Joke  Praise
  Rant
Rant  Admin
Admin 


