Article Series
This article is part one of a series on developing a Silverlight business application using Self-tracking Entities, WCF Services, WIF, MVVM Light Toolkit, MEF, and T4 Templates.
Contents
Introduction
The idea of this article series comes after I wrote my previous series about building a sample Silverlight LOB application using WCF RIA Services and MVVM. WCF RIA Services simplifies the development of n-tier solutions for Rich Internet Applications by encapsulating some of the most commonly desired CRUD functionality, and uses code generation to make it simple to build and consume the services. It is a highly customizable "canned" solution that is a great choice if you are developing new systems. But if you have to reuse some existing WCF Services, or if you want the ultimate in control, WCF RIA Services may not be for you. A possible alternative would be to start with ADO.NET Self-Tracking Entity Generator and plain old WCF Services.
Well, if you are interested in further exploring this alternative option, our next step would be to do a gap analysis of what nice features are currently available in WCF RIA Services, but missing if we choose ADO.NET Self-Tracking Entity Generator and WCF Services. Here are the three main areas as far as I can see:
First of all, WCF RIA Services provides a class called DomainContext that is a stateful client-side representation of a domain service, providing access to all the functionality of the service. Some of the nice methods and properties for change tracking are SubmitChanges, RejectChanges, and HasChanges. If we choose WCF Services, there is no point to re-build the whole DomainContext class, but at least we can try to implement similar change tracking on each self-tracking entity, which we will cover in the following article.
Next, WCF RIA Services supports multiple levels of validation: member/field level validation, entity level validation, and operation level validation. Validation can be expressed as declarative rules via metadata annotations, or implemented via imperative rules in code attached through metadata annotations. Unfortunately, none of these currently exists in the ADO.NET Self-Tracking Entity Generator out of the box from VS2010. It would be nice if we could build an infrastructure of multiple levels of validation by enhancing the self-tracking entity generator.
Finally, WCF RIA Services provides a set of built-in classes for authentication and authorization. If we use WCF Services, none of these built-in classes will be available. An alternative would be to use Windows Identity Foundation (WIF) to handle authentication and authorization, and fortunately, there is even a great sample from the Identity Developer Training Kit.
Before we continue, let me mention this up-front that this article series covers a wide range of technologies, including self-tracking entities, WCF Services, WIF, MVVM (MVVM Light Toolkit), MEF, and T4 Templates. My primary focus would be on how to create an enhanced version of the Self-Tracking Entity Generator so that we can build a data access layer along with WCF Services. My next focus would be on changes to other parts of this sample so that they work seamlessly with this new data access tier. There is an assumption that you have a good grasp of the technical areas mentioned above, and please also be aware that some of the discussions could get quite advanced.
The Sample's Main Features
The main features of this issue tracking application stay mostly the same compared to what we have used in the previous article series, with only minor enhancements. In case you are not familiar, here is a recap:
- Login screen provides custom authentication and password reset based on security question and answer.
- My Profile screen is for updating user information, password, security questions and answers.
- User Maintenance screen is only available to Admin users, and lets an Admin user add/delete/update users.
- Audit Issue screen is also available to Admin users only, and lets Admin users audit changes to any issue.
- New Issue screen is for creating new issues (bugs, work items, spec defects, etc.).
- My Issues screen is for tracking all the active and resolved issues assigned to a user.
- All Issues screen is for tracking all issues (Open, Active, Pending, or Resolved).
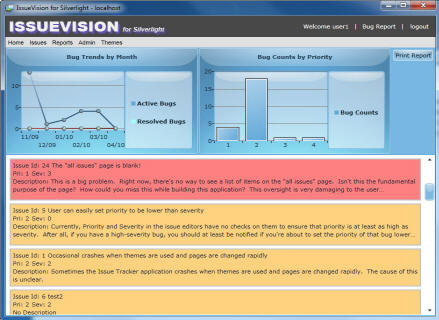
- Bug Report screen provides a summary of bug trends, bug count, and the functionality to print the summary.
- Four different Themes are available, and can be applied dynamically at any time.
System Requirements
In order to build the sample application, we need:
Supported Operating Systems:
- Windows Vista SP2, Windows Server 2008 SP2, Windows 7, or Windows Server 2008 R2
Other requirements:
- Microsoft IIS 7
- Microsoft SQL Server 2005, 2008, or 2008 R2
- Microsoft Visual Studio 2010 Professional
- Microsoft Silverlight 4 Tools for Visual Studio 2010
- Silverlight 4 Toolkit April 2010 (included in the sample solution)
- MVVM Light Toolkit V3 SP1 (included in the sample solution)
- Windows Identity Foundation Runtime
- Windows Identity Foundation SDK 4.0
- Portable Extensible Metadata (VS2010 Extension)
- (Optional) Tangible T4 Editor plus modeling tools for VS2010 (VS2010 Extension)
Unfortunately, Windows XP is not supported. This is because Windows Identity Foundation does not support Windows XP. Also, we have to choose at least VS2010 Professional because Visual Web Developer 2010 Express does not support VS2010 Extensions.
System Setup
After downloading the source code to a location on your local disk, we need to make sure that our development environment is set up properly before building and running this sample. Our following discussions all assume that we use Windows 7.
IIS 7 Setup
First, we need to get IIS 7 up and running. To add this Windows feature, please enable the "Internet Information Services" feature as follows:

In addition to the default choices, please also select the following two options:
- "Web Management Tools" -> "IIS 6 Management Compatibility" -> "IIS Metabase and IIS 6 configuration compatibility"
- "World Wide Web Services" -> "Application Development Features" -> "ASP.NET"
Database Setup
Next, we will install SQL Server for hosting our sample database. SQL Server 2005, 2008, or 2008 R2 will work; we could also use the free SQL Server 2008 R2 Express. Just make sure to choose "SQL Server and Windows Authentication mode" as shown below:
VS2010, VS2010 Extension, and WIF Setup
After completing the database set up, our next step is to install Microsoft Visual Studio 2010 and Microsoft Silverlight 4 Tools for Visual Studio 2010. Then, we need to add two VS2010 Extensions. The first one is called "Portable Extensible Metadata", and it is available here. The second one is "tangible T4 Editor plus modeling tools for VS2010". This one is optional, and only needed if you are interested in making some T4 template changes. We can find the download here.
Next, we need to install Windows Identity Foundation Runtime and Windows Identity Foundation SDK. Please be aware that they are two separate downloads, and for each download, there are different packages targeting different development environments. The Windows Identity Foundation Runtime is available here, and the Windows Identity Foundation SDK can be downloaded from here.
Additional IIS 7 Setup
After setting up VS2010, we have some additional IIS 7 setup steps, and they are as follows:
First, start a Command Prompt with "Run as administrator". We register the ASP.NET 4.0 runtime to IIS as follows:
We are assuming that we use the command above only on our own development machines. It is essentially setting ASP.NET 4.0 runtime to the whole IIS web site, and this may have unintended consequences of impacting other web applications if done in a production environment.
After the above step is done, there is one more thing we need to verify in IIS 7. Please start IIS Manager, go to "Application Pools", then "DefaultAppPool", and choose "Advanced Settings...". After the "Advanced Settings" window opens, make sure that the setting for "Load User Profile" is set to True.
Certificates and Database Scripts Setup
The last part of this setup is installing certificates and the sample database, where setting up certificates manually could be one of the most difficult steps so far. Fortunately, we have scripts to automate the whole process.
Open a Command Prompt with "Run as administrator", and go to the "Certificate Scripts" folder of the downloaded source code. The script "SetupCertificates.cmd" would install all the necessary certificates required by our sample application, and "CleanupCertificates.cmd" would remove them all if you are getting sick of this sample. Everything inside the folder "Certificate Scripts" comes from the Identity Developer Training Kit without any modification, and certainly I do not take credit for any of them. Also, you can verify whether these certificates are set up correctly or not by viewing them in the MMC snap-in as shown below:
To verify whether the SSL certificate is set to "localhost" for IIS, we need to launch IIS Manager, go to "SSL Settings", and select "Bindings...".
Setting up certificates manually and granting the necessary permissions so that IIS 7 can access them is out-of-the-scope for this article. But, if you are really curious, you certainly can open the file "SetupCertificates.cmd" and take a peek.
To install the sample database, please run SqlServer_IssueVision_Schema.sql and SqlServer_IssueVision_InitialDataLoad.sql included in the "Database" folder of the downloaded source code. SqlServer_IssueVision_Schema.sql creates the database schema and database user IVUser; SqlServer_IssueVision_InitialDataLoad.sql loads all the data needed to run this application, including the initial application user ID user1 and Admin user ID admin1, with passwords all set as P@ssword1234.
Building and Running the Sample
After all these steps of setup, we are finally ready to start building and running this sample application. When launching VS2010, make sure to start with "Run as administrator" because two of the projects use the local IIS server. As the solution is loading for the first time, we will see the following two screens, and please select Yes to both of them. This creates two virtual directories in our local IIS server.
Also, if we choose to test this sample through the two installation packages instead of running inside VS2010, please be aware that these two options both use the same virtual directories of our local IIS server, and they can cause a conflict. Therefore, if we have already installed the two install packages and we want to switch to running the sample inside VS2010, make sure to uninstall the two packages first, remove the two virtual directories inside IIS, and restart IIS.
Architecture
Before we conclude this article, let's briefly go over how this solution is structured.
To build this whole solution from scratch, we first would add a new "Silverlight Application" to a Blank Solution. This creates two projects: one named "IssueVision.ST.Web" and another named "IssueVision.ST". Just for my personal preference, I renamed project "IssueVision.ST" to "IssueVision.Client", with the same changes to "Assembly name" and "Default namespace" from the Properties window.
All other projects in the "Client" folder are added as "Silverlight Class Library" projects, which include "IssueVision.Common", "IssueVision.Data", "IssueVision.Model", "IssueVision.ViewModel", and "IssueVision.WCFService".
The other two projects inside the "Server" folder are created as follows: project "IssueVision.Data.Web" is a "Class Library" project, and project "IssueVision.ST_Sts" starts as an "ASP.NET Empty Web Application" and models after one of the samples from the Identity Developer Training Kit.
Project IssueVision.Data.Web
Next, let us take a closer look at how the project "IssueVision.Data.Web" is structured.
The folder "EntityModel" hosts the ADO.NET Entity Data Model EDM file along with two T4 template files which are part of the enhanced ADO.NET Self-Tracking Entity Generator. And, the folder "Validation" includes all custom validation logic defined on entity classes.
To create a new project similar to "IssueVision.Data.Web", we need to first add an ADO.NET Entity Data Model item, and switch its "Code Generation Strategy" to "None".
After that, add the two T4 template files into this new project, rename them to anything of your choice, set the "inputFile" value to where the new EDM file is located, and set "namespaceName" to a new namespace of your choice. After that, all we have to do is right-click on the T4 template file and select "Run Custom Tool". This will generate all the entity classes based on the new EDM file.
Project IssueVision.Data
Project "IssueVision.Data" hosts all the server-side auto-generated entity classes as well as client-side only partial classes of any entity defined in the EDM file. The project is created as a "Silverlight Class Library" because we cannot add a reference to any "Class Library" project from Silverlight Application/Library projects. Our option is to share source code instead of DLLs.
Just like project "IssueVision.Data.Web", project "IssueVision.Data" also has folders "EntityModel" and "Validation".
The folder "EntityModel" hosts a link to the file "IssueVisionModel.tt" inside the project "IssueVision.Data.Web", and the folder "Validation" has links to all the files under the same "Validation" folder of the project "IssueVision.Data.Web". We can easily add a link as the following picture illustrates:
The third folder "ClientExtension" contains all the client-side only logic of our entity classes. One of them is a T4 template file "IssueVisionClientModel.tt", which is the client-side component of the enhanced ADO.NET Self-Tracking Entity Generator. When you work on your own projects, make sure to set the "inputFile" and "namespaceName" values of this T4 template, as well as click "Run Custom Tool" so that client-side entity classes would be generated.
Next Steps
In this article, we visited all the necessary steps for getting the environment setup, building and running this sample, as well as a brief overview of the solution architecture. In part 2, we will move on to discuss the topics of how to implement change tracking with AcceptChanges, RejectChanges, and HasChanges using self-tracking entities.
I hope you find this article useful, and please rate and/or leave feedback below. Thank you!
History
- January, 2011 - Initial release.
- March, 2011 - Update to fix multiple bugs including memory leak issues.
Weidong has been an information system professional since 1990. He has a Master's degree in Computer Science, and is currently a MCSD .NET


 General
  News
News  Suggestion
  Question
  Bug
Bug  Answer
  Joke
Joke  Praise
  Rant
Rant  Admin
Admin 


