Introduction
- Part 1 (Distributed Application Layers with project details): Learn about what layered design in distributed environment is and how we are going to name it while implementing the actual app
- Part 2 (Database and Library Design): Learn about database design and implementing library which interacts with Edmx container
- Part 3 (Engine and Service Managers design): Learn how to implement the engine which has core business logic and implementing the actual WCF service with service contracts. And also how to test the service using test client [this article]
- Part 4 (Client implementation): Learn how to implement the actual client with MVVM pattern which invokes services
This is the third article in a canonic series about the Enterprise Application Architecture design. In the previous articles, we discussed about what is distributed application layers, how to design database and library for interacting with database. So in this article, I am going to describe about engine and service managers implementation. Project names in the attached solution will remain the same as mentioned at the right side of architecture diagram explained in part 1.
Business Logic (Engine)
It’s supposed to be the layer containing an application’s business logic and is inserted between a database layer and a presentation layer. Maintainability of your code is always a big concern when determining where business logic should go. Obviously, we can write our business logic in the database layer itself. But we should not. Here is the reason why we should not.
- Framing the business logic in the database layer tightly couples it to the technical implementation of the database. Changing a table will cause you to change a lot of the stored procedures again causing a lot of additional bugs and testing.
- Typically the UI depends on business logic for things like validation. Putting these things in the database will cause tight coupling between the database and the UI or in different cases duplicates the validation logic between those two.
- It will get hard to have multiple applications work on the same database. As we discussed, any client can access our service and database. Changes for one application will cause others to break. This can quickly turn into a maintenance nightmare. So it doesn't really scale.
- If you are fairly sure that your clients will never ever change their database back-end, you can put business logic in database layer. Otherwise don't.
- Does your company maintain different teams like developers for application layer and DBA-types? Then go ahead with business layer.
- Do you have any plan to keep the minimal resource for project maintenance in future? Then go ahead with business layer.
- You can't sell your software to companies with their own preference for a database backend.
- Apart from this consider performance, integrity, and the ability to allow multiple applications to use the same API.
- Difficult to debug the application.
- Difficult to understand the project flow.
- Difficult to write Unit Tests.
Similarly, we can say lot of reasons. You can even just Google it about why business logic, you will get tons of reasons shared by architects based on their experience. However I didn’t say that you can't use stored procedures and views for business logic. But my opinion is, it is a good idea to put an extra layer for writing business logic between the tables and application to decouple the two. This way, you can change the database without changing external interface allowing you to refractor the database independently. Last but not least, everything is in the architect's hand. He has to choose right arch to help their developers to drive the project smoothly without any overhead. Let’s start implementing our engine which contains business logic.
Business Logic Implementation (Engine)
As we discussed in the architecture diagram which was explained in part 1, in this post we are going to discuss and implement the third level (Business Layer) from the bottom. See the image given below:
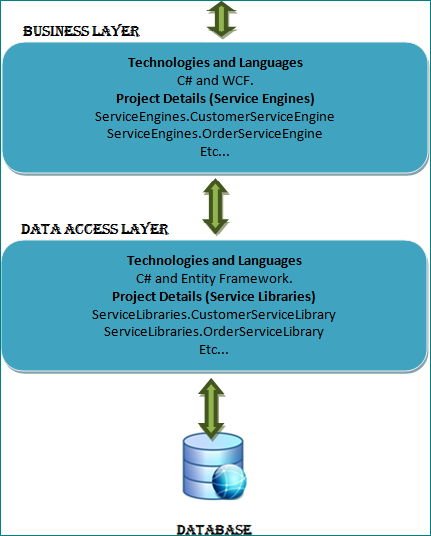
(Figure 1: Business Layer Implementation)
Before we start discussing about implementation, let me ask a question. What kind of codes will be considered as business logic in an application? Virtually every single line in the application is considered as business logic only:). However, we should decide what are the main possible areas that will be refactored in future based on future requirements. Take those parts and put it into the engine.
Eventually, one more thing needs to be considered while implementing business logic. As we discussed in previous parts, Engine directly interacts with Library and Manager interacts with Engine to provide data to the client. Since client doesn’t have an idea about EntityObject, Engine needs to return common raw business object instead of EntityObject. So let’s implement common business object and converter for customer service.
Common Converter and Business Object Implementations
We need an interface for converter implementation which should contain a method in generic declaration. Yes, this is possible with the help of where clause in C#. It is used to specify constraints on the types that can be used as arguments for a type parameter defined in a generic declaration. Here is the interface which will be inherited in actual converter class later.
public interface IObjectConverter
{
TTarget Convert<tsource,>(TSource source, TTarget target)
where TSource : class
where TTarget : class;
}
Here is the actual converter code for converting CustomerEntityObject into Customer object.
public class CustomerEntityToCustomerDataConverter : IObjectConverter
{
#region IObjectConverter Members
public TTarget Convert<tsource,>(TSource source, TTarget target)
where TSource : class
where TTarget : class
{
var src = source as CustomerEntityObject;
var tgt = target as Customer;
if (src == null)
{
throw new Exception("Source should not be null");
}
var custData = new Customer();
custData.Address1 = src.Address1;
custData.Address2 = src.Address2;
custData.City = src.City;
custData.Country = src.Country;
custData.CustomerID = src.CustomerID;
custData.Email = src.Email;
custData.FirstName = src.FirstName;
custData.Image = src.Image;
custData.LastName = src.LastName;
custData.Phone = src.Phone;
custData.State = src.State;
return custData as TTarget;
}
#endregion
}
Here, Customer is the Data Contract class which contains data members in common project to use in both the Engine and Manager.
[DataContract]
    public  class Customer
    {
        [DataMember]
        public Int32 CustomerID
        {
            get
            {
                return _CustomerID;
            }
            set
            {
                  _CustomerID = value;
            }
        }

         private global::System.Int32 _CustomerID;

        [DataMember]
        public String FirstName
        {
            get
            {
                return _FirstName;
            }
            set
            {
                _FirstName = value;
            }
        }
        private global::System.String _FirstName;

        [DataMember]
        public global::System.String LastName
        {
            get
            {
                return _LastName;
            }
            set
            {
                _LastName = value;
            }
        }
        private global::System.String _LastName;

      [DataMember]
        public global::System.Byte[] Image
        {
            get
            {
                return  _Image;
            }
            set
            {
                _Image = value;
            }
        }
        private global::System.Byte[] _Image;


        [DataMember]
        public global::System.String Address1
        {
            get
            {
                return _Address1;
            }
            set
            {
                _Address1 = value;
            }
        }
        private global::System.String _Address1;

        [DataMember]
        public global::System.String Address2
        {
            get
            {
                return _Address2;
            }
            set
            {
                _Address2 = value;
            }
        }
        private global::System.String _Address2;

        [DataMember]
        public global::System.String City
        {
            get
            {
                return _City;
            }
            set
            {
                _City = value;
            }
        }
        private global::System.String _City;


     [DataMember]
        public global::System.String State
        {
            get
            {
                return _State;
            }
            set
            {
                _State = value;
            }
        }
        private global::System.String _State;

        [DataMember]
        public global::System.String Country
        {
            get
            {
                return _Country;
            }
            set
            {
                _Country = value;
            }
        }
        private global::System.String _Country;


        [DataMember]
        public global::System.String Phone
        {
            get
            {
                return _Phone;
            }
            set
            {
                _Phone = value;
            }
        }
        private global::System.String _Phone;

        [DataMember]
        public global::System.String Email
        {
            get
            {
                return _Email;
            }
            set
            {
                _Email = value;
            }
        }
        private global::System.String _Email;
    }
Here are the project details in solution tree.

(Figure 2: Common Projects in Solution Tree)
Similarly we can implement other converters and business objects for Order, OrderDetail and Product EntityObjects later on demand. Now we can continue with Engine implementations.
Customer Service Engine
Let’s start implementing actual service engine which contains business logic. Declare the ICustomerServiceEngine interface for interacting with Engine by the Manager. This interface contains two methods declaration. One is for getting complete customer list and another one is for getting only specific customer details using customer id.
public interface ICustomerServiceEngine
    {
        List<customer> GetCustomers();
        Customer GetCustomer(int customerID);
    }
Implement CustomerServiceEngine with required properties and methods. Before implementing the actual interface methods, we need library instance in engine class to get the entity object context.
public class CustomerServiceEngine : ICustomerServiceEngine
    {
        #region ICustomerService Members

        CustomerServiceLibrary customerServiceLibrary;

        public CustomerServiceLibrary CustomerServiceLibrary
        {
            get
            {
                if (customerServiceLibrary == null)
                {
                    customerServiceLibrary = new CustomerServiceLibrary();
                }
                return customerServiceLibrary;
            }
        }
CustomerServiceLibrary has the method GetEntitiesObjectContext which returns actual Entity Object Context. Here is the code which is in customer service library class that we already discussed in Part II.
 public class CustomerServiceLibrary : ICustomerServiceLibrary
    {
        Customer_DatabasesEntities context = null;

        public CustomerServiceLibrary()
        {
            context = new Customer_DatabasesEntities();
        }


public Customer_DatabasesEntities GetEntitiesObjectContext()
        {
            return context;
        }
...
}
In class CustomerServiceEngine, method GetCustomers returns all the customer details from database using entity object context.
public List<customer> GetCustomers()
        {
            List<customer> customerList = new List<customer>();
            CustomerEntityToCustomerDataConverter convertEntityToData =
				new CustomerEntityToCustomerDataConverter();
            Customer convertedItem = null;
            foreach (CustomerEntityObject custData in CustomerServiceLibrary.GetCustomers
		(CustomerServiceLibrary.GetEntitiesObjectContext()))
            {
                convertedItem = convertEntityToData.Convert
				<customerentityobject,>(custData, null);
                customerList.Add(convertedItem);
            }

            return customerList;
        }
Here, you could see that we are returning customer list with raw business object called Customer. This method gets customer details using libraries.GetCustomers method and converts every entity object into business object using converter that we have implemented in common project.
Next start with GetCustomer method implementation which return single customer details based on customer id.
public Customer GetCustomer(int customerID)
        {
            var FilteredCustList = from customer in GetCustomers()
                                   where customer.CustomerID == customerID
                                   select customer;
            return FilteredCustList.FirstOrDefault();
        }
That’s it. We are done with CustomerServiceEngine implementation. Finally Customer Service Engine project looks as mentioned below in solution and is ready to ship.
(Figure 3: CustomerServiceEngine Project in Solution)
Let’s start with ServiceManager implementation in WCF which helps to provide service APIs for clients.
Service Manager Implementation (Manager)
Since we are going to implement our Manager through WCF technology, you may ask why we should go ahead with WCF. Because, services built on the Windows Communication Foundation (WCF) platform provide a lot of flexibility to the developer. The premise of WCF is that a developer can build a service once and then deploy it as different endpoints simply by changing the configuration files. In substance, WCF is all about how you configure your services, but manipulating a configuration file involves a lot of details that developers can easily overlook. Whenever developers in large teams change configuration files, for example, unexpected errors surface. The teams get better as they learn the patterns in the configuration files.
If you are a beginner and don't have basic idea about WCF, please refer to this article.
The first step is to create the Windows Communication Foundation service contract. This is basically an interface that is marked up to show that it is a service contract. Before starting on actual service implementation, let’s start on how to create WCF project and config file in detail.
As an initial step, create a new project as WCF Service Library type and name it as ServiceManagers.CustomerServiceManager. Once project has been created, rename IService.cs to ICustomerServiceManager.cs and Service1.cs to CustomerServiceManager.cs. And delete all the existing code from there.
(Figure 4: WCF Library Project Template )
Add Common.DataContracts and ServiceEngines.CustomerServiceEngine projects as project reference. Now open ICustomerServiceManager.cs file for declaring required service contracts and add the below mentioned service contracts code in it.
namespace ServiceManagers
{
    [ServiceContract]
    public interface ICustomerServiceManager
    {
        [OperationContract]
        List<customer> GetCustomers();

        [OperationContract]
        Customer GetCustomer(int customerID);
    }
}
Next, implement the service.
using System;
using System.Collections.Generic;
using System.Linq;
using System.Runtime.Serialization;
using System.ServiceModel;
using System.Text;
using ServiceEngines;
using System.Collections.ObjectModel;

namespace ServiceManagers
{
    public class CustomerServiceManager : ICustomerServiceManager
    {
        public CustomerServiceManager()
        {
        }

        ICustomerServiceEngine customerServiceEngine = null;

        public ICustomerServiceEngine CustomerServiceEngine
        {
            get
            {
                if (customerServiceEngine == null)
                {
                    customerServiceEngine = new CustomerServiceEngine();
                }
                return customerServiceEngine;
            }
        }

        #region ICustomerServiceManager Members

        public List<common.datacontracts.customer> GetCustomers()
        {
            return CustomerServiceEngine.GetCustomers();
        }

        public Common.DataContracts.Customer GetCustomer(int customerID)
        {
            return CustomerServiceEngine.GetCustomer(customerID);
        }

        #endregion
    }
}
In the above code, just call the customer service engine methods based on service manager contracts. For instance, GetCustomers contracts call customer service engine GetCustomers() method which returns actual data based on business logic. At this level, we are done with service contracts implementations.
Let's open and start at the very top of the config file. Open app.config file and you could see service section to the <services /> node in the config file. The service requires an element called name, which has to be the fully qualified class name of the class that implements the interface.
<services>
      <service name="ServiceManagers.CustomerServiceManager"></service>
</services>
In order to reach the service from outside, you need to specify an endpoint. This endpoint will have the following address:
<endpoint contract="ServiceManagers.ICustomerServiceManager" binding="basicHttpBinding"
address="http://localhost/ServiceManagers/CustomerServiceManager
" />
The endpoint requires minimum, an address, a binding, and a contract. The Address is where someone can call the service. Now this service is exposing a Contract called ICustomerServiceManager. This is all you need to make a service usable. All you need to do in the client is share the contract and you should be able to consume the service. Let’s deploy the service.
Getting Customer Service Manager Ready to Ship
As we know, we have created our service contracts in WCF Service Library for clear understanding. We can’t directly deploy these service libraries in IIS. So create a deployment web project for deploying all our service manager libraries and make them ready to ship.
Create a new project using ASP.NET Web Site template in VS IDE and name it as Web.ServiceManagers.
(Figure 5: ASP.NET Item Template)
Once project has been created, delete all the unwanted files if you want. For instance, delete the following files and keep the project as very simple with only web.config file and app_data folder.
(Figure 6: Unwanted Files)
Right click on web project and select Add New Item for creating .svc file for providing service to the client. You can create simple text file and name it as CustomerServiceManager.svc or you can create WCF Service through Project Item Template in Visual Studio as mentioned in the below image.
(Figure 7: Add Service Project Item Template)
If you create .svc file as WCF Service as mentioned in the above image, delete all .cs files that have been created automatically when you add this .svc because we already created all the service contracts in our service manager library project that we are going to refer via project reference.
Now open .svc file and add the tag with proper service name in Service attribute.
<%@ ServiceHost Language="C#" Debug="true"
	Service="ServiceManagers.CustomerServiceManager"  %>
Next start with web.config file configuration file in detail. Open web.config file, remove all the existing content and put the below code:
="1.0"
<configuration>
<!—Connection String should be mentioned here -->
<connectionStrings>
<add name="Customer_DatabasesEntities" connectionString="metadata="res://*/Data
Contracts.CustomerOrderManagementModel.csdl|
res://*/Data Contracts.CustomerOrderManagementModel.ssdl|res://*/Data
Contracts.CustomerOrderManagementModel.msl";provider=System.Data.SqlClient;
provider connection string='Data Source=IN09PC77-PC\SQLEXPRESS;Initial
Catalog="Customer Databases";Integrated
Security=True;MultipleActiveResultSets=True'"
providerName="System.Data.EntityClient"/>
</connectionStrings>
<system.serviceModel>
<services>
<service name="ServiceManagers.CustomerServiceManager"
behaviorConfiguration="metadataAndDebug">
<endpoint address="mex" binding="mexHttpBinding" contract="IMetadataExchange" />
<endpoint address="" binding="basicHttpBinding"
bindingConfiguration=""
contract="ServiceManagers.ICustomerServiceManager" />
<host>
<baseAddresses>
<add baseAddress="http://localhost/CustomerServiceManager/" />
</baseAddresses>
</host>
</service>
</services>
<behaviors>
<serviceBehaviors>
<behavior name="metadataAndDebug">
<serviceMetadata httpGetEnabled="true" httpGetUrl=""/>
<serviceDebug httpHelpPageEnabled="true"
includeExceptionDetailInFaults="true"/>
</behavior>
</serviceBehaviors>
</behaviors>
<serviceHostingEnvironment multipleSiteBindingsEnabled="true"/>
</system.serviceModel>
<system.web>
<compilation debug="true" targetFramework="4.0">
</compilation>
<pages controlRenderingCompatibilityVersion="3.5"
clientIDMode="AutoID"/></system.web>
</configuration>
This file contains the settings similar to app.config file which we have discussed already in service manager project except connection string information. ConnectionString element helps to connect with SQL server by information server. This can be included at top of config file for easy understanding. You can get connection string for your project from edmx project.
<connectionStrings>
        <add name="Customer_DatabasesEntities" connectionString="metadata="res://*/Data
Contracts.CustomerOrderManagementModel.csdl|res://*/Data
Contracts.CustomerOrderManagementModel.ssdl|res://*/Data
Contracts.CustomerOrderManagementModel.msl";provider=System.Data.SqlClient;
provider connection string='Data Source=IN09PC77-PC\SQLEXPRESS;
	Initial Catalog="Customer Databases";
Integrated Security=True;MultipleActiveResultSets=True'"
	providerName="System.Data.EntityClient"/>
    </connectionStrings>
The remaining endpoint and service name configuration in this file is similar to app config file that we already discussed in Service Manager Library. You can copy and paste here if you want. That’s all with architecture design. Now we have database, library which interacts with database, Engine which has business logic and Manager which exposes service contracts for clients. Now let’s start about how to deploy our service and make sure that our CustomerServiceManager service is live. There are many ways to test our service. But we will test directly via Visual Studio. Set our web project as StartUpProject in Visual Studio and run the application. You could see that Internet Explorer displays the list of files as mentioned below:
(Figure 8: Directory List in Internet Explorer)
Click on CustomerServiceManager.svc file and see Internet Explorer shows that CustomerServiceManager service is ready.
(Figure 9: Customer Service In Live)
Still you can call your service using svcutil as mentioned at the top of this page. Click that link to find out whether your service is working fine or not.
(Figure 10: Customer Service XML Content)
Let’s deploy our web project in IIS to call our service from web browser or client directly. Here are the steps to deploy our service in IIS.
Step 1
Build the solution and make sure that all are compiling without any issue.
Step 2
Copy the physical path of web project. Just explore the project and copy the physical location. Here is the web project physical location in my machine - C:\Mine\Samples\Enterprise Sample\Code Project\CustomerOrderManagementSystem\Web.ServiceManagers.
Step 3
Open IIS Manager by typing inetmgr in run dialog box in Windows.
Step 4
Explore the sites and go to Default Web Site. Right click here and select Add Application.
Step 5
Type Alias Name as CustomerOrderManagementSystem and select ASP.NET v4.0 in application pool by clicking Select Button.
(Figure 11: Application Pool Settings)
Paste your physical path and click ok to save the settings. That’s it! We have deployed our service web project and our service is ready to ship.
(Figure 12: CustomerServiceManager in IIS)
Now you can access the customer service manager using the following URL in your local machine.
Finally, we have completed server side implementations and will look at client implementation in the next part. In the next part, will discuss about other service implementations in our COMS and MVVM approach while designing Silverlight client. However, I have attached a simple test client for running the demo application. Just download the source and run to display data from database if you have. You can refer to part II or another article which describes about database build for more idea about how to build database.
To be open, still I have more information to explain in detail in this post. But this post already has heavy content. If I put all the information in this post itself, then you will feel that the article is too long and need more time to read :). So I focused on only what I am trying to convey in this series for my readers. Apparently, we can get more details about specific area from other articles on the internet.
Note
If you have any issue while running the demo application, please refer to this post in tips/tricks to resolve the issue. Please let me know if you are still having any issue. I will try to provide the solution ASAP.
Hope you might have got an idea about how to design layered architecture and what is the use of it. If you have any questions, please post your comments please. Obviously, don’t forget to vote please :).
History
- 15th November, 2010: Initial post
Venugopal works as a Senior Software Engineer in Logitech Engineering & Design (India) Pvt. Ltd. He hold a Masters in Computer Applications and has 4+ years experience in C#, XAML, Silverlight & WPF.
Venugopal firmly believes "technology is impermanent, change is not"!. While he has strong technical inclination towards MS technologies, he is deeply passionate about pursuing his career in Windows7-WPF and Silverlight Technology.
Venu engages in a wide gamut of temperamental hobbies ranging from making friends, traveling, helping his friends studies. To murmuring songs and watching movies in leisure time.


 General
  News
News  Suggestion
  Question
  Bug
Bug  Answer
  Joke
Joke  Praise
  Rant
Rant  Admin
Admin 


 Looking forward for the next part.