Introduction
This rare dissertation is committed to demonstrate cracking and byte patching of a binary executable using IDA Pro with the intention of subverting various security constraints, as well as generating or producing the latest modified version (patched) of that particular binary. IDA Pro is typically utilized to analyze the disassembled code of a binary so that internal mechanism could be comprehended and identify the inherent vulnerability in the source code.
This article comprises the following contents:
- Binary Sample
- Patching Configuration in IDA Pro
- Binary Analysis
- Binary Cracking & Patching with IDA Pro
- Script Patching Substitute
- Final Note
IDA Pro appears to have managed mystical potentials in the reverse engineer minds by having the impression that merely opening a binary with IDA will reveal all the secrets of a target file. IDA Pro is intended to assist you in considering the behavior of a binary by offering us disassembled code. IDA Pro is in fact, not designed to modify or patch the binary code to suit your needs like other tools such as OllyDbg and CFF Explorer. It is really only a static-analysis disassembler tool. It can only facilitate your attempts to locate software vulnerabilities, bugs and loopholes which are typically, utilized by both white hat and black hat professionals. Ultimately, it is up to your skills and how you apply them as to whether IDA makes your search for vulnerabilities easier.
Essential
This tutorial requires thorough knowledge of Assembly Programming and Hex Code manipulation because patching binary with IDA Pro especially deals with assembly opcode instructions. Besides that, the reverse engineer is supposed to operate the IDA Pro Software IDE features perfectly. This operation lists the following tools of trades as:
- The Target Binary (C/C++ code)
- IDA Pro Interactive Dissembler
- IDA-Script File (*.idc files)
- Assembly Language skills
- ASCII Converter
Binary Sample
This article exposes the demonstration of byte patching over a typical C++ binary which essentially required user password to validate his identity and let him log into the system and such confidential information is only provided to the registered person indeed. There is, of course, no direct method to breach into this application without being authenticated except reverse engineer or patch the critical bytes which are responsible for performing validation. The following code will make the binary executable live as binaryCrack.exe as:
#include "stdafx.h"
#include <stdio.h>
#include <stdlib.h>
#include <string.h>
#include <conio.h>

#define password "ajay"

int _tmain(int argc, _TCHAR* argv[])
{
  char pwd[100];
  printf("Please enter the password::\n\n");
  scanf("%s", pwd);
  if ( strcmp(pwd, password) == 0 )
  {
      printf("Congratulation!!\n\n");
      printf("Ready to login with: %s",password);
  }
  else
  {
      printf("Wrong password");
  }
  getch();
  return 0;
}
We can use any compiler to execute the aforementioned binary source code which makes an executable as binaryCrack.exe and when we run that file, it will prompt to enter the password. If we enter the correct password as “ajay”, then it shows the congratulations message, otherwise issue Wrong Password message as follows:
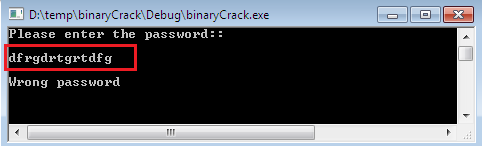
It is probable that we might not be aware of the real password and in such circumstances; we can’t proceed without this information. So the only option left is Reverse Engineering this binary and manipulates the sensitive bytes to suit your needs as we shall see in the next sections.
Patching Configuration in IDA Pro
The patching or editing assembly code features are normally invisible in the IDA Pro. You can double check it from the Edit menu that none of the Patch program options appeared. Thus, in order to make this option visible, open the idagui.cfg configuration file of IDA Pro which is located at Drive: \Program Files\IDA PRO Advanced Edition\cfg folder and scroll down to find the DISPLAY_PATCH_SUBMENU option which is typically set to NO. So, make the following changes and save this file.

After saving this file, re-launch the IDA PRO and the movement you change the submenu option in the configuration file, you can notice that Patch program option becomes visible in the Edit menu as:
Now, load the target binary in to IDA Pro, it will ask to create a new database as usual, then select the PE file option as given in the following figure and the important point to remember is don’t forget to uncheck the Make imports segment option because some useful date can be lost from the database if this option is enabled as follows:
The target file will be loaded into the IDA Pro but we could still not modify the byte sequence of the binary file even if enabling the Patch program option in the Edit menu earlier. So here, the role of special IDA script files came into light as they are able to modify the byte like OllyDbg as well as writing the changes into the executable to make the effect permanent.
The IDC script files can be downloaded from this URL as http://www.openrce.org/downloads/details/57/PE_Scripts. When downloaded, extract the files in a separate folder on the file system of your machine. There are couple of scripts files provided but mainly; two script files are significant as follows:
After loading the target binary into the IDA Pro, open the folder where the aforesaid IDA script files are located and execute the pe_sections.idc file in order to extending new functionality into IDA Pro such binary patching and writing. You can ensure about new specification from the Segments (shift + F7) windows that certain new segments are automatically added.
After successful completion of such aforesaid operations, we can modify as well as write the byte sequence into binary file.
Binary Analysis
We have only the binary executable and so it is almost impossible to know about the logic implementation without the source code. But we can disassemble the source code of any binary by employing IDA Pro because unless we are aware with logic flow, how can we subvert any security mechanism. Hence, let’s analyze the proper logic flow path of the binary file.
As we can consider the following image, IDA Pro disassembles the binary into raw assembly instruction sets. This program first, prompts the user to enter the password by displaying a string message, then compares this value to a predefined value “ajay” which might be the real password. The comparison happens via string class strcmp method and if the value is 0, then the entered value is corrected otherwise incorrect.
If the value of eax register is 1, then the execution is shifted towards the loc_411444 block by jnz statement, where the “wrong password” message would be echoed in the screen as follows:
And if the value of eax is 0, then jump won’t throw the execution anywhere. The program intimates us that we have entered the correct password as follows:
We can easily anticipate that Jump instruction determines either the password is correct or incorrect. If the eax register has value 1, then execution is diverted towards the “wrong password” box flow otherwise the “congratulation” message would be displayed. As we are implying from execution flow, everything depends on jnz instruction. So, the reverse engineer would surely be interested in this instruction because manipulation of this instruction can produce different results.
Binary Cracking and Patching
As we have concluded from the analysis, the outcome of this binary application is regulated by the jnz short 1oc_411444 statements. The 1oc_411444 instruction belongs to the unmatched password displaying block and execution is directly jump to this block as you can notice in the RED arrow.
However, all we have to do is to change the corresponding jnz statement related bytes. So, right click on the current location of this statement and synchronize it with Hex Editor View in order to examine this statement byte sequence as:
The hex view offers a 16 bytes of sequence in one line and each two bytes represent only one assembly instruction set such that the hex value 75 35 belongs to .text: 0041140D address location where assembly code jnz short 10c_411444 is implemented as follows:
So we have to identify the correct bytes to specific instruction so that we can modify to suit our needs. The following figure showcasing the hex code refers to which instruction as follows:
Finally, we have concluded that hex code 35 is the key value that is directing the execution flow of the program. However, select the address location 0041140D into text view and go to Edit menu, choose Patch program and select Patch Bytes over there. It will show up the entire 16 hex bytes sequence alike to hex view as follows:
In order to diffuse the effect of jnz statement where from the execution is shifting towards the 1oc_411444 block, we have to change its corresponding hex value 35 to 00 which typically fill nothing action in the memory as follows:
The moment you change the 1oc_411444 instruction code to 00, it will also reflect in the assembly as follows:
You can also notice the modification in the hex view as follows:
One of the important change to notice, is that after making the value 00, this time no jump arrow is showing which was pointing the execution divert to 1oc_411444 like earlier.
Now open the graph view, and notice that the “congratulation” block is merged into the main code rather than being separated like earlier before the editing the hex value. The BLUE arrow finally goes to the end of statement block and “wrong password” block is isolated or disconnected from the main operation. So even if we enter the wrong password value, always the correct password block would be executed because jnz statement code is diffuse to 00 and 1oc_411444 block is disconnected as follows:
Ok, we have done the byte editing, it is time to save the effect permanently into memory, but IDA Pro is not capable to write bytes of the binary file into memory, instead it can write altered bytes into database. So for this purpose, IDA special script files are used here. Go to File and select Script file and choose pe_write.idc which make the perpetual effects in the memory as:
The moment you run the pe_write.idc file, you will notice that bytes has been written to segments successfully and lastly, IDA will prompt to re-save the binary file as follows:
Save the modified binary with the same name as binaryCrack.exe as:
Now, load the binaryCrack.exe and it will prompt to enter the password, merely enter any value and BINGO@!!!!!!! Congratulations message along with original password appearing. We have successfully bypassed or subverted the password mechanism by patching some related critical bytes using IDA Pro.
Patching String Bytes
As we can observe in the binaryCrack.exe, couple of strings messages are showing. We can access all these strings into place via String window (shift + F12) and can directly reach its assembly code merely by clicking the string.
It is not a good programming practice to show the sensitive strings likes serial keys or passwords directly. Such information should be hidden because after patching (reverse engineering) the passwords assembly code, the hacker can easily aware that the password is “ajay” as it is showing after “congratulations” message. So we can hide or rename the showing password on screen by patching its corresponding bytes.
So, double click the “ajay” in the String windows, and IDA would let us reach to its assembly code where from we can modify its visibility as:
Thereafter open the Hex view and we can observe the “ajay” byte code sequence as 61 6A 61 79 00 as follows:
Again open the, the Patch Bytes from the Patch program resides in the Edit menu and replace all these bytes with 00 as follows:
Now once again, run the pe_write.idc to make changes perpetual in the binary file and the binaryCrack.exe, enter any value as password and observe that this time real password is not showing.
Removing Segments
A question comes into mind, why should we display the string message after the “Congratulations” message when we subverted the password mechanism. We cannot allow to execute a particular assembly code by using IDA Pro. Here, we can easily figure out that the code instruction after address location 00411411 is senseless to be display as:
This time, we are not patching the bytes, instead we are integrating new assembly code so that any string message won’t display after “Congratulations” message. Hence, go Patch program and choose Assemble as follows:
Now place nop assembly instruction which stands for no operation and it decides that none of the code would be executed as follows:
After this, you can notice that nop is placed after 0041132 locations as follows:
Now, run pe_write.idc again and notice that none of the code is executing after the message as follows:
Script Patching Substitute
It is not necessary that we can only patch bytes by using IDA Script file which exports the current Ida’s database into the EXE binary executable. Rather, we can opt with another approach. First, make changes in the byte or hex code just by editing them and produce a new DIF file as test.dif. Now open the test.dif file and it show the original hex code and patched code as follows:
Later, compile this following C program by using any editor (I suggest use GCC in the linux platform) as:
#include <stdio.h>
int main(int argc, char **argv) {
char line[256];
FILE *patch = stdin;
FILE *input = NULL;
unsigned int offset;
int orig;
int newval;
int i;
for (i = 1; i < argc; i += 2) {
if (!strcmp(argv[i], "-p")) {
if ((i + 1) < argc) {
FILE *f = fopen(argv[i+1], "r");
if (f) {
patch = f;
}
else {
fprintf(stderr, "Failed to open patch file %s\n", argv[i+1]);
exit(0);
}
}
}
else if (!strcmp(argv[i], "-i")) {
if ((i + 1) < argc) {
fprintf(stderr, "Opening %s\n", argv[i+1]);
input = fopen(argv[i+1], "rb+");
if (input == NULL) {
fprintf(stderr, "Failed to open input file %s\n", argv[i+1]);
exit(0);
}
}
}
else {
fprintf(stderr, "usage:\n\t%s [-i <binary>] [-p <dif file>]\n", argv[0]);
fprintf(stderr, "\t%s [-p <dif file>]\n", argv[0]);
fprintf(stderr, "\t%s [-i <binary>] < <dif file>\n", argv[0]);
fprintf(stderr, "\t%s < <dif file>\n", argv[0]);
exit(0);
}
}
if (patch == stdin) {
fprintf(stderr, "Reading patch data from stdin.\n");
}
fgets(line, sizeof(line), patch);
fgets(line, sizeof(line), patch);
if (input == NULL) {
fprintf(stderr, "Inferring input file name from patch file data.\n");
fscanf(patch, "%256s", line);
input = fopen(line, "rb+");
if (input == NULL) {
fprintf(stderr, "Failed to open input file %s\n", line);
exit(0);
}
}
else {
fgets(line, sizeof(line), patch);
}
while (fscanf(patch, "%x: %x %x", &offset, &orig, &newval) == 3) {
fseek(input, offset, SEEK_SET);
if (fgetc(input) == orig) {
fseek(input, offset, SEEK_SET);
fputc(newval, input);
}
else {
}
}
fclose(input);
if (patch != stdin) {
fclose(patch);
}
}
After compiling this code successfully, execute the following command on DOS which requires the DIF file and new patched file name as:
ida_patcher.exe -i PatchedApp.exe -p binaryCrackPatched.dif
This approach also fulfills the same objective and produces patched binary as defined earlier in the papers.
Final Notes
So, we have learnt one of the amazing tactics of patching the binary and producing new executable file using IDA Pro, for which crackers used to struggle because as of the IDA limitation, it can only disassemble the binary code to analyze the vulnerabilities or bugs in the code. We can temporarily divert the instruction code by modifying the ZF register during debugging just by placing the breakpoint but can’t patch or modify the bytes sequence into the memory directly, to produce new binary executable because IDA Pro makes change in the database, not in the binary executable. This paper taught us how to make visible the hidden feature of Patch program in the IDA Pro IDE. We have also come across string patching and a new way to modify byte by producing DIF file which is later passed as an argument to a custom C patch code.
Ajay Yadav is an author, Cyber Security Specialist, Subject-Matter-Expert, Software Engineer, and System Programmer with more than eight years of work experience on diverse technology domains. He earned a Master and Bachelor Degree in Computer Science, along with numerous premier professional certifications from Microsoft, EC-council, and Red-hat. For several years, he has been researching on Reverse Engineering, Secure Source Coding, Advance Software Debugging, Vulnerability Assessment, System Programming and Exploit Development. He is a regular contributor to various international programming journals as well as assists developer community with writing blogs, research articles, tutorials, training material and books on sophisticated technology. His spare time activity includes tourism, movies and meditation. He can be reached at om.ajay007@gmail.com;


 General
  News
News  Suggestion
  Question
  Bug
Bug  Answer
  Joke
Joke  Praise
  Rant
Rant  Admin
Admin 


