Introduction
The Genesis Smart Client Framework was developed by Blue Marble, a South African
software development house. The framework was developed as the means of distributing
an application to a large wide-spread audience over the internet.
By providing a Dynamic Application Workspace the framework allowed the development
team to focus on developing task specific modules, while the framework dealt with
keeping client software up to date with the latest version of the modules, and provided
users access to modules they were allowed to work with.
This article is a step-by-step guide for writing a Twitter client application. It
continues where the Getting Started article left off. If you have not read this
article yet, please do so now.
In the previous article you were introduced to the steps required to get the latest
build of the Genesis Smart Client Framework running on your computer. You also learnt
how to get the Template Application configured and runnning. In this article you
will learn to enhance the Template Application to include a simple Twitter client.
This client will use an existing C# Twitter library (LinqToTwitter, see below).
Why Twitter?
I decided to use Twitter as a generic application type to demonstrate the features
of the Genesis Smart Client Framework. Using Twitter you will not be distracted
by other unrelated features and concepts. Everybody knows that you can only send
a status update to twitter, and read your twitter feed. We will ignore advanced
features such as retweeting, user profiles etc.
I have never written a Twitter client before, so this will also be a first for me
to develop using the Twitter API. Since this is my first attempt at a Twitter client,
I did some research, and decided to settle for LINQToTwitter (http://linqtotwitter.codeplex.com/)
as the preferred library to use.
Preparing the project
The LinqToTwitter library supports OpenAuth (OAuth) and we will use this as the
default authentication mechanism. This will cause Twitter to prompt the user via
an Internet browser if he/she is using the program. The user will be given a Verification
PIN which we capture from the application.
Register an account with Twitter at http://dev.twitter.com/apps/new to get your Consumer Key
and Consumer Secret. These values are used to uniquely identify your application
when transacting with Twitter. You will need to enter these values in the correct
places in the Constants file below.
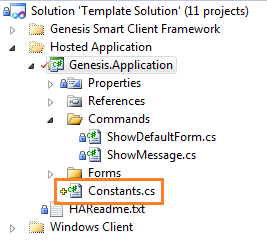
I have created a new static class called Constants in the Genesis.Application project.
This class contains some constant string values, including OAuthConsumerKey, OAuthConsumerSecret,
the Request Token URL, Access Token URL and the Authorize URL. You HAVE to update
these values with the values that you get from the registration of your application
with Twitter on the URL above.
namespace Genesis.Application
{
    public static class Constants
    {
        public const string OAuthConsumerKey = "YOURCONSUMERKEY";
        public const string OAuthConsumerSecret = "YOURCONSUMERSECRET";
        public const string OAuthRequestTokenURL = "https://api.twitter.com/oauth/request_token";
        public const string OAuthAccessTokenURL = "https://api.twitter.com/oauth/access_token";
        public const string OAuthAuthorizeURL = "https://api.twitter.com/oauth/authorize";
    }
}
Next you have to include a reference to the LinqToTwitter library in the Genesis.Application
project. You can find this file in the download of the LinqToTwitter library from
CodePlex. In order to use this library you have to change the <startup> tag
in the app.config file for the BlueMarble.Genesis.Client project to <startup
useLegacyV2RuntimeActivationPolicy="true">. I have included a Microsoft.NET
4.0 build of this library in the $/Stable/Stable Assemblies folder in the online
source control at CodePlex.

To initialize the LinqToTwitter library we need to create a GlobalDataSetFunctionsInitializer
implementation in the Genesis.Application project. The GlobalDataSetFunctionsInitializer
is used by Genesis Hosted Applications that require initialization code to be executed
during the startup of the application. The Client Application will identify any
classes that implement the Genesis.Common.Interfaces.IGlobalDataSetFunctionsInitializer
interface and automatically execute them before displaying the main form. In the
GlobalDataSetFunctionsInitializer we will create a new ITwitterAuthorization and
set the ConsumerKey and ConsumerSecret using the string constant values that we
created.
public void Initialize(Common.Classes.GlobalDataSetFunctions GlobalDataSetFunctions)
{
    Globals.auth = new DesktopOAuthAuthorization();

    (Globals.auth as DesktopOAuthAuthorization).ConsumerKey = Genesis.Application.Constants.OAuthConsumerKey;
    (Globals.auth as DesktopOAuthAuthorization).ConsumerSecret = Genesis.Application.Constants.OAuthConsumerSecret;

    Globals.auth.UseCompression = false;
    Globals.auth.UserAgent = "Genesis Template Application";
}

private string VerifierString()
{
    return Genesis.Application.Forms.Verifier.GetVerificationPin();
}
I have also created a Globals.cs class to contain the ITwitterAuthorization in a
static class. This class will ensure that the LinqToTwitterWrapper is in shared
memory. Not all applications will use global static classes, however I believe that
dealing with the Twitter API it would be best to keep performance and resources
in mind. I have also created a LinqToTwitterWrapper.cs which exposes static methods
to deal with the Globals class. The wrapper acts as the Controller in a typical
Model-View-Controller configuration.
public static class Globals
{
    public static ITwitterAuthorization auth;
}
public static class LinqToTwitterWrapper
    {
        public static TwitterContext twitterCtx = new TwitterContext(Globals.auth, "https://api.twitter.com/1/", "http://search.twitter.com/");

        public static void SignOn()
        {
            if (twitterCtx.AuthorizedClient is OAuthAuthorization)
            {
                InitializeOAuthConsumerStrings(twitterCtx);
            }

            try
            {
                Globals.auth.SignOn();
            }
            catch (OperationCanceledException)
            {
                return;
            }
        }

        private static void InitializeOAuthConsumerStrings(TwitterContext twitterCtx)
        {
            var oauth = (DesktopOAuthAuthorization)twitterCtx.AuthorizedClient;
            oauth.GetVerifier = () =>
            {
                return Genesis.Application.Forms.Verifier.GetVerificationPin();
            };

            if (oauth.CachedCredentialsAvailable)
            {
                Console.WriteLine("Skipping OAuth authorization step because that has already been done.");
            }
        }
    }
Because of how this implementation of the Twitter API using LinqToTwitter and OAuth
works, we will rely on Twitter to provide us with an OAuth authentication token.
This will happen automatically because an Internet browser will open asking the
user to log in, or to confirm that the application is allowed to access the Twitter
API using the users' credentials. The Twitter site will then provide the user with
a Verification PIN which needs to be provided to the application. The following
screen is used to capture the Verification PIN from the user, and is displayed during
the authentication process.
During the sample we will continue to add more code to the classes above. We are
now ready to move on to the next step.
Creating a User Interface
In this section we will create a form to display Tweets and the command to show
the form. The form is going to be very simple and straight forward by using a ListBox
to show the individual tweets and a textbox to allow the user to send a Tweet.
In order to make the form usable through the Genesis Smart Client Framework, we
have to change the default inherited class from Form to Genesis.Client.Common.Classes.MdiChildBase
and also to include the Genesis.Common.Interfaces.IMdiChild interface.
public partial class TweetForm : Genesis.Client.Common.Classes.MdiChildBase, Genesis.Common.Interfaces.IMdiChild
{
    public TweetForm()
    {
        InitializeComponent();
Next you have to create the Command to allow Genesis to load the form in the User
Interface. This is a class that inherits from Genesis.Common.Classes.CommandBase
and implements the Genesis.Common.Interfaces.ICommand interface. This class
has an Execute method which executes the code it contains. Genesis will ensure that
the user has the correct security rights before it allows execution of this code.
[Genesis.Common.Attributes.CommandCode("Genesis.Application.Commands.ShowTweetForm")]
[Genesis.Common.Attributes.CommandDescription("This command shows the tweet form")]
[Genesis.Common.Attributes.CommandName("Twitter Form")]
public class ShowTweetForm : Genesis.Common.Classes.CommandBase, Genesis.Common.Interfaces.ICommand
{
    #region ICommand Members

    void Genesis.Common.Interfaces.ICommand.Execute()
    {
        Genesis.Application.Forms.TweetForm tweetForm = new Genesis.Application.Forms.TweetForm();

        tweetForm.Host = base.host;

        base.host.CreateWindow(tweetForm);
    }

    #endregion
}
The code above is simple and self-descriptive, starting with the Attributes applied
to the ShowTweetForm class:
- CommandCode - The command code is a unique reference to this Command
and is used by the Genesis Smart Client Framework to identify the correct class
to execute. It is also used by the Update.aspx page in the Genesis.FileHost project
to identify new Commands and to update existing Commands. For code maintenance reasons,
it is simpler to keep the command code the same as the full namespace and classname.
It is not limited to being the same as the full namespace and classname.
- CommandDescription - The command description contains a description
of the command.
- CommandName - The command name contains an easy name for the command.
Looking at the class you will see that it only contains one method called Execute
and that it does not require any parameters. In this implementation we see three
lines of code. The first line creates a new copy of the TweetForm. The
second line sets the Host property on the form. This property is available
because of the interface that we implemented on the form. By passing the Host
to the form, we are enabling the form to integrate directly with the main form of
the BlueMarble.Genesis.Client application. The main form implements the global::Genesis.Common.Interfaces.IHost.
The third line of code accesses the Host property on the Command and instructs
the main form to create a new window by calling the CreateWindow method.
We have written all the code we need to for now, in the next step we will configure
the Genesis Smart Client Framework to identify the new Command and to set the security.
Configuring Genesis
The first step to configuring the new Command is to change the current version number
for the application and then to recompile the application. Change the AssemblyVersion
and AssemblyFileVersion attributes in the AssemblyInfo.cs file
to any other version number. The actual number is unimportant, Genesis never expects
a version to be higher/lower than the existing entries in the database. Genesis
will respond if the version number has changed in any way.
I have set my version information to:
[assembly: AssemblyVersion("1.0.1.1")]
[assembly: AssemblyFileVersion("1.0.1.1")]
Once you have done this, rebuild the project output and wait for the Update.ASPX
page to complete its execution. Once you recompile the Update.aspx page should automatically
open indicating that the project output has changed.
Once the update process has run, you will notice that Genesis has identified the
new version number as 1.0.1.1 and that it also added a reference
to the Genesis.Application.Commands.ShowTweetForm Command.
You can now run the application and sign into the Genesis Management System 2010
application.
Commands
Once you are signed into the Genesis Management System 2010, open the Genesis
Administration menu and click on the Commands menu item. This
will open the Commands screen. Look for the Genesis.Application.Commands.ShowTweetForm
command and open its editor. Scroll down to the Group Membership section
of the form and add the Registered Users and Genesis Application Users
roles to this Command.
This will enable users who are members of these roles to execute the Command. Next
open the Genesis Administration menu and click on the Item menu
item. We are going to create the menu item that will open this form. Create a new
Bar Item by clicking on the Create Bar Item icon in the top right corner
of the page.
Enter the following information into the provided fields:
- Bar Name - Tweets
- Parent Bar Item - <Root Item>
- Bar Item Type - Button Item
- Ribbon Bar - Seperator 1
- Command - Twitter Form
- Image - Select any image from the list, and enter 16
in the Size value.
- Order - 200
Files
This application is referencing the LinqToTwitter.DLL library.
Because the Genesis Client Application downloads only the files configured per application
in Genesis, we also have to add this library to the configuration to ensure that
it exists on the client when the Client Application executes your Genesis Hosted
Application. Open on the Genesis Administration menu and click on the Files
menu item.
Enter the following information into the provided fields:
- File Name - LinqToTwitter.dll
- Type - LinqToTwitter Library.
- Description - LinqToTwitter library eases the use of the Twitter
API.
- Application - My First Genesis Application.
- Order - 200.
- Path - ..\..\Genesis Smart Framework\Genesis.Client.Host\bin\debug\
- Url - http://localhost:1581/genesis.filehost/myapp/libraries/LinqToTwitter.dllx
- Version - 1.0.0.0
The LinqToTwitter.DLL library has references to some other libraries (also available
in the LinqToTwitter download and in $/Stable/Stable Assemblies in the CodePlex
online source control) and these libraries have to be included in the list
along with the LinqToTwitter.DLL. These files are:
- DotNetOpenAuth.dll
- System.Web.Mvc.dll
- log4net.dll
- Kerr.Credentials.dll
You can now sign out of the Genesis Management System 2010. Update the
version number Attributes in the Genesis.Application project and rerun your application.
You should now see entries for each of the new files on the output from the Update.ASPX
page in the Genesis.FileHost website.
I have set my version information to:
[assembly: AssemblyVersion("1.0.1.2")]
[assembly: AssemblyFileVersion("1.0.1.2")]
Once you have changed your version information you can rebuild the solution, and
the files should now be visible in the output from the Update.ASPX page.
If you followed the steps detailed in the
previous article you should have an application called My First Genesis
Application
Once you are signed into your own application you should notice a new menu item
in the My First Menu menu called Tweets. This menu is visible
because you added it to the configuration earlier, and because your user is a member
of one or more of the groups that were added to the Genesis.Application.Commands.ShowTweetForm
Command.
Click on this menu to open the Tweet Form. The image below is slightly
cropped, to the right of the image there is simply a 'Tweet!' button and then the
end of the form. This form was added to the main form because the main form implements
the IHost interface. This interface allows the Commands, and child windows
to communicate with the main form to instruct it to open/close forms, update the
status bar text, create/remove menu's and menu items.
We can now focus on adding functionality to the form since we have done everything
that the Genesis Smart Client Framework requires. REMEMBER: Each
time we want to debug and test new features or fixes we simply have to change the
AssemblyVersion and AssemblyFileVersion attributes.
Making it Tweet
In this section we will link up the Tweet Form to the Twitter API via LinqToTwitter.
You will write a Linq query to select all of the users' Tweets from his/her followers
or themselves. You will also allow the user to update his/her status by sending
a Tweet.
The first step was to add a method to the LinqToTwitterWrapper class to expose the
Twitter public feed to our application. This method selects all of the tweets whose
type is either a Public tweet, or a tweet from Friends. It also sorts the tweets
so that the newest always appears first in the list.
public static LinqToTwitter.TwitterQueryable<LinqToTwitter.Status> GetPublicTweets()
{
    var tweets =
        from tweet in twitterCtx.Status
        where tweet.Type == (Globals.auth.CachedCredentialsAvailable ? StatusType.Friends : StatusType.Public)
        orderby tweet.CreatedAt ascending
        select tweet;

    return (LinqToTwitter.TwitterQueryable<LinqToTwitter.Status>)tweets;
}
The we are going to link up our Tweet Form to process this feed and to display the
results in the List Box. Add a Timer control to the Tweet Form and set the Interval
to 60000 (one minute). Next make sure that your code behind looks like this:
public partial class TweetForm : Genesis.Client.Common.Classes.MdiChildBase, Genesis.Common.Interfaces.IMdiChild
{
    public TweetForm()
    {
        InitializeComponent();

        LinqToTwitterWrapper.SignOn();
    }

    private void tweemer_Tick(object sender, EventArgs e)
    {
        tweemer.Enabled = false;

        LinqToTwitter.TwitterQueryable <linqtotwitter.status> statusTweets = LinqToTwitterWrapper.GetPublicTweets();

        foreach (LinqToTwitter.Status status in statusTweets)
        {
            string tweet = string.Empty;

            tweet = string.Format("{0} said {1} - {2} ago",
                status.User.Name,
                status.Text,
                GetTweetTime(status));

            if (!tweets.Items.Contains(tweet))
                tweets.Items.Insert(0, tweet);
        }

        tweemer.Enabled = true;
    }

    private static string GetTweetTime(LinqToTwitter.Status status)
    {
        TimeSpan tweetTime = new TimeSpan(DateTime.Now.Ticks - status.CreatedAt.Ticks);

        string returnValue = string.Empty;

        if (tweetTime.TotalSeconds < 60)
        {
            returnValue = string.Format("{0} seconds ago",
                tweetTime.TotalSeconds);
        }
        else if (tweetTime.TotalMinutes < 60)
        {
            returnValue = string.Format("{0} minutes ago",
                tweetTime.TotalMinutes);
        }
        else if (tweetTime.TotalHours < 24)
        {
            returnValue = string.Format("{0} hours ago",
                tweetTime.TotalHours);
        }
        else
        {
            returnValue = string.Format("{0} days ago",
                tweetTime.TotalDays);
        }

        return returnValue;
    }
}
You are now ready to run the application and access your tweets. Update the version
number Attributes in the Genesis.Application project and rerun your application.
You should now see entries for each of the new files on the output from the Update.ASPX
page in the Genesis.FileHost website.
I have set my version information to:
[assembly: AssemblyVersion("1.0.1.3")]
[assembly: AssemblyFileVersion("1.0.1.3")]
Tweeting
Run the application and log into My First Genesis Application. Open the
My First Menu menu and click on the Tweets menu item. The first
time that you do this, your Internet browser should open automatically to confirm
if this application is allowed to access your tweets.
Click Allow to get the Verification PIN. You will need to copy
this PIN so that you can provide it to the Twitter client for authentication.
Enter the Verification PIN into the space provided on the Verification PIN form
in the application. This PIN will be provided to the OAuth provider and only has
to be done once. The authentication token is cached until such a time as the user
reboots his/her computer, or if the user is inactive for a sufficient amount of
time.
Your tweets should now be visible in the list box as below. The format of the output
in the listbox is "{USER} said {TWEET} -
{TIMESTAMP}". In the image below you will notice some highlighted
areas indicating the USER, TWEET and TIMESTAMP fields.
The next step will be to allow the user to send their Tweets. To do this, add the
following code to the tweetton (thats the name of the 'Tweet!' button):
 LinqToTwitterWrapper.UpdateStatus(tweetBox.Text);
tweetBox.Text = string.Empty;

tweemer_Tick(sender, e);
This code will use the LinqToTwitterWrapper to execute the UpdateStatus method,
then it will clear the tweetBox (thats the name of the status textbox)
and execute the tweemer_Tick event (tweemer is the name of the
Twitter timer)
Add the following code to the LinqToTwitterWrapper:
public static void UpdateStatus(string Tweet)
{
    twitterCtx.UpdateStatus(Tweet);
}
This code will execute the UpdateStatus method on the TwitterContext static field.
The Tweet is passed in as a parameter.
Update the version number Attributes in the Genesis.Application project and rerun
your application. You should now see entries for each of the new files on the output
from the Update.ASPX page in the Genesis.FileHost website.
I have set my version information to:
[assembly: AssemblyVersion("1.0.1.4")]
[assembly: AssemblyFileVersion("1.0.1.4")]
As soon as you have been authenticated open the My First Menu menu and
click on the Tweets menu item. Enter some text into the TweetBox and click
the 'Tweet!' button.
You should see your tweet appear in the listbox below. See the highlighted regions
of the image.
And finally if you sign directly into your Twitter page or any other Twitter client
you will see your posts appear there as well.
Thats it, you have successfully written a Twitter client on the Genesis Smart Client
Framework. Each time you update your application, your users will automatically
get those same updates.
Other information
Blue Marble is proud to be a Microsoft BizSpark startup company.
This member has not yet provided a Biography. Assume it's interesting and varied, and probably something to do with programming.


