The article explains how to set up a system using Home Assistant, CodeProject.AI Server, Agent DVR, and a Wyze Cam v3 to detect when a person is in the camera's frame, start recording, and send a snapshot with an alert to a phone.
For as long as I've been messing with Home Assistant, I've wanted to get AI detection alerts on my phone. Once I found out that Home Assistant had a mobile app that was easy to download and set up, I immediately envisioned a practical use case scenario. Yes, I've used CodeProject.AI Server to detect a dog, but I'm not concerned about a dog breaking into my home. So here, I do something far more pragmatic. In this article, I use CodeProject.AI Server, Agent DVR, and Home Assistant Container to detect when a person is in the camera's frame, start recording, then take a snapshot that gets sent to my phone with an alert.
My Setup
This article assumes that you are using Windows (10), have Docker Desktop installed, CodeProject.AI Server installed, and a Wyze Cam v3 set up with the RTSP firmware. You can definitely use other cameras for this, I'm simply using a Wyze Cam in this article. Here's a rundown:
Setting Up Home Assistant Container
The first thing we need to do is create a configuration folder for Home Assistant. We're setting up Home Assistant in Docker, but we need a Home Assistant configuration folder that can be accessed and modified.

The configuration folder will be on whatever drive you run the Docker pull on, which in my case, is the C:\ drive. So open Windows Explorer, go to the C:\ drive, right-click in the folder area, and go to New -> Folder. Input the folder name you want, I'm calling mine "haconfig".
Now go to the Start button for Windows and type "CMD" and open Command Prompt. Then type:
docker run -d --name homeassistant --privileged --restart=unless-stopped
-e TZ=America/Edmonton -v c:\haconfig:/config
-p 8123:8123 homeassistant/home-assistant:latest
where --name homeassistant is the name of your container, TZ=America/Edmonton is the time zone for Home Assistant (just enter your own time zone here), and -v c:\haconfig:/config is the path of the config folder (if you created a folder in C:\Users\Joseph\haconfig, this would be -v C:\Users\Joseph\haconfig:/config).
All right, let's log into Home Assistant. In the browser, put http://localhost:8123. Input your Name (which automatically starts entering that as your Username in lower case), then choose a password. Make sure you write this password down somewhere, you're going to need it a lot. Hit Create Account.
Next input more specific details for Home Assistant. You can give Home Assistant a name (I'm very creative and call mine "Home"), then select a Country, Language, Time Zone, and Currency. Hit Next.
Then is a screen about sharing data. I'm not interested in sharing, so I click Next.
This next page is where all your IoT devices would show up if have them. Nothing shows up for me. Click Finish.
Setting Up Agent DVR with CodeProject.AI Server and a Wyze Cam
Agent DVR is surveillance software that is a helpful go-between between CodeProject.AI Server, a Wyze Cam, and Home Assistant. For example, in order to get a Wyze Cam working in Home Assistant, you have to set up an integration in Home Assistant, and run another container (docker-wyze-bridge) in Docker. If you're interested in that, I have a guide on how to set up docker-wyze-bridge here. For now, Agent DVR not only saves some steps for using a Wyze Cam with Home Assistant, Agent DVR also offers the ability to set up triggers using detections from CodeProject.AI Server.
In another article, I demonstrate How to Setup Agent DVR and CodeProject.AI Server, but there is a new version of Agent DVR that has better integration with CodeProject.AI Server, so here's an updated setup of Agent DVR and CodeProject.AI Server.
Please note that this is for version 4.5.8.0 so if you're running a different version of Agent DVR, some of this may look different.
The first step is to go to the ispyconnect.com download page. I'm doing a Windows install, so I select Agent DVR - Windows and hit the Download button. This downloads Agent_Setup_Windows.zip which needs to be extracted. The two files within the zip are install.exe and Setup.exe. As far as I can tell, these two files do the exact same thing.
So run install.exe as an administrator. To install Agent DVR, it needs access to your home network, so when the Windows Defender Firewall window pops up, hit Allow access.
Next on the Agent Setup Utility screen, there is an option to select the destination folder for installation, the local server port for Agent DVR, then some other installation options. I'm keeping all this default, and hit Next. If you select the install tray application option, a second Windows Defender Firewall window pops up requesting access.
Agent DVR launches in your browser at http://localhost:8090 and gives a series of Help options for getting started with Agent DVR. Hit OK.
Then a Language selection pops up. English is the default, so hit OK.
Now to setup the camera. Go to the Server Menu, which is in the upper-left hand corner.
Then hit New Device.
From here, there's a page that asks what grid slot you want. Because there aren't any yet, it's blank. Hit the + button to bring up the New Device menu.
Now, select Video Source. I tried to use IP Camera Wizard, but I couldn't get my Wyze Cam v3 set up with that option, so Video Source it is!
Straight out of the gate, Agent DVR wants to know if you're going to want to use alerts with this camera, whether or not you to record when motion is detected, if you want to reduce the resolution of the video, or if you want to record raw footage. I'm switching on Alerts and Record Raw.
Next is the camera setup window.
The first thing to do is to change the Source Type to IP Camera. This brings up the Network Source window. I'm using a Wyze Cam v3 that I've setup to do RTSP, so I input the settings I created for my Wyze Cam. If you want to see how I set up my Wyze Cam v3, please check out my guide on setting up a Wyze Cam. Input the Username for the camera (my camera is called "eyespy"), the Password, and the Live URL. For the Live URL, I'm going to use the RTSP stream address, which looks something like rtsp://username:password@192.169.0.1/live where the username and password are the options you just input. Hit OK.
Then in the camera settings, give your camera a name (I call mine Eye Spy), and hit OK.
There it is! The Wyze Cam v3 is working with Agent DVR.
Now it's time to get CodeProject.AI Server working with Agent DVR. If you haven't set up CodeProject.AI Server before, check out my guide on how to set up CodeProject.AI Server. From Agent DVR, click on the Server Menu button. Then from the Configuration heading, select Settings.
Then from the General dropdown, select AI Settings. Then click the ... button next to Configure.
Now click the Add to add an AI Server.
Here, input a name for your AI Server (all the cool kids input "CodeProject.AI Server"), then input the URL for CodeProject.AI Server, which is http://localhost:32168 and hit OK to accept these settings, and OK three more times to exit the Agent DVR menu.
Launch the CodeProject.AI Server dashboard by putting http://localhost:32168 in your browser, and make sure Object Detection (YOLOv 6.2) is running.
Setting Up the Home Assistant Phone App
In order to receive the notifications from Home Assistant on your phone, you need to set up the Home Assistant app, Home Assistant Companion. I'm doing this from an Android phone, but it is also available on iOS.
From the Google Play store, search "home assistant". Then hit Install. Open the app, which brings you to the welcome screen. Hit Continue.
For you, Home Assistant Companion may find the Home Assistant Server on its own. For me, I always click Enter address manually.
Put in the Home Assistant URL. http://localhost:8213 might work for some, I use the IP address, something like, http://192.169.0.1:8123. If you do not know your IP address, go to the Start button in Windows and start to type "CMD" then select Command Prompt. Then, type ipconfig. The address you want is the IPv4 Address. Then hit Connect.
Next, input the same Username and Password that you use for Home Assistant in the browser, and hit Login.
Home Assistant Companion asks if you want to enable location tracking. I don't need this, so I just hit Continue.
I do, however, want to enable notifications. Hit Continue, and then when the phone prompts a request for notifications, hit Allow.
And that's it! Home Assistant is now set up on your phone. The nice thing about installing Home Assistant Companion on your phone is, this automatically integrates the device and its entities into Home Assistant, which can then be used for automations.
Detecting a Person and Triggering an Alert, Recording, and Snapshot to Your Phone
Now that we have all the tools set up, let's get to the practical application. This is how you detect a person with a Wyze Cam v3, using Agent DVR, CodeProject.AI Server, trigger a recording, and send a snapshot through Home Assistant to your phone. In this section, we're jumping between Agent DVR, Home Assistant, CodeProject.AI Server, and the phone, so keep them all open and accessible.
Setting Up Person Detection in Agent DVR
First, we need to set up the ability to detect a person in Agent DVR. Go to the camera settings and hit Edit.
Under the General dropdown, select Alerts. The way we're setting up the action triggers in Agent DVR is through alerts, so we just need to make sure that alerts are Enabled, and that the Mode is set to Actions Only. Hit OK.
Now go back into the camera settings, and from the General dropdown, select Object Detection, which is at the bottom of the list under AI. Here, ensure that Object Detection is Enabled. And because the AI Server has already been set up, from the AI Server dropdown, select whatever you called CodeProject.AI Server. To make the testing process faster, the Mode should be set to Motion Detected, that way when I move in the camera frame, CodeProject.AI Server automatically runs a detection.
Optionally, under Objects to look for and Find, click .... To limit the options, in the Find field, we can simply have "person". Hit OK to accept the list of objects, then OK to accept the Object Detection settings.
Once again, head back to the camera settings and from the General dropdown, select Detector. Here, ensure that Detector is set to Simple. Simple means that the AI detection will be triggered on motion, which is what we want for easy testing. Hit OK.
Now for the real fire. From the camera settings, under the General tab, select Actions. Click Add.
Under the If dropdown, select AI: Object Found, and under the With tag field, type "person". Then scroll to the bottom of the action and click Add Task +.
We're going to set up two tasks in the same action. In the first task, the Task from the dropdown is Trigger Object Detection, and the Device from the dropdown is your camera (in my case, Eye Spy). In the second task, the Task from the dropdown is Start Recording On, and the Device from the dropdown is your camera (in my case, Eye Spy). Hit OK to accept these tasks, and the Action, then OK again.
Setting up Home Assistant to Send a Snapshot to Your Phone
Now it's time to set up what Home Assistant calls an Automation. Automations are going to be the cornerstone of everything we do with CodeProject.AI Server. Automations are a series of triggers and actions based on triggers like the date, a device, an MQTT message, a change in state on a device, a webhook, etc. that allow Home Assistant to create an action like, turning off the lights. In this case, we want Home Assistant to trigger when Agent DVR changes from idle to recording, then tells the camera to take a snapshot, which is then sent to the phone.
First, we need to add Agent DVR as an integration to Home Assistant. Integrations in Home Assistant are connecting elements that allow Home Assistant to work with other devices and services. In this case, Home Assistant has an Agent DVR integration that seamlessly connects the two entities. To add the Agent DVR integration, go to the tab with Home Assistant and click the Settings tab on the left. Then click Devices & Services.
From here, hit + Add Integration.
Type in and then select Agent DVR.
Now enter the Host, which is either http://localhost:8213 or using the IP address, something like, http://192.169.0.1:8123. Then when the Success window pops up, select the area you want (if you have areas set up in Home Assistant) and hit Finish.
Now to set up the Automation. In Home Assistant, go back to the Settings tab on the left and click Automations & Scenes. Then click + Create Automation.
Then select Create new automation.
Click +Add Trigger then from the Entity dropdown, select Eye Spy which is the entity camera.eye_spy. Then in the From dropdown, select Idle and in the To dropdown, select Recording. This is why we set up Agent DVR to start recording when a person was detected, because it acts as the trigger for Home Assistant. Also, if this camera was pointed at your front door, maybe you would want to record footage when a person shows up at your door.
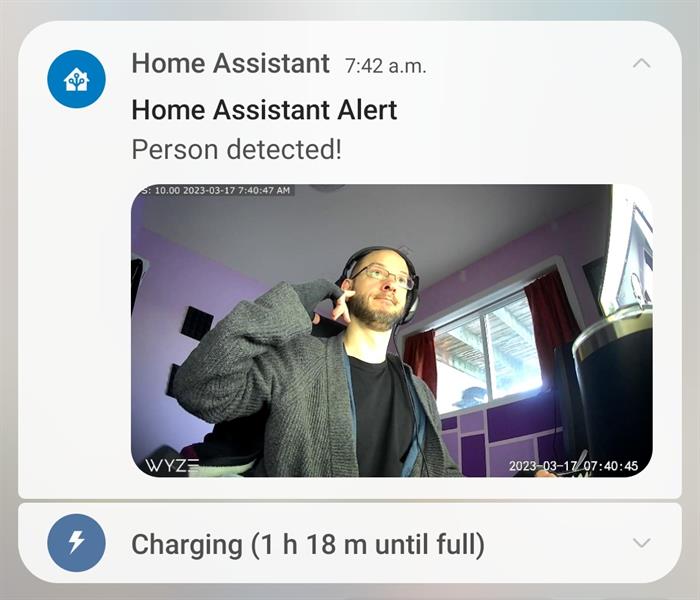
Then under the Actions heading, click + Add Action and select Device. From the Device dropdown, select your camera. For me, this is SM-A536W. Then in Message, type the message you want to receive when a person is detected. I want something alarmist, so I put "Person detected!" Then under Title, put the heading under which you want this message to appear as a push notification on your phone. I'm calling mine "Home Assistant Alert".
There's actually two ways to create these automations. Home Assistant provides a visual editor if the user doesn't like code, but there's also an option to Edit in YAML if you right-click the three dots in the top-right corner of the Action. Or you click on the dropdown menu in the top-right of the New Automation to set up the whole automation in YAML. Click the dropdown for the dropdown for the Send a notification and select Edit in YAML.
device_id: 656692a0734a65d3ce3df19b31783698
domain: mobile_app
type: notify
message: Person detected!
title: Home Assistant Alert
data:
  image: /local/snapshot.jpg
Add the two lines below title: Home Assistant Alert. Home Assistant is very picky about spacing, so make sure there are two spaces before image: /local/snapshot.jpg. Not one, not three -- two spaces. There isn't actually a local folder in our Home Assistant config folder, what local denotes is the www, which we set up shortly.
Now click + Add Action again. We need our camera to take a snapshot when Agent DVR changes states. Under the + Add Action dropdown, select Call service. Then, from the Service dropdown select Camera: Take snapshot which is service camera.snapshot. Then under Targets select + Choose entity and select your camera name, in my case, Eye Spy. Then in the filename, put "/config/www/snapshot.jpg".
service: camera.snapshot
data:
  filename: /config/www/snapshot.jpg
target:
  entity_id: camera.eye_spy
If you prefer to do this in YAML, this is what the action looks like in YAML.
In the Companion Apps documentation, there are some cool modifications you can make to this automation depending on your device. For example, if I were using an iOS device, I could stream audio instead of sending a picture. This documentation is where I discovered that in order for a snapshot to be sent to a phone, it needs to be accessible on the web. This is why the filename specifies the www directory. Only files in this directory are exposed to the internet. /config acts as a placeholder for the config folder you named earlier. Mine is haconfig, but as long as this was the config folder you created specifically for Home Assistant, it will recognize it as /config, so make sure you leave this as /config even if you named your config folder something else.
Because Home Assistant won't create the www folder, go to Windows Explorer now and create it.
Now we need to restart Home Assistant. Click on Developer Tools on the left-hand side navigation menu, then under Check and Restart, click Restart and then Restart again.
OK, now we're ready. Open Agent DVR and make sure the camera is on, pointed at you, and that CodeProject.AI Server is open in another tab.
Look at that! Person detected, and the system is recording. If you want to see the recording later, for me, these videos show up in a folder something like C:\Program Files\Agent\Media\WebServerRoot\Media\video\YJSXT.
Now to check the phone. YES! There's the alert exactly as we wrote it. Click the little arrow dropdown and you'll see a bigger version of the snapshot.
Hot dog! I feel safer already.
This article is just one demonstration of how to use CodeProject.AI Server in your Home Assistant Automations. We recently integrated CodeProject.AI Server in Home Assistant as a custom integration. You could even follow that article and change the trigger to image_processing of the codeproject_ai_object entity, but I'll be showing how to do that in a separate article. The benefit to setting up person detection in Agent DVR is that we also get to trigger a recording. So for now, we'll leave it at that. Look forward to the next article where we set up CodeProject.AI Server and Home Assistant on a Raspberry Pi 4.
But otherwise, if you have any questions, please feel free to leave them in the comment forum below.
Sean Ewington is the Content Manager for CodeProject.
His background in programming is primarily C++ and HTML, but has experience in other, "unsavoury" languages.
He loves movies, and likes to say inconceivable often, even if it does not mean what he thinks it means.


 General
  News
News  Suggestion
  Question
  Bug
Bug  Answer
  Joke
Joke  Praise
  Rant
Rant  Admin
Admin 


