Build this simple DailyJournal note app and learn if you would like to build cross-platform apps using the Photino framework.
Introduction
If you want an introduction to what Photino is, please read my first article here on CodeProject:
In this article, I'm going to show you how you can build a complete Desktop app which runs on all major OSes (macOS, Linux, Windows).
Not Much Yet, But There Are Benefits
This app might not look like much at this point because it will only allow editing and saving text. However, in the future, I plan on making it so you can include links & inline images.
I'm not sure why I'm writing this article, but I really love the idea of building User Interface with common technology (HTML5). I've written Desktop apps since Windows 3.1 and although building Desktop apps in Visual Studio allows us to be lazy, it's old technology and we all need to move on.
It's Still Ugly
Please don't make fun of my User Interface because I know it is still ugly, but I wanted to show how cool the Photino framework is for building a complete desktop app. I'll clean up the User Interface in later revisions.
My Github Project
If you want to get the latest updates, you can visit the repo at Github:
Background
Way back around 2008, I wrote an app so I could quickly save off notes, links, images from research I did each day while developing apps. It only ran on Windows but that was enough back then.
It looked like this:
The new version doesn't (yet) have all the features, but I have a good start and I believe the code will be interesting to learn more about using Photino to create Cross-Platform apps.
Main Point of the App
The main idea of the app was to allow me to quickly save my notes without ever having to make up a File Name or think about where I would save the file (manage directories).
Where / How are Files Saved?
The old (and new) app handle all of the file creation and saving for you so you don't have to create a file, name it and pick a directory to save it in.
App Directory: YYYY-MM Directory
Wherever you start the app and save a document will be considered the root path for the app and the app will create sub-directories which follow the pattern YYYY-MM (four number year, dash, followed by two number month).

Of course, the directory is only created when you save a file on a specific date. So if you create a file for 2022-11-02 you will get a new 2022-11 directory.
File Naming
Whenever you save a new file, the appropriate Year/Month directory will be created and a file named after the current date will be added.
Here's a snapshot of my current 2023-03 directory:
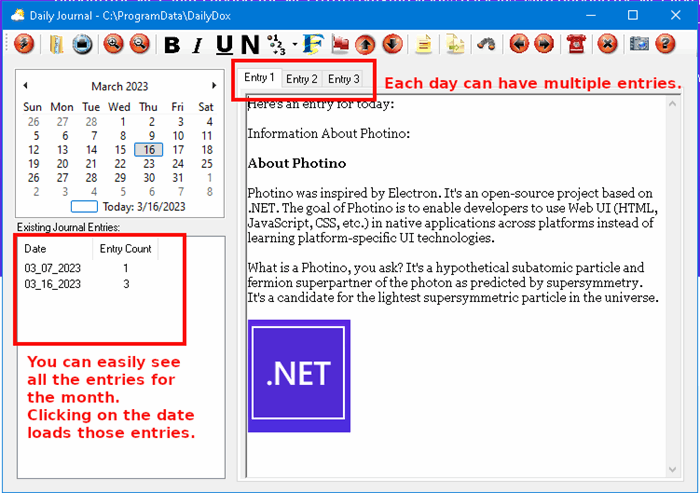
Multiple Entries Per Day
Later, when the new app allows multiple entries per day, you'll see entries with the same date and a trailing 2023-03-09-001.txt, 2023-03-09-002.txt, etc.
Here's What It Looks Like So Far
I've left some CSS borders that I was using to "debug" the UI (User Interface).
They just allow me to see where each are begins and ends.
Monthly Entries
If you click on an existing entry in the Monthly Entries list, then it is read from disk and loaded into the edit area (an HTML <textarea>).
Let's Take a Look at the Interesting Parts of the Code
Everything Starts in the Program.cs File
namespace HelloPhotinoApp
{
class Program
{
[STAThread]
static void Main(string[] args)
{
string windowTitle = "DailyJournal - save your work notes";
var window = new PhotinoWindow()
.SetTitle(windowTitle)
.SetUseOsDefaultSize(false)
.SetSize(new Size(800, 600))
.Center()
.SetResizable(true)
.RegisterWebMessageReceivedHandler(MainMessageHandler.MessageHandler)
.Load("wwwroot/index.html");
window.WaitForClose();
}
}
}
We went over this in my first article on the Photino framework, but I've cleaned up the message handler so it is in its own class now.
The most important thing to remember from Program.cs is:
.Load("wwwroot/index.html"); Loads the main UI (defined the HTML file).RegisterWebMessageReceivedHandler(MainMessageHandler.MessageHandler) Sets the function that will handle all of the Messages that we send to the C# side of the code.
MessageHandler - What Does It Mean?
Remember, now that we are using HTML as the front-end (User Interface) we have to be able to tell the app that we want some C# code to be run. To do that, the creators of the Photino library have created this MessageHandler that allows us to:
- Send a message from the front-end using JavaScript
- Receive a message in the "back-end" using C# -- Well, it's not truly a back-end, is it?
That's all we're really doing is wiring up the HTML front-end to functionality that we want to write in C#.
Example: Clicking the Save Button
To save the data that you've typed in the <textarea>, you just click the [Save] button in the UI.
However, that button is a HTML <button>Save</button>.
The code that runs for us to save the file to a specific location is C#.
How can HTML / JavaScript get C# code to run?
It does so by sending a message.
Sending A Message From JavaScript
You probably know that an HTML button can fire the onclick() event via JavaScript.
We will use that to fire the JavaScript code that I've placed in the messageHandler.js file in my project.
When the button is clicked, the following JavaScript function is called:
function saveEntryData(){
console.log("in saveEntryData()...");
let entryDate = today.yyyymmdd();
let entryData = document.querySelector("#dailyNotes").value; 2. Get typed text
let message = {};
message.Command = "saveEntryData";
let allParameters = [];
allParameters.push(entryDate.toString());
allParameters.push(entryData);
message.Parameters = allParameters.join();
let sMessage = JSON.stringify(message);
sendMessage(sMessage);
}
We set up two parameters:
- The current date of the Entry (an entry is a journal entry that contains our daily notes)
- The
entryData which is the text that the user typed in the <textarea>
We need to stringify the data we are sending so it can be easily parsed on the C# side.
Here's the method (defined by Photino) that we use to send the message to the C# side.
function sendMessage(sMessage){
    console.log(sMessage);
    window.external.sendMessage(sMessage);
}
Photino-defined: window.external.sendMessage
When window.external.sendMessage is called, the message is sent to the previously defined MessageHandler which is a C# function. I've placed that C# function inside a class -- just to keep it clean.
Here's the top of that C# Class so you can see that this is the place where the sendMessage() call is caught.
public class MainMessageHandler{
    static public void MessageHandler(object? sender, string message)
     {
        var window = sender as PhotinoWindow;

        if (message == null){
            return;
        }

        WindowMessage? wm = JsonSerializer.Deserialize<WindowMessage>(message);

        if (wm == null){
            return;
        }
The first thing I do inside the MessageHandler function is load the window that sent us the message.
First Paramater Provided By Photino Framework
That's the first parameter that the framework provides for us. We didn't have to send that parameter in when we called sendMessage().
Next, we check to see if the message that is sent in is null, because if it is there is nothing we can do with it so we just return.
Loading the String message as a WindowMessage
Next, we deserialize the JSON string that we had sent via sendMessage().
I deserialize it into a helpful C# class that I've created and named WindowMessage.
WindowMessage: An Abstraction To Keep Things Clean
Here's the entire WindowMessage class. It's just a wrapper so we can easily get:
- Commands -
Strings created to indicate what C# functionality we want to run - Parameters - Values we'll need to pass to functions in order to get the correct state
class WindowMessage{
  public WindowMessage(String command, String parameters)
  {
    this.Command = command;
        this.Parameters = parameters;
    this.AllParameters = parameters.Split(',',StringSplitOptions.RemoveEmptyEntries);
  }

  public String Command{get;set;}
  public String[] AllParameters{get;set;}

  public String Parameters{get;set;}
}
Examine MessageHandler - To Learn How We Use the WindowMessage
Here's the rest of the MessageHandler function which is just a large switch statement which uses the WindowMessage.Command to switch to run the proper functionality on the incoming message.
switch(wm.Command){
case "createYMDir":{
var currentDir = Environment.CurrentDirectory;
Directory.CreateDirectory(Path.Combine
(currentDir,DateTime.Now.ToString("yyyy-MM")));
break;
}
case "getCurrentDirectory":{
wm.Parameters = Environment.CurrentDirectory;
window?.SendWebMessage(JsonSerializer.Serialize(wm));
break;
}
case "getDirSeparator":{
wm.Parameters = System.IO.Path.DirectorySeparatorChar.ToString();
window?.SendWebMessage(JsonSerializer.Serialize(wm));
break;
}
case "getUserProfile":{
wm.Parameters = Environment.GetFolderPath
(Environment.SpecialFolder.UserProfile);
window?.SendWebMessage(JsonSerializer.Serialize(wm));
break;
}
case "loadEntryData":{
var localEntry = new Entry(wm.Parameters, String.Empty);
var entryData = localEntry.Read();
Console.WriteLine(entryData);
wm.Parameters = entryData;
window?.SendWebMessage(JsonSerializer.Serialize(wm));
break;
}
case "loadMonthlyEntries":{
var localEntry = new Entry(wm.Parameters, String.Empty);
var monthPath = Path.Combine
(Environment.CurrentDirectory,localEntry.EntryFolder);
if (Directory.Exists(monthPath)){
String [] allFiles = Directory.GetFiles(monthPath);
String filesDelimited =
String.Join(",",allFiles.Select(item => item ));
wm.AllParameters = allFiles;
wm.Parameters = filesDelimited;
window?.SendWebMessage(JsonSerializer.Serialize(wm));
}
break;
}
case "saveEntryData":{
var entry = new Entry( wm.AllParameters[0], wm.AllParameters[1]);
entry.Save();
window?.SendWebMessage(JsonSerializer.Serialize(wm));
break;
}
default :{
wm.Parameters = $"Received message: \"{wm.Parameters}\"";
window?.SendWebMessage(JsonSerializer.Serialize(wm));
break;
}
}
saveEntryData : This Is C# Code
You can see that in our example, there is a saveEntryData case which handles when the Save button has been clicked.
In this case, we create a new C# Entry object (again another abstraction I've created to handle the saving of the data).
After that, we call entry.Save() to do the work to save the file to the proper folder (based upon the entry's date selected on the calendar control.)
Interesting Parts of the Entry Class
Here are the most interesting parts of the Entry class so you can get an idea of all the C# work that it does.
public Entry(String date, String data)
    {
        try{
            Created = DateTime.Parse(date);
        }
        catch{
            Console.WriteLine("couldn't parse entry date");
        }
        EntryFolder = Created.ToString("yyyy-MM");
        EntryFile = $"{Created.ToString("yyyy-MM-dd")}.txt";
        Data = data;
    }

    public bool Save(){
        try{
            Directory.CreateDirectory(EntryFolder);
            var targetFile = Path.Combine(EntryFolder,EntryFile);
            File.Delete(targetFile);
            File.AppendAllText(targetFile,Data);
        }
        catch{
            return false;
        }
        return true;
    }

    public String Read(){
        try{
            var currentDateFile = Path.Combine(EntryFolder,EntryFile);
            if (File.Exists(currentDateFile)){
                return File.ReadAllText(currentDateFile);
            }
            Console.WriteLine($"An entry doesn't exist yet for
                             {Path.Combine(EntryFolder,EntryFile)} ");
            return String.Empty;
        }
        catch{Console.WriteLine($"couldn't read data from
             {Path.Combine(EntryFolder,EntryFile)} ");
        return String.Empty;}
    }
Back in the MessageHandler: Send Message Back To UI
After all that work is done, we send a message back to the User Interface so it can let the user know that the file has been saved.
window?.SendWebMessage(JsonSerializer.Serialize(wm));
Back On UI / JavaScript Side
In the messageHandler.js file, you'll find a JavaScript-based switch statement which handles the same command name.
In this case, we will run the following code when C# sends that message back to us:
case "saveEntryData":{
            loadMonthlyEntries();
            document.querySelector("#dailyNotes").focus();
            break;
          }
- We load the monthly entries (there is a new one now so we need to make sure the list is updated.
- We set the focus back to the
<textarea> field so the user isn't interrupted if they are still typing.
Implemented: CTRL-S
I've also implemented the keydown functionality in JavaScript so that if you type CTRL-S, your entry is saved.
What Do You Think?
What do you think of this idea of building a User Interface using HTML5 (HTML, JavaScript, CSS)?
In many ways, it harkens back to Windows API programming and the original loop and window's messagehandler[^] and WndProc (Windows Procedure).
Example WndProc:
LRESULT CALLBACK WindowProc(HWND hwnd, UINT uMsg, WPARAM wParam, LPARAM lParam)
{
switch (uMsg)
{
case WM_SIZE:
{
int width = LOWORD(lParam); int height = HIWORD(lParam);
OnSize(hwnd, (UINT)wParam, width, height);
}
break;
}
}
void OnSize(HWND hwnd, UINT flag, int width, int height)
{
}
Learn HTML, CSS, JavaScript, C#
It's a lot of technology to learn to get to a cross-platform app. Is it worth it? I'm still deciding, but I run Ubuntu 22.04 as my main machine. I remote to Windows 10 desktops and I run macOS Mac Mini M1 for my iOS development. There are times when I need an app that will run on all platforms, right out of the box. The Photino framework works perfectly for that.
How Do You Run the Source Code?
- Download source.
- Make sure you have .NET Core 6.x installed.
- Type the following command in the project directory
$ dotnet run. - The app will start.
History
- 30th March, 2023: First publication


 General
  News
News  Suggestion
  Question
  Bug
Bug  Answer
  Joke
Joke  Praise
  Rant
Rant  Admin
Admin 


