This article provides a step-by-step guide on setting up facial recognition using Agent DVR and CodeProject.AI Server, enabling the detection of recognized faces.
In the previous article, I got Agent DVR set up with CodeProject.AI Server and detected a person (me). In this article, I'm going to set up facial recognition with Agent DVR and CodeProject.AI Server.
This article assumes you have a camera already set up and working with Agent DVR and CodeProject.AI Server. I won't retread ground here, so if you need to do this first, please check out my article, How to Setup Agent DVR and CodeProject.AI Server on Windows Using a Wyze Cam.
Setting up Facial Recognition in CodeProject.AI Server
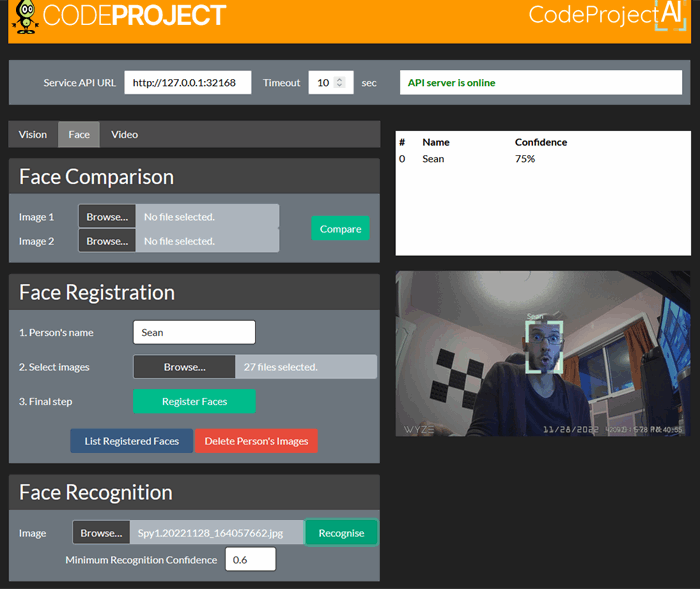
The first step is to set up a face profile with CodeProject.AI Server. Put http://localhost:32168 in the browser to launch CodeProject.AI Server. Then click Open CodeProject.AI Explorer. From the Explorer, click on the Face tab. Under Face Registration, input the Person's name. In my case, I put "Sean." Then, select the images you want to use for the registered face.

You can use Agent DVR to take some snapshots of your face. Go to Agent DVR, look directly in the camera, and hit the Take a Photo button.
So handsome!
For me, this takes a snapshot and places it in the C:\Program Files\Agent\Media\WebServerRoot\Media\video\YJSXT\grabs folder. You can take multiple snapshots if you wish. Then select these images from the grabs folder. Then, hit Register Faces.
Setting Up Agent DVR for Facial Recognition
Now, launch Agent DVR. Go to the camera settings by clicking the edit icon in the bottom left corner while on the Live Feed.
Then, select Facial Recognition from the dropdown.
Make sure the AI Server has the correct address for CodeProject.AI Server. In this case, http://localhost:32168. Keep the Mode as the default Alert, then change the Minimum Interval to 3. Now click ... next to Edit Faces.
Because you set up the face profile in CodeProject.AI Server, the name of the face profile (in my case, "Sean") should already be there. You can also create a face profile in Agent DVR, by clicking Add, but I got a random error when I deleted my face profile from the Edit Faces menu, so I decided on setting up the face profile in CodeProject.AI Server. Hit OK.
Next, add an action for face recognition. Go to the camera settings, and select Actions from the dropdown. Then hit the Add button to create an action.
Under the If dropdown, select Face Recognized, and under the Then menu, select Trigger Alert On. After this, the device should automatically be selected. In my case, my camera "Eye Spy.". Hit OK, them OK again to accept the action.
Next, we need to ensure that the AI settings in Agent DVR are set up to detect people. This makes sense when you think about it. People have faces, so once the camera detects a person, that's when we want to run facial recognition.
Go to the camera settings, and from the dropdown, select Detector.
Ensure the detector is Enabled, then from the Detector dropdown, select Objects. Hit OK.
Now we need to ensure the objects being recognized are people. From the camera settings, go to the General dropdown, select Object Recognition.
Input the URL for CodeProject.AI Server http://localhost:32168/, put the Mode on Alert, make sure Object Recognition is enabled, then click the ... button in front of Configure.
The default Confidence level for Agent DVR object detection is 60, but I think this is too high. Change it to 50. I want Agent DVR to save a photo when a person is detected, so I toggle Photos to the On position. Then, in the Find list, I'm only looking for a person, so I remove everything else from the list, and hit OK, and OK again to accept the Object Recognition settings.
Detecting a Face with Agent DVR
Now it's time to test facial recognition. I am sitting right in front of the camera, so I give the camera a little looky loo. And bam! There's the alert.
To confirm that a face was detected, click the Server Menu in the upper-left corner.
Then select Logs under the System Menu.
This screen isn't very exciting, but if you look at the time of the Alert snapshot, you can see "facerecognized: Eye Spy."
Success! Agent DVR is now set up to do facial recognition using CodeProject.AI Server.
Sean Ewington is the Content Manager for CodeProject.
His background in programming is primarily C++ and HTML, but has experience in other, "unsavoury" languages.
He loves movies, and likes to say inconceivable often, even if it does not mean what he thinks it means.


