This article discusses deployment of an existing ASP.NET Core UI, API, and SQL Server to Docker containers. It also gives information about the common pitfalls that are time consuming to troubleshoot.
In this project, I will show you how to deploy an existing ASP.NET Core UI, API, and SQL Server to Docker containers, along with the information on common pitfalls that are time consuming to troubleshoot. You can see the source article and the latest updates to this project here.
In this post, we will go over:
- Setting up SQL Server container with Docker volume for data persistence and connecting to the SQL Server container using SQL Server Management Studio
- Setting up a Docker network so that the SQL Server, API, and UI containers can talk to each other
- Setting up the self-signed certificate for the Linux .NET environment so that the UI container will trust the API container without errors
- Setting up the API and UI containers so that you can test the application from your browser
You can download the code for this project in the GitHub repository.
Project Setup
The starting point for this project is created by using the Paging and Sorting Project, which has an ASP.NET frontend and API that connects to a SQL Server database. You can download it and make sure it runs on your computer first.
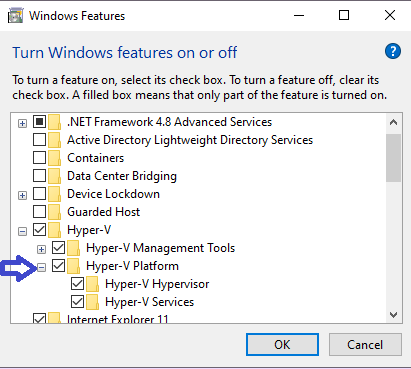
To run Docker on Windows machine, you first need to install WSL (Windows Subsystem for Linux), which depends on Hyper-V. Go to “Turn Windows Features on or off” feature in Windows and enable the Hyper-V Platform as shown below:
After completion, you can install WSL (Windows Subsystem for Linux) Linux Kernel Update package. You can set the default version of WSL in Powershell:
wsl --set-default-version 2
Download Docker Desktop. Docker Desktop should be up and running as shown below before proceeding:

Set Up SQL Server Container
We first need to set up a Docker network, this is needed so that the SQL Server, API, and UI containers can be placed in the same network so that they can find each other.
Create the network named as network-name in the command prompt:
docker network create network-name
Then run the docker pull command below in command prompt to get the SQL Server image:
docker pull mcr.microsoft.com/mssql/server:2022-latest
You can then create the SQL Server container with docker run command below by giving it:
sql-server-password – The SA(system admin) password must be at least eight characters long and contain characters from three of the following four sets: uppercase letters, lowercase letters, base-10 digits, and symbols. If the password is non-conforming, it will not work.sql-server-volume-name – the name of the Docker volume for data persistencesql-server-container-name – the name of the containernetwork-name – the name of the Docker network the SQL Server container will run in.sql-server-name – the name of the SQL Server so that the API container can find it- mapping of the /https location in the container to your computer location at %USERPROFILE%\.aspnet\https, which maps to my drive location C:\Users\Kendall\.aspnet\https. The reason is that we will use the SQL Server container to create the self-signed certificate in Linux to be used in the API container. More details on this in a bit.
docker run -e "ACCEPT_EULA=Y" ^
   -e "MSSQL_SA_PASSWORD=sql-server-password" ^
   -p 1433:1433 ^
   -v sql-server-volume-name:/var/opt/mssql ^
   -v %USERPROFILE%\.aspnet\https:/https/ ^
   --name sql-server-container-name ^
   --network network-name ^
   --network-alias sql-server-name ^
   -d mcr.microsoft.com/mssql/server:2022-latest
After running the command, you should see the Docker Volume in the Docker Desktop:
You can now connect to the SQL Server container using SQL Server Management Studio with server name as 127.0.0.1 on port 1433 by giving the SA(system admin) password:
Once the connection is established, change the connection string in the appsettings.Development.json file in the API project to point to the container database:
"StarterConn": "Data Source=127.0.0.1;Initial Catalog=Starter;
                User Id=sa;Password=sql-server-password"
From the command prompt, navigate to the Data folder of the project and run the dotnet ef command below which will set up the structure of the database in the container:
dotnet ef database update -s ..\Api\Api.csproj
You can run the file insertCustomer.sql located in the Data folder to populate some sample data:
Setup API Container
The setup of the API container requires:
- Creating a self signed certificate that has the same domain name of the API Container. If you use the
dotnet dev-certs command to generate the certificate, it will generate the RemoteCertificateNameMismatch error when the UI calls it because the domain name is different. Instead, you need to use the openssl command in Linux to generate the certificate which I will show you. - Creating a Docker image that contains your API code. You can publish your API project to a directory, then build a Docker image by copying the published API project into the image.
To create the self signed certificate for the API, go into the SQL Server container in Docker Desktop and navigate to the /https location, which maps to your computer’s C:\Users\[UserName]\.aspnet\https location, and run the openssl command below to generate the certificate:
openssl req \
  -newkey rsa:4096 -nodes -sha256 -keyout api-server.key \
  -addext "subjectAltName = DNS:api-server-name" \
  -x509 -days 365 -out api-server.crt
It will ask you a list of questions, you can take the default for all of them except you must specify the API’s server name when it asks for the Common Name(CN). In this case, I just use api-server-name as the name of my API server. You should now have the .crt certificate file and the .key private key file. You can then issue another openssl command below to generate the .NET compatible .pfx certificate file which is required for running ASP.NET containers:
openssl pkcs12 -export -out api-server.pfx -inkey api-server.key -in api-server.crt
It will ask the password you will use for the .pfx certificate, just create a password and remember it.
You should now have the files shown below in C:\Users\[UserName]\.aspnet\https as shown:
Please note that:
- the .crt and .key files are needed to be installed into the UI container as trusted certificate
- the .pfx and its password is needed to run the API container
Now let’s create an image for the API. First copy the appsettings.Development.json configuration file and name it appsettings.Container.json, it will be the configuration file for the container:
Inside the appsettings.Container.json file, update the SQL Server connection string with the name of the SQL Server and the SA (system admin) password:
"StarterConn": "Data Source=sql-server-name;
                Initial Catalog=Starter;User Id=sa;Password=sql-server-password"
Publish the API project to the bin directory and choose linux-x64 as the Target Runtime shown below:
The next step is to build the Docker image that will contain the API. This is done by creating the Dockerfile which contains the instructions for building a new image.
Inside the API project, create a text file named as Dockerfile (the file must be named as such for the docker command to find it), and paste the build instructions below into it:
FROM mcr.microsoft.com/dotnet/aspnet:6.0
COPY bin/Release/net6.0/publish App/
WORKDIR /App
ENTRYPOINT ["dotnet", "Api.dll"]
The Dockerfile specifies that the new image will be created with the steps below:
- It use the aspnet image from the Docker repository as the base image.
- It copies the published output of the API project from your computer to the /App folder in the container.
- It uses the /App folder as the location to start the application.
- It runs the
dotnet command with Api.dll to start the application.
Now run the docker build command in the command prompt inside the API folder to build the new image that will contain the API:
docker build -t api .
You should now see the new image for the API in Docker Desktop:
With the image in place, you can now run the API container with the docker run command with the parameters below:
docker run -d -p 7000:80 -p 7001:443 ^
   -e ASPNETCORE_URLS="https://+;http://+" ^
   -e ASPNETCORE_HTTPS_PORT=7001 ^
   -e ASPNETCORE_Kestrel__Certificates__Default__Password="" ^
   -e ASPNETCORE_ENVIRONMENT=Container ^
   -e ASPNETCORE_Kestrel__Certificates__Default__Path=/https/api-server.pfx ^
   -v %USERPROFILE%\.aspnet\https:/https/ ^
   --network network-name ^
   --network-alias api-server-name ^
   --name api-container-name ^
   api
The parameters specify that:
- port 7000 and 7001 on your computer maps to port 80 and 443 of the container respectively
- the API’s port on your computer is 7001
- the
ASPNETCORE_Kestrel__Certificates__Default__Password parameter specifies the password for the API certificate, make sure to add the password inside the double quote - the
ASPNETCORE_ENVIRONMENT parameter specifies that it will use the appsettings.Container.json configuration file which you created earlier - the
ASPNETCORE_Kestrel__Certificates__Default__Path parameter specifies the location of the API certificate - the
-v parameter maps the /https/ location in the container to the %USERPROFILE%\.aspnet\https location on your computer, which has the API certificate - the
–network parameter specifies the name of the network so that the SQL server and the UI container can find the API - the
–network-alias parameter specifies the name of the API server, which is needed so that the UI container can find the API - the
–name parameter specifies the name of the API container
You should now see the API container running on port 7001:
You can see the API running by going to https://localhost:7001/api/customer as shown below and noticing that the certificate is not secure for your browser which is ok because your browser uses localhost as the name of the server instead of the name of the API server specified in the certificate:
Setup UI Container
For the UI container, we can use the dotnet dev-certs command to generate a certificate for the localhost domain so that it will be trusted on your browser. First, clean up the existing certificate that may already exist on your computer by running the command below:
dotnet dev-certs https --clean
Then run the command below to generate a new certificate by giving it a password. The password must be alphanumeric or it will not work.
dotnet dev-certs https -ep %USERPROFILE%\.aspnet\https\ui.pfx -p password-here
Check that the certificate was generated by going to the directory under your user profile location:
Then run the command below to trust the certificate:
dotnet dev-certs https --trust
Now let’s create an image for the UI. First, copy the appsettings.Development.json configuration file and name it appsettings.Container.json, it will be the configuration file for the container:
Inside the appsettings.Container.json file, update the url location of the API:
"APIurl": "https://api-server-name/api/"
Publish the UI project to the bin directory and choose linux-x64 as the Target Runtime shown below:
We need the UI container to trust the API certificate, otherwise you will get the error “The remote certificate is invalid because of errors in the certificate chain: UntrustedRoot”. We can add the API certificate into the UI container and trust it. Go to the bin directory where the UI project was published, create a folder named cert and copy the API certificate (located in %USERPROFILE%\.aspnet\https on your computer) into it:
Now we can create the Dockerfile inside the UI project and tell it to trust the API certificate. Below is the Dockerfile:
FROM mcr.microsoft.com/dotnet/aspnet:6.0
COPY bin/Release/net6.0/publish App/
ADD bin/cert/ /etc/ssl/certs
RUN update-ca-certificates
WORKDIR /App
ENTRYPOINT ["dotnet", "WebApp.dll"]
The Dockerfile specifies that:
- Add the bin/cert contents, which include the API certificate, into the /etc/ssl/certs location into the container
- Run the
update-ca-certificates command which will trust new certificates added in /etc/ssl/certs
Now run the docker build command in the command prompt inside the WebApp folder to build the new image that will contain the UI:
docker build -t ui .
You should now see the new image for the UI in Docker Desktop:
You can now run the UI container with the docker run command with the parameters below:
docker run -d -p 8000:80 -p 8001:443 ^
   -e ASPNETCORE_URLS="https://+;http://+" ^
   -e ASPNETCORE_HTTPS_PORT=8001 ^
   -e ASPNETCORE_Kestrel__Certificates__Default__Password="" ^
   -e ASPNETCORE_ENVIRONMENT=Container ^
   -e ASPNETCORE_Kestrel__Certificates__Default__Path=/https/ui.pfx ^
   -v %USERPROFILE%\.aspnet\https:/https/ ^
   --network network-name ^
   --network-alias ui-server-name ^
   --name ui-container-name ^
   ui
The parameters specify that:
- port 8000 and 8001 on your computer maps to port 80 and 443 of the container, respectively
- the UI’s port on your computer is 8001
- the
ASPNETCORE_Kestrel__Certificates__Default__Password parameter specifies the password for the UI certificate, make sure to add the password inside the double quote - the
ASPNETCORE_ENVIRONMENT parameter specifies that it will use the appsettings.Container.json configuration file which you created earlier - the
ASPNETCORE_Kestrel__Certificates__Default__Path parameter specifies the location of the UI certificate - the
-v parameter maps the /https/ location in the container to the %USERPROFILE%\.aspnet\https location on your computer, which has the UI certificate - the
–network parameter specifies the name of the network so that the UI container can find the API container - the
–network-alias parameter specifies the name of the UI server - the
–name parameter specifies the name of the UI container
You should now see the UI container running on port 8001:
And see the UI running on port 8001 with a trusted self signed certificate:
After everything is up and running, you can create a Docker Compose file named as docker-compose.yml that has all the docker run commands so that you can create all three containers (SQL Server, API, UI) in one go. Below is the Docker Compose file for this project and the syntax should be self explanatory when compared to the docker run command.
version: "3.9"
services:
  sql-server-container-name:
    image: mcr.microsoft.com/mssql/server:2022-latest
    ports:
      - "1433:1433"
    volumes:
      - sql-server-volume-name:/var/opt/mssql
      - ${USERPROFILE}\.aspnet\https:/https/
    environment:
      MSSQL_SA_PASSWORD: ""
      ACCEPT_EULA: Y
    networks:
      network-name:
        aliases:
          - sql-server-name

  api-container-name:
    image: api
    ports:
      - "7000:80"
      - "7001:443"
    volumes:
      - ${USERPROFILE}\.aspnet\https:/https/
    environment:
      ASPNETCORE_URLS: "https://+;http://+"
      ASPNETCORE_HTTPS_PORT: 7001
      ASPNETCORE_Kestrel__Certificates__Default__Password: ""
      ASPNETCORE_ENVIRONMENT: Container
      ASPNETCORE_Kestrel__Certificates__Default__Path: /https/api-server.pfx
    networks:
      network-name:
        aliases:
          - api-server-name

  ui-container-name:
    image: ui
    ports:
      - "8000:80"
      - "8001:443"
    volumes:
      - ${USERPROFILE}\.aspnet\https:/https/
    environment:
      ASPNETCORE_URLS: "https://+;http://+"
      ASPNETCORE_HTTPS_PORT: 8001
      ASPNETCORE_Kestrel__Certificates__Default__Password: ""
      ASPNETCORE_ENVIRONMENT: Container
      ASPNETCORE_Kestrel__Certificates__Default__Path: /https/ui.pfx
    networks:
      network-name:
        aliases:
          - ui-server-name

volumes:
  sql-server-volume-name:

networks:
  network-name: {}
To run the docker compose file, you can give the command:
docker compose up -d
And that’s all! Hope you enjoyed this article!
This member has not yet provided a Biography. Assume it's interesting and varied, and probably something to do with programming.


