Reasons why any serious WPF developer should use WpfControlTestbench: + Creating sophisticated test windows for your control with few lines of code + Test your control visually and interactively + Gain detailed insight into the interactions between the parent of your control and your control + Minimize the time required for repeated testing from hours to minutes + Examine Microsoft’s controls and gain detailed knowledge which you cannot find anywhere else.
Introduction
WpfControlTestbench helps you to write quickly sophisticated test windows for your control or any control whose behaviour you want to investigate. It takes only a dozen XAML lines to create the following Window:
It displays your control to be tested in the lower left corner, in the upper part of the Window are Controls for all the properties of your control. You can change their values during run time. On the right lower corner, you see a trace viewer showing any property whose value has changed and how the WPF container holding your control and your control do the layouting of your control.

WPF controls support an amazing range of layouting (Margin, Border, Padding, Width/Height, alignment, …) functionality and are accordingly challenging to develop. Even more difficult is to test if the control behaves properly under the many scenarios possible. The WpfControlTestbench lets you test this visually and interactively, you can see immediately what effect a property value change has on your control. Out of the box, WpfControlTestbench displays all important properties inherited from FrameworkElement and Control. Of course, you can easily add more controls to also investigate the properties specific to your control.
Investigating the Interaction of Your Control and their WPF Parent
Controls behave differently depending on who is their Parent in the logic tree, i.e., into which WPF ContentControl or Panel they are placed. A Canvas might give all the space your control wants, while a StackPanel will limit how wide or tall your control can be. To get this interaction between different WPF ContentControls and your control work properly can be rather challenging. Luckily, WpfControlTestbench makes it very easy to place your control into different ContentControls at runtime.
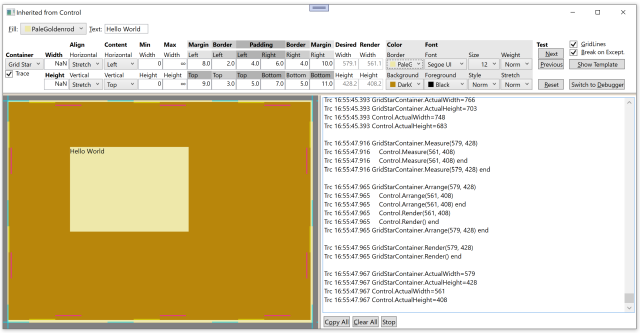
Debugging Measurement, Arrangement and Rendering Problems
It is a kind of black magic to write a WPF Control which renders directly to the screen, but it offers great flexibility and the highest possible speed. Debugging it is difficult with Visual Studio because breakpoints cannot be used, they get constantly fired as soon VS tries to switch to your window, which then calls your methods, which stops at that breakpoint and shows VS again. You could use System.Diagnostics.Debug.WriteLine() to trace that information, however that can be a lot of work and you can't do that for the parent. But it's often the interplay with the parent which causes the problem. But fear not, WpfControlTestbench can trace all of this information for you and much more.
In the picture above, you can see CanvasContainer, which is the parent of the Control to be tested, called StackPanel. The parent gets 877 horizontal pixels and 381 vertical pixels screen space to arrange its children in it. The child StackPanel receives only 0 pixels, because during the measurement (not shown in the picture), it did not request any space, since it is empty. Interesting here is that the child is executing Render() already while it is still in the Arrange() call from its parent.
WpfControlTestbench makes the inner working of the controls transparent. It shows in a real time trace when which property was changed and how the parent and your control interact for the layouting of this change.
When writing your own control, it is imperative that it behaves similarly like Microsoft's controls. But Microsoft's documentation lacks the needed information. To examine the behaviour of a Microsoft control, host it in WpfControlTestbench. Do the same for your own control and then verify that yours behaves the same in every scenario like Microsoft's.
Control Sizing and Positioning
It is difficult to write a control whose content uses all available space, because the available space depends on numerous factors, like space given by host, margin, alignment and more. A simple formula for the screen width the child needs would look like this:
Required Width = LeftMargin + LeftBorder + LeftPadding + Content Width +
                 RightPadding + RightBorder + RightMargin
Of course, required width is often different from the width that the host can provide.
- What happens when there is too little space? Too much space?
- What happens if the
Width property gets set (notice that it is not part of the formula above)? - What happens if
Width is undefined? - What happens if
HorizontalAlignment changes from Left to Center, Right or Stretch? - What happens when the
Font.Size changes? - Does the parent or your control handle
Margin? Padding?
Answers
- Too little space: If your control renders outside the given space, it depends on clipping if that is shown or not. Too much space: Depends on alignment. If not stretched, parent (!) will place the content accordingly. If stretched, child should use all available space.
- When
Width is set, your control is supposed to use exactly that space. If alignment is stretched, no stretching should happen, but the parent will center your control. - When
Width is undefined, your control should figure out itself how much space it needs. - Changing
HorizontalAlignment from Left to Center or Right does not matter for your control, the rendering is the same, but the parent will place it differently. Changing HorizontalAlignment from Left to Stretch will ask your control to render using all available size, not just the size it feels it should use. - When the
Font.Size (or Font.Family or …) changes, the content of your control might need more or less space, i.e., Measure(), Arrange() and Render() need to be executed. - The host of your control handles
Margin. Your control needs to handle Border and Padding.
Congratulations if you know the answers to all these questions. If not, sadly you will hardly find the answers in Microsoft's documentation. But as the developer of a control, you need to have a precise understanding how this works.
To get quickly answers to this kind of questions, use WpfControlTestbench, change some values and see how a Microsoft control reacts. Then implement the same behaviour for your control. Also helpful to better understand Microsoft controls is the Show Template button in the TestBench which shows the ControlTemplate XAML. If you really want to know details, you can also check the WPF source code at https://github.com/dotnet/wpf. But be warned, it can be complex.
Since getting the Sizing and Positioning right requires checking many scenarios and a pixel more or less might make a difference, WpfControlTestbench allows changing the width, alignments, etc. easily. It displays dashed lines for Margin, Border and Padding which can be moved with the mouse. Even the total available space can be easily changed with a mouse drag of the splitter line.
Testing Standard Properties
You can also change properties by entering values with the keyboard, which can be more precise, but is also more time consuming.
If your control inherits from FrameworkElement, WpfControlTestbench displays properties for Width, Height, Alignment, Min, Max and Margin, which the user can change. DesiredWidth and RenderWidth are calculated values and cannot be changed. If your control inherits from Control, also properties for Border and Padding get displayed.
You can also change colors and fonts:
You can change the color of Background, Foreground (i.e., Font) and Border. Changing other font properties is interesting, since the required size of your control might depend also on FontFamily and Font.Size.
Clicking on Reset sets the values of all standard properties back to the values they had when the window opened.
Standard Test
Since a Control has so many properties and all combinations of possible values should be tested, many tests need to be performed. If you set these values manually, you can easily spend hours and you might do that again and again over many days. But fear not, WpfControlTestbench has you covered also here. It comes with 111 predefined test settings for all interesting combinations of standard property values. And best of all, you can run through all these tests in a minute or two!
You just keep on clicking Next (Alt + N). Usually, a quick glance tells you if everything looks ok. Of course, you can also easily add your own tests for the properties which are specific for your control, which is explained in detail further down.
Try Out WpfControlTestbench
Before you continue reading how you can write your own test windows, which is tedious reading, I recommend you download WpfControlTestbench from Github and give it a test run. I wrote it with VS 2022 and .NET 6. If you don't use VS 2022 yet, just install that one too. You can run different VS versions on your PC, they do not interfere with each other.
When you start WpfControlTestbench, a small window appears:
In the left column are 2 tests for 2 controls provided by WPF, in the right column is a control I wrote. You can write your own application or add your test windows to this window. My hope is that other people will write test windows for other WPF controls and share those with us on Github. Have a look for the TextBox test, which is rather sophisticated, but took me only 2 days to write.
Preparing Your Control for Use in TestBench
Only read this and the next chapter if you are interested in the nifty gritty details of how to write your own test window.
When tracing the layouting process, one challenge is that it happens in the Measure() and Arrange() methods. Since these are not events, it is not possible for the TestBench to trace their execution. To make this possible, you have to inherit a new class from your control and override methods like MeasureOverride().
That new class needs to implement the simple WpfControlTestbench interface ITraceName or IIsTracing to support tracing:
public interface ITraceName {
string TraceName { get; }
}
public interface IIsTracing: ITraceName {
public bool IsTracing { get; set; }
}
There was a difficult problem to solve for tracing. The trace should show where the construction of your control starts, then which properties get set and finally a trace showing the control construction is completed. The challenge here is how do you write a trace before the constructor is executing? Like in the example of StackPanel, there is no way to add a trace instruction at the beginning of its constructor. It also does not help to write the start trace into a constructor of an inheriting class, since it only executes after the StackPanel constructor has finished. The solution was to use the following inheritance:
YourControl => YourControlWithConstructor => YourControlTraced
public class YourControlWithConstructor: YourControl {
  public YourControlWithConstructor(object? _) : base() { }
}

public class YourControlTraced: YourControlWithConstructor, ITraceName {

  public YourControlTraced() : this("YourControl") { }

  public YourControlTraced(string traceName) :
         base(TraceWPFEvents.TraceCreateStart(traceName)) {
    TraceName = traceName;
    TraceWPFEvents.TraceCreateEnd(traceName);
   }
}
In XAML, you place your test control like this:
<local:YourControlTraced"/>
This XAML creates a C# line calling the parameterless constructor of YourControlTraced, which calls the other constructors like this:
1) YourControlTraced()
     this("YourControl")

     2) YourControlTraced(string traceName) :
        base(TraceWPFEvents.TraceCreateStart(traceName))

        3) YourControlWithConstructor(object? _) :
           base()

           4)YourControl ()
- Parameterless constructor of
YourControlTraced calls the YourControlTraced constructor with the parameter TraceName. Note that the WPF Name property cannot be used for tracing, because it gets its value assigned only after the constructor has completed. - The
YourControlTraced constructor with the TraceName traces the start of the constructor by calling the method TraceWPFEvents.TraceCreateStart(traceName), which returns null. - The
YourControlWithConstructor constructor has a parameter, but does not use it! It finally calls the YourControl constructor. - The
YourControl constructor executes after a start trace is already written.
Here is a complete code example to prepare StackPanel to be used in TestBench:
using System.Windows;
using System.Windows.Controls;
using System.Windows.Media;

namespace WpfTestbench {

  public class StackPanelWithConstructor: StackPanel {
    public StackPanelWithConstructor(object? _) : base() { }
  }

  public class StackPanelTraced: StackPanelWithConstructor, ITraceName {

    public string TraceName { get; private set; }

    public StackPanelTraced() : this("StackPanel", true) { }

    public StackPanelTraced(string traceName) :
           base(TraceWPFEvents.TraceCreateStart(traceName)) {
      TraceName = traceName;
      TraceWPFEvents.TraceCreateEnd(traceName);
    }

    protected override void OnPropertyChanged(DependencyPropertyChangedEventArgs e) {
      TraceWPFEvents.OnPropertyChanged(this, e, base.OnPropertyChanged, IsTracing);
    }

    protected override Size MeasureOverride(Size constraint) {
      return TraceWPFEvents.MeasureOverride(this, constraint, base.MeasureOverride, IsTracing);
    }

    protected override Size ArrangeOverride(Size finalSize) {
      return TraceWPFEvents.ArrangeOverride(this, finalSize, base.ArrangeOverride, IsTracing);
    }

    protected override void OnRender(DrawingContext drawingContext) {
      TraceWPFEvents.OnRender(this, drawingContext, base.OnRender, IsTracing);
    }
  }
}
Special here is that in the layouting overrides TraceWPFEvents methods are called, which
- mark the start of the overridden method in the trace
- call the overridden method
- mark the end of the overridden method in the trace
If you wonder why not writing just one trace line, the reason is that for example the parent's Measure() calls the child's Measure(), which then looks like this:
Trc 17:54:44.785 GridStarContainer.Measure(605, 517)
Trc 17:54:44.786     StackPanel.Measure(585, 497)
Trc 17:54:44.786     StackPanel.Measure(0, 0) end
Trc 17:54:44.786 GridStarContainer.Measure(20, 20) end
It's exactly this kind of tracing information showing the interaction between the parent and child which helps solving layouting problems.
Writing Your Own Test Window
Here is how the final test widow will look like:
It takes just few lines of XAML code (see ControlWindow.xaml):
You can add anything you like to your window. In this example, the window just contains a TestBench, which contains all the standard test properties and the tracer. You can add to TestBench:
TestProperties, where you can add something like a StackPanel or Grid containing Labels, TextBoxes, etc. to test the properties of your controlTestControl, where you place your control you want to test. This is also a good place to set property values of your control.
Note: If you change the TestControl in XAML, you need to refresh the designer to see the new control.
In the code behind file, you have to write only few lines of code:
using System.Windows;
using System.Windows.Data;
using System.Windows.Media;

namespace WpfTestbench {
  public partial class ControlWindow: Window {

    public ControlWindow() {
      InitializeComponent();

      WpfBinding.Setup(TextTextBox, "Text", TestControlTraced,
        ControlTraced.TextProperty, BindingMode.TwoWay);

      FillStandardColorComboBox.SetSelectedBrush(TestControlTraced.Fill??Brushes.Transparent);
      WpfBinding.Setup(FillStandardColorComboBox, "SelectedColorBrush", TestControlTraced,
        ControlTraced.FillProperty, BindingMode.TwoWay);
    }
  }
}
All you have to do is to make your special properties work, which often can be done with just defining a binding in XAML or code behind. Easy, right?
I wrote WpfBinding() to make my code look nicer when setting up a WPF binding:
public static class WpfBinding {
public static BindingExpression Setup(
object sourceObject, string sourcePath,
FrameworkElement targetFrameworkElement, DependencyProperty tragetDependencyProperty,
BindingMode bindingMode,
IValueConverter? converter = null,
string? stringFormat = null)
{
var newBinding = new Binding(sourcePath) {
Source = sourceObject,
Mode = bindingMode,
Converter = converter,
StringFormat = stringFormat
};
return (BindingExpression)targetFrameworkElement.SetBinding
(tragetDependencyProperty, newBinding);
}
}
Adding Your Own Tests
You add lines like this to the constructor of your test window:
TestBench.TestFunctions.Add(("Green Fill", fillGreen));
TestBench.TestFunctions.Add(("Red Fill",
          ()=>{ TestControlTraced.Fill = Brushes.Red; return null;}));
TestBench.TestFunctions.Add(("Width", testWidth));
TestBench.TestFunctions.Add(("Reset Properties", resetProperties));
TestFunctions is a List in TestBench. Each entry is a test. At that point, it is empty. TestBench will add at a later time its 100+ tests.
public readonly List<(string Name, Func<Action?> Function)> TestFunctions;
A test consists of a name and a function which executes the test and might return another Action, which will verify if the test was successful or throw an exception. Since the layouting happens at a later time, it is not possible to verify if the test was successful in the test function. The verify action will get executed when the user presses the NextButton to execute the next text.
private Action? testWidth() {
  oldWidth = TestControlTraced.Width;
  TestControlTraced.Width = 200;
  return verifyWidth;
}

private void verifyWidth() {
  if (double.IsNaN(TestControlTraced.Width)) return;

  if (TestControlTraced.ActualWidth==TestControlTraced.Width) {
    throw new InvalidOperationException($"Actual width should be {TestControlTraced.Width} " +
      $"but was {TestControlTraced.ActualWidth}.");
  }
}
A failed test gets shown in the EventTracer like this:
Trc 11:20:05.228 Test: Width
Trc 11:20:05.228 Control.Width=200
…
Trc 11:20:05.636 Control.ActualWidth=123

Err 11:20:06.448 Test Error: Actual width should be 200 but was 123.
System.InvalidOperationException
================================
Actual width should be 200 but was 123.
Data: System.Collections.ListDictionaryInternal
Source: WpfControlTestbench
HResult: -2146233079
   at WpfTestbench.ControlWindow.verifyWidth() in
   C:\Users\Peter\source\repos\WpfControlTestbench\WpfControlTestbench\ControlWindow.xaml.cs:
   line 98
   at WpfTestbench.TestBench.nextTestButton_Click(Object sender, RoutedEventArgs e) in
   C:\Users\Peter\source\repos\WpfControlTestbench\WpfControlTestbenchLib\TestBench.cs:line 895
It might be useful if the user can reset the property values which were changed by your test. To do that, add these lines to the constructor of your test window (for complete code, check ControlWindow.xaml.cs):
resetFill = TestControlTraced.Fill;
TestBench.ResetAction = () => TestControlTraced.Fill = resetFill;
ResetAction gets executed when the user presses the ResetButton.
WpfControlTestbench Source Code
Recommended Reading
Congratulations again if you have read until here. For a better understanding of how layouting works in WPF, I highly recommend you read my article on CodeProject (Best Article of February 2022, Second Prize):
Some other top rated WPF articles I wrote on StackOverflow:
My Github projects which might be interesting for you:
- WpfWindowsLib: WPF Controls for data entry, detecting if required data is missing or data has been changed
- TracerLib: Part of it used in
WpfControlTestbench. Fast tracing of exceptions, errors and infos in memory, some entries can be written by a background thread to a file. Great to document what happened just before an exception occurred. - StorageLib: C# only library providing fast object oriented data storage in RAM and long term storage on local hard disk for single user applications. No database required.
- MasterGrab: MasterGrab is a WPF game where a human player plays against several computer players (=Robots). You can program your own Robot in C#. Since 6 years, I play it every day. It takes just about 10 minutes. Perfect for warming up my brain before starting to program.


