Raneto allows only basic username/password authentication, so I added Google OAuth support. In this post, you will see the steps one needs to take to get this working on a fresh copy of Raneto.
TL;DR
Raneto allows only basic username/password authentication, so I added Google OAuth support. This option can be turned on by setting the googleoauth option in the config.default.js file to true, and by supplying the OAuth config object as outlined in the guides below. Additionally, you can allow only emails from the certain domain to use the service with one config setting.
The basic idea was taken from the Google Cloud Platform Node.js guide.
This has been submitted as a pull request on the official Raneto Github repository. This is my way of saying thanks to an awesome author of Raneto. edit: 13.09.2016: The pull request was approved and merged!.
Steps on How to Reproduce this on Fresh Copy
Below are the steps one needs to take to get this working on a fresh copy of Raneto. In case this won’t make it to the official repo, you can clone my fork here. Just make sure you set your Google OAuth credentials properly (more about this in the X section).
Install packages via npm
Make sure you first install Raneto dependencies after you clone it.
Install the following packages:
npm install passport --save-devnpm install passport-google-oauth20 --save-dev
Editing the app/index.js File
- Add passport:
var passport=require('passport'); just after raneto is required. - Add oauth2 middleware:
var oauth2= require('./middleware/oauth2.js'); in the config block, just afer error_handler.js middleware. - Change
secret to secret:config.secret, in the // HTTP Authentication section. - >>> Remove the rn-login route
app.post('/rn-login', route_login); - >>> Remove the logout route:
app.get('/logout', route_logout); - Add the following Oauth settings, just before the
app.post('/rn-login', route_login); line:
if (config.googleoauth === true) {
app.use(passport.initialize());
app.use(passport.session());
app.use(oauth2.router(config));
app.use(oauth2.template);
}
- Change the Online Editor Routes to look like this now:
if (config.allow_editing === true) {
if (config.googleoauth === true) {
app.post('/rn-edit', oauth2.required, route_page_edit);
app.post('/rn-delete', oauth2.required, route_page_delete);
app.post('/rn-add-page', oauth2.required, route_page_create);
app.post('/rn-add-category', oauth2.required, route_category_create);
}
else {
app.post('/rn-edit', authenticate, route_page_edit);
app.post('/rn-delete', authenticate, route_page_delete);
app.post('/rn-add-page', authenticate, route_page_create);
app.post('/rn-add-category', authenticate, route_category_create);
}
}
- Set the root routes to be like this:
if (config.googleoauth === true) {
app.get('/:var(index)?', oauth2.required, route_search, route_home);
app.get(/^([^.]*)/, oauth2.required, route_wildcard);
}
else {
app.get('/:var(index)?', route_search, route_home);
app.get(/^([^.]*)/, route_wildcard);
}
Editing the app/middleware/authenticate.js File
Change the res.redirect(403, '/login'); line to be:
if (config.googleoauth === true) {
res.redirect('/login');
}
else {
res.redirect(403, '/login');
}
Editing the app/routes/login_page.route.js File
Add the googleoauth variable to the return object like this:
return res.render('login', {
layout : null,
lang : config.lang,
rtl_layout : config.rtl_layout,
googleoauth : config.googleoauth
});
Add the oauth2.js File
Create a new file oauth2.js in the app/middleware folder with the following content:
'use strict';
var express = require('express');
var debug = require('debug')('raneto');
var passport = require('passport');
var GoogleStrategy = require('passport-google-oauth20').Strategy;
function extractProfile (profile) {
var imageUrl = '';
if (profile.photos && profile.photos.length) {
imageUrl = profile.photos[0].value;
}
return {
id: profile.id,
displayName: profile.displayName,
image: imageUrl
};
}
function authRequired (req, res, next) {
if (!req.user) {
req.session.oauth2return = req.originalUrl;
return res.redirect('/login');
}
next();
}
function addTemplateVariables (req, res, next) {
res.locals.profile = req.user;
res.locals.login = '/auth/login?return=' +
encodeURIComponent(req.originalUrl);
res.locals.logout = '/auth/logout?return=' +
encodeURIComponent(req.originalUrl);
next();
}
function router(config) {
passport.use(new GoogleStrategy({
clientID: config.oauth2.client_id,
clientSecret: config.oauth2.client_secret,
callbackURL: config.oauth2.callback,
hostedDomain: config.hostedDomain || '',
accessType: 'offline',
}, function (accessToken, refreshToken, profile, cb) {
cb(null, extractProfile(profile));
}));
passport.serializeUser(function (user, cb) {
cb(null, user);
});
passport.deserializeUser(function (obj, cb) {
cb(null, obj);
});
var router = express.Router();
router.get(
'/auth/login',
function (req, res, next) {
if (req.query.return) {
req.session.oauth2return = req.query.return;
}
next();
},
passport.authenticate('google', { scope: ['email', 'profile'] })
);
router.get(
'/auth/google/callback',
passport.authenticate('google'),
function (req, res) {
req.session.loggedIn = true;
var redirect = req.session.oauth2return || '/';
delete req.session.oauth2return;
res.redirect(redirect);
}
);
router.get('/auth/logout', function (req, res) {
req.session.loggedIn = false;
req.logout();
res.redirect('/login');
});
return router;
}
module.exports = {
extractProfile: extractProfile,
router: router,
required: authRequired,
template: addTemplateVariables
};
This is a changed file based on the Google Node.js official example file. Notable differences are in Google strategy settings which basically load settings from our settings config:
clientID: config.oauth2.client_id,
clientSecret: config.oauth2.client_secret,
callbackURL: config.oauth2.callback,
hostedDomain: config.hostedDomain || '',
We’ll define these settings the config.default.js file now.
Editing the example/config.default.js File
Change/add the following settings:
allow_editing : true,
authentication : true,
googleoauth: true,
oauth2 : {
client_id: 'GOOGLE_CLIENT_ID',
client_secret: 'GOOGLE_CLIENT_SECRET',
callback: 'http://localhost:3000/auth/google/callback',
hostedDomain: 'google.com'
},
secret: 'someCoolSecretRightHere',
Google OAuth2 Credentials
Oauth2 settings (GOOGLE_CLIENT_ID and GOOGLE_CLIENT_SECRET) can be found in your Google Cloud Console->API Manager->Credentials project settings (create a project if you don’t have one yet):
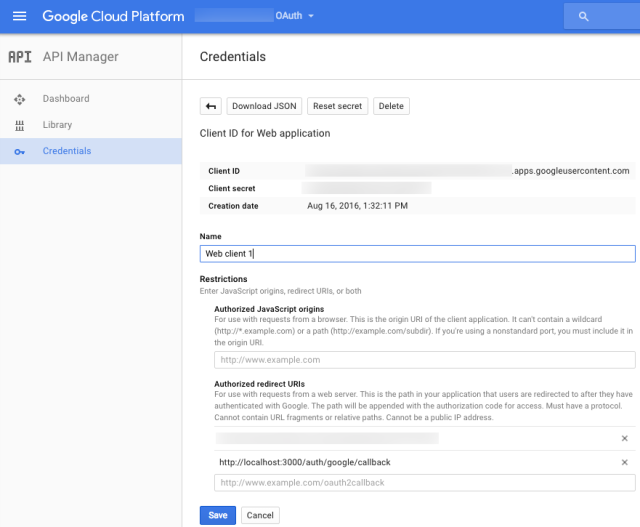
The callback, if testing locally, can be set as shown above (http://localhost:3000/auth/google/callback). The hostedDomain option allows certain domains – for your use case, you may want to set this to your domain.
Google+ API
If you get an error like:
Access Not Configured. Google+ API has not been used in project 701766813496 before, or it is disabled. Enable it by visiting https://console.developers.google.com/apis/api/plus/overview?project=701766813496 then retry. If you enabled this API recently, wait a few minutes for the action to propagate to our systems and retry.
Make sure you enable Google+ API for your project:

Adding Zocial CSS
To add support for the nice Zocial social buttons, download this file from their Github repo to the themes/default/public/styles/ folder.
Editing the themes/default/templates/layout.html File
Replace the login form with:
{{^config.googleoauth}}

<form class="form-inline pull-right">{{#config.authentication}}
{{#loggedIn}}
<div class="dropdown"><button id="userDropDown"
 class="btn btn-info dropdown-toggle" type="button" data-toggle="dropdown">
{{username}}

</button>
<ul class="dropdown-menu dropdown-menu-right">
 	<li><a class="btn btn-info"
         href="{{config.base_url}}/logout">{{lang.login.logout}}</a></li>
</ul>
</div>
{{/loggedIn}}
{{^loggedIn}}
<a class="btn btn-info" href="{{config.base_url}}/login">{{lang.login.login}}</a>
{{/loggedIn}}
{{/config.authentication}}

</form>{{/config.googleoauth}}

{{#config.googleoauth}}

<form class="form-inline pull-right">{{#config.authentication}} {{#loggedIn}}
{{profile.displayName}}
<a class="btn btn-info" href="{{config.base_url}}/auth/logout">
   {{lang.login.logout}}</a> {{/loggedIn}} {{^loggedIn}}
<a class="btn btn-info" href="{{config.base_url}}/auth/login">
   {{lang.login.login}}</a> {{/loggedIn}} {{/config.authentication}}</form>
   {{/config.googleoauth}}
We added two scenarios for when we have Google OAuth enabled (config.googleoauth) and when we don’t (defaulting to the current Raneto behavior).
Editing the themes/default/templates/login.html File
Add zocial reference:
Replace the whole form-bottom classed div with the following code:
<div class="form-bottom">{{#config.googleoauth}}
<a class="zocial google" href="/auth/login">Sign in with Google</a>
{{/config.googleoauth}}{{^config.googleoauth}}

<form class="login-form" action="" method="post">
<div class="form-group"><label class="sr-only" for="form-username">
                        {{lang.login.username}}</label>
<input id="form-username" class="form-username form-control" tabindex="1"
 name="username" type="text" placeholder="{{lang.login.username}}" /></div>
<div class="form-group"><label class="sr-only" for="form-password">
 {{lang.login.password}}</label>
<input id="form-password" class="form-password form-control"
 tabindex="2" name="password" type="password" placeholder="{{lang.login.password}}" /></div>
<button class="btn" type="submit">{{lang.login.login}}</button>

</form>{{/config.googleoauth}}
</div>
Same thing here as well. If we have Google OAuth enabled (config.googleoauth) then we show the new Google login button and hide the rest. Otherwise, we default it to the current Raneto behavior.
Testing
Congratulations, you’re done! Now, to test this locally just run the npm start from the root of your project and go to http://localhost:3000 and you should see this:
After logging in, you should see something like this:
Hope this helps someone!


