Azure Sphere is Microsoft's Linux-based operating system that runs on embedded devices. This article explains how to install the Azure Sphere SDK, connect a certified device, and prepare a development environment for writing and deploying Azure Sphere applications. Later articles will explain how to code and deploy high-level applications.
Introduction
The phrase Internet of Things, or IoT, refers to technology that connects embedded systems, such as sensors and medical devices, to the Internet. Some embrace IoT and see it as a way to make embedded systems easier to access. Others find IoT troubling, and fear that it may lead to pervasive surveillance. Still others find IoT to be an annoying buzzword, referring to vaporware that will always be five years away.
But Microsoft's IoT technology isn't vaporware. Microsoft's cloud offering, Azure, provides resources called IoT hubs that transfer data to and from embedded systems. These hubs also make it possible to transmit device data to other Azure resources.
IoT security is a major concern. Devices are frequently deployed to remote locations, so it's possible that intruders may tamper with them or replace them with untrustworthy duplicates. To prevent this. Microsoft developed Azure Sphere, an operating system that runs on embedded systems and makes it possible to securely communicate with Azure IoT hubs.
The good news is that Azure Sphere's development tools can be freely downloaded. The bad news is that setting up a development environment is complicated. The goal of this article is to present the tasks that need to be performed before you can start coding and deploying Azure Sphere applications. Application development will be discussed in later articles.
1. Hardware Requirements
You can't install Azure Sphere the way you can install Windows or Linux. Azure Sphere can only be installed on devices that have been certified by Microsoft. For a device to be certified, it can't allow developers to uninstall Azure Sphere or tamper with it. Once Azure Sphere is installed, it can't be removed.
As I write this in October 2021, the only certified device is MediaTek's MT3620. The MT3620 contains a Cortex-A7 processor for general-purpose computing and two ARM Cortex-M4 microcontroller cores that access the device's peripherals. These peripherals include 8 analog-to-digital controllers, 12 pulse-width modulation (PWM) outputs, and 72 general-purpose input/output (GPIO) pins.
To write code for the MT3620, you need a suitable development board. From what I've seen, the most popular development boards are the MT3620 Development Kit from Seeed Studio and the MT3620 Starter Kit from Avnet. I'm testing my applications on the Avnet board, and the following figure shows what it looks like.
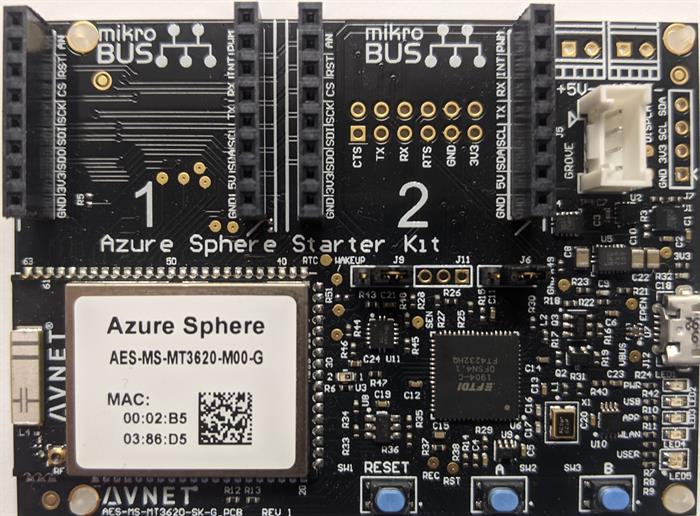
Figure 1: The MT3620 Starter Kit from Avnet
To build applications for this board, you'll need to install the Azure Sphere software development kit (SDK) and a handful of other tools. The following section makes this clear.
2. Software Requirements
Building applications for Azure Sphere is a complex process that requires several steps involving multiple software packages. This section explains how to install the Azure Sphere Software Development Kit (SDK), CMake, Ninja, and the Azure Sphere extension for Visual Studio Code.
2.1 The Azure Sphere SDK
The most important development tool is the Azure Sphere software development kit (SDK), which can be downloaded here. When you run the executable, the first page asks you to agree to the licensing terms. The second page has an Install button that launches the installation process. When you click this, the installer installs several components, including the Azure Sphere command line interface (CLI).
You can verify that installation completed successfully by opening a command prompt and entering azsphere. If this produces a list of commands, installation was successful.
After a successful installation, a folder named Microsoft Azure Sphere SDK will be created in your C:\Program Files (x86) directory. This folder contains two important subfolders: Tools and Sysroots. The Tools subfolder provides important utilities like azsphere.exe, which we'll use extensively.
The Sysroots folder contains utilities needed for building applications. For example, if you look in Sysroots\11\tools\gcc, you'll find tools that start with arm-poky-linux-musleabi. These are needed to compile and link applications for the Cortex-A7 processor on the MT3620. The following article explains how to use these tools to build and deploy applications.
2.2 CMake
CMake is a popular tool for automating software builds. The Azure Sphere SDK relies on CMake to manage the compilation of Azure Sphere applications. To download and install CMake, you'll need to perform six steps:
- Open a browser and visit the CMake home page.
- Click the link entitled Download Latest Release.
- Scroll down and click the link for the Windows x64 Installer.
- Launch the installer (*.msi) and accept the license.
- Be sure to add
CMake to the PATH environment variable. - Click the Install button to install
CMake.
Once the installation is finished, open a command prompt and enter the cmake command. If this describes the usage of CMake, the installation was successful. If this doesn't work, add the bin folder containing the CMake executable to your PATH environment variable.
2.3 Ninja
Ninja accelerates the build process by analyzing system dependencies and making decisions as early as possible. The Azure Sphere build process requires Ninja, and you can download the zipped executable from its Github page.
Right-click the link for ninja-win.zip and save it to your system. Decompress the archive and place ninja.exe in a folder whose location you'll remember. Then update your PATH environment variable so that it includes the folder containing ninja.exe.
2.4 Extension for Visual Studio Code
Microsoft doesn't provide a dedicated application for editing and deploying Azure Sphere applications. But you can add extensions to Visual Studio or Visual Studio Code that simplify Azure Sphere development. Alternatively, you can manage the entire build process using the command line interface.
Visual Studio Code is free and popular, so these articles focus on using Visual Studio Code for editing and deploying Azure Sphere projects. If you don't have this installed, you can download the installer from its home page.
Once you've install Visual Studio Code, you'll need to visit the Extension Marketplace, which provides access to Visual Studio Code extensions. Enter Azure Sphere in the search box, press Enter, and click the entry entitled Azure Sphere. Then click the green box labeled Install. This will open Visual Studio Code on your system and install the extension.
3. Development Board Configuration
At this point, you should have all the necessary software tools installed and a suitable development board connected to your system. Before you can deploy applications, you need to configure the board's operation. This requires entering several commands at a command prompt (or a Visual Studio Code terminal), so this section starts by discussing the commands supported by Azure Sphere.
3.1 Commands
To configure the development board, you'll need to use the command line interface (CLI). Each command starts with azsphere and is followed by a command name and parameters. For example, if you want to add a user, the command name is register-user. If the user's email address is billg@microsoft.com, the full command is given as follows:
azsphere register-user --new-user billg@microsoft.com
There are sixteen different commands available. Table 1 lists them and provides a description of each.
| Command Name | Description |
ca-certificate | Manages certificate authority (CA) certificates for the current tenant |
device | Manages devices, apps, images, and network connections |
device-group | Creates and manages device groups |
feedback | Send feedback to the Azure Sphere development team |
get-support-data | Accesses log files |
hardware-definition | Creates header files from hardware definitions |
image | Manages Azure Sphere images on disk |
image-package | Creates and displays image packages |
login | Logs into the Azure Sphere Security Service |
logout | Logs out from the Azure Sphere Security Service |
product | Manages products |
register-user | Registers a user with the Azure Sphere Security Service |
role | Manages roles in tenants |
show-user | Displays the email address of the current user |
show-version | Displays the SDK version |
tenant | Manages tenants |
Table 1: Azure Sphere Commands
In these articles, we won't use all of the commands or even most of them. But it's important to know how they can be executed and the types of operations they accomplish.
3.2 Board Configuration
When you plug in a development board for the first time, you'll need to perform two important tasks. You'll need to claim the board and then set up networking.
Claiming the Board
Every certified device must be linked to a user account before it can be programmed. More precisely, a certified device must be linked to a tenant associated with a user account. This process is called claiming the board.
Once the device has been linked to an account's tenant, it can't be programmed by another account. This means buying a used MT3620 development board is probably a bad idea.
Claiming a board requires three steps:
- Log in with your account (or register if necessary).
- Create a tenant for the account.
- Link the device to the tenant.
The first step is the easiest. If you already have an Azure Sphere account, you can log in by entering azsphere login. Otherwise, you'll have to register by entering azure register-user followed by --new-user and the account address. In both cases, a browser will open and ask for authentication.
According to Microsoft's documentation, a tenant is an "aggregation point for metadata, functional organization, and information about images, deployments, users, and roles." An account can have multiple tenants, but for this discussion, you only need one. You can create a new tenant with azsphere tenant create, which accepts a --name flag. As an example, the following command creates a tenant named mytenant:
azsphere tenant create --name mytenant
After a tenant has been associated with the current account, you can claim the board with the following command:
azsphere device claim
By default, users and tenants are assigned Administrator roles, which means they have complete access to the device. Different roles can be configured with the azsphere role command.
If an account has multiple tenants, one of them must be selected before the board can be claimed. This is accomplished with azsphere tenant select.
Network Configuration
After a board has been claimed, you can deploy applications to it and configure its operation. One important configuration task is to set up network access through WiFi.
A board's network access can be set up with azsphere device wifi add, which requires two pieces of information: the network's name and password (key). For example, suppose you want the board to access a network named LAN of the Free whose key is 12345. You can configure this with the following command:
azsphere device wifi add --ssid "LAN of the Free" --psk "12345"
It takes a minute or two to establish the board's connection. After that, you can check WiFi connectivity with the command azsphere device wifi show-status.
Once you've installed the required tools and configured your board, you're ready to start coding and deploying applications. In the next article, I'll explain the basics of Azure Sphere development.
History
- 31st October, 2021: Submitted for publication
I've been a programmer, engineer, and author for over 20 years.


 General
  News
News  Suggestion
  Question
  Bug
Bug  Answer
  Joke
Joke  Praise
  Rant
Rant  Admin
Admin 


