In this installment, we work with an evolving GFX library which can now load JPEG images. This article also introduces an optimized graphics driver for the popular ILI9341 display running on an ESP32 with the ESP-IDF.
Introduction
I promised you images. I promised you drivers. Here's me, delivering the goods. In this article, we introduce an extremely capable ILI9341 driver and an improved GFX library with some API improvements and JPEG support.
I'm exhausted from working on this. This library is a labor of love. In the end, I hope to provide a proof for an extremely flexible and generalized graphics library that's source agnostic, meaning it can be used over pretty much any sort of display. As you've seen, it's not even difficult to get it to render as ASCII.
Now we're going to render for real. We're playing for keeps, with a smart and snappy ILI9341 driver. You can draw directly to it using gfx::draw just like you can with a bitmap, but if you dive a little deeper, you'll find performance enhancing niceness like batching operations, and queued asynchronous writes. GFX will already use the batching in many places, but if you want asynchrony, you'll have to do queued frame writes yourself directly to the driver layer for now. Eventually, GFX will have asynchronous draw support for drivers that support it.
In addition to that, I've made several API adjustments, and added JPEG loading support. JPEG loading on an IoT device is tricky, because there's almost never enough RAM to load a real world JPEG all into memory at once. To solve this problem, this and future image loaders support/will support progressive loading wherein you are called back with parts of the image at a time.
Building this Mess
You'll need Visual Studio Code with the Platform IO extension installed. You'll need an ESP32 with a connected ILI9341 LCD display. I recommend the Espressif ESP-WROVER-KIT development board which has an integrated display and several other pre-wired peripherals, plus an integrated debugger and a superior USB to serial bridge with faster upload speeds. They can be harder to find than a standard ESP32 devboard, but I found them at JAMECO and Mouser for about $40 USD. They're well worth the investment if you do ESP32 development. The integrated debugger, though very slow compared to a PC, is faster than you can get with an external JTAG probe attached to a standard WROVER devboard.
This project is set up for the above kit by default. If you're using a generic ESP32, you'll have to set your configuration to the generic-esp32 setting (as listed in the platformio.ini file). Make sure to select the appropriate configuration when you build. In addition, you'll need to change the SPI pin settings near the start of main.cs to whatever your pins are. The defaults are for the ESP-WROVER-KIT. You'll also need to change the specific extra pins for the ILI9341, like the DC, the RST and the backlight pins.
Before you can run it, you must Upload Filesystem Image under the Platform IO sidebar - Tasks.
Note: The Platform IO IDE is kind of cantankerous sometimes. The first time you open the project, you'll probably need to go to the Platform IO icon on the left side - it looks like an alien. Click it to open up the sidebar and look under Quick Access|Miscellaneous for Platform IO Core CLI. Click it, and then when you get a prompt type pio run to force it to download necessary components and build. You shouldn't need to do this again, unless you start getting errors again while trying to build.
Conceptualizing this Mess
Driver Concepts
GFX has no particular knowledge of any specific driver, although in a few places, it can use driver specific optimizations if the driver supports them.
A fully featured driver will have knowledge of GFX and a dependency on it in order to fully integrate. It's not required to fully integrate, and some devices like the SSD1306 - which I also have a preliminary driver for I haven't released yet - lack the capabilities to do anything other than the most basic frame writes.
The ILI9341 driver is feature complete in terms of synchronously writing to the display but does not currently support read operations. The reason is that the datasheet isn't especially clear to me for read operations, and after trying a couple of different approaches with no results, I am at a loss as to what to do next. I've tried looking at other libraries but they haven't been especially helpful.
Usually, a driver will expose two sets of functionality - the raw device calls which are not dependent on GFX, and then the GFX interface bindings that use those calls. I prefer to keep them on the same class for convenience despite it sort of polluting the class with a lot of members.
Drivers may do things such as frame reads and writes which blt pixel data to or from the frame buffer. All GFX capable drivers must support the frame_write(), clear(), fill(), bounds(), dimensions(), caps and pixel_type bindings although note that some drivers will only work on the entire display rather than parts of it at a time. Some drivers, like the included driver support additional operations, like batch writes and setting individual pixels. Also, some drivers may support reading the frame buffer. See the included driver for examples on implementing all of this.
The drivers themselves use little classes I wrote to do raw device I/O, in this case, my spi_master and spi_device classes. These are there for the purpose of considerably simplifying the code, and saving on code size.
When instantiating a driver, typically you will specify the pins, any buffering, and other features as template arguments.
Note that while the driver interface method names are noun_verb, like frame_write<>() the GFX interfaces are verb_noun, like write_frame<>(). Since I dumped both interfaces on the same class (though I didn't have to) this should help distinguish them.
Interfacing with GFX
GFX does not use standard polymorphism for its interfaces. Instead, it uses templates, meaning you don't have to inherit from anything, but you do have to implement necessary members. This has some downsides, like making it so you can leak bad (uncompiled source that's problematic) code into your production branch if you're not careful to check all instantiations when running your tests.
If you're familiar with generic programming in C++ this code should be familiar to you. It was carefully crafted to avoid code bloat in the most common situations, although there are scenarios where it's inefficient in terms of code size, such as trying to run two ILI9341 screens at the same time. I could improve this but it hardly seems worth it for something so unlikely.
Typically when you're accepting a graphics target, you will take its type as a template argument to your method or type. You can then do draw and query operations on that, and as long as you stick to the standards, you should be able to use the same code with a display driver or with a bitmap. See the draw class in gfx_drawing.hpp for examples. When you're spelunking through that file you may notice some weird nested XXXX_helper templates. These facilitate specialization based on the capabilities of the draw target. That way, GFX can query the target to see if it supports a certain method, and if so it can call it, or if no such method exists, it can run the alternative (less efficient) code path. You may need to employ similar techniques yourself to implement different draw operations so it can pay to study them.
Working with Images
Currently, GFX only supports JPEG, but in the future, it will support PNG and may support BMP. As I mentioned prior, image loading happens by way of callbacks wherein a portion of the image is passed each time the callback is fired. This is dramatically more memory efficient than loading the entire image at once, which isn't usually realistic on an IoT device.
Note that the JPEG loading code was ported from Chan's tjpgd.c code and the copyright is included in the source file.
Images can be loaded using image::load() from any type that implements io:stream. There are existing stream implementations for files and for memory, but nothing is stopping you from creating your own.
In the output function, you'll get a small 24-bpp RGB bitmap representing part of the image. You'll most likely need to convert the pixel format but draw::bitmap() will do that for you automatically in a target independent manner.
The above is actually supposed to be a YCbCr based bitmap, since that's what JPEG uses natively. However, my YCbCr pixel<>.convert() code is producing colors that are "washed out" and a bit off tint-wise. After spending hours on it trying to track down the problem, I simply gave up for the time being. As a result, at the top of gfx_image.hpp, there is a HTCW_JPEG_AS_RGB which forces the JPEG to produce RGB pixels, using an internal conversion routine which doesn't seem to share the same problem. This will be fixed in a future release. You can undefine the above if you want to see what I mean about the colors being corrupted. It "feels like" a scaling or rounding problem but I can't find it to save my life.
In order to reduce cross dependencies, this portion of the library is not referenced by anything else. Therefore, the draw class does not have a method for drawing images. You must draw the images in a callback yourself, which is really easy. See the example code.
Using this Mess
Code is worth so much more than words, so let's kick things off with the demo code:
extern "C" { void app_main(); }
#include <stdio.h>
#include <stdlib.h>
#include <string.h>
#include "freertos/FreeRTOS.h"
#include "freertos/task.h"
#include "esp_system.h"
#include "spi_master.hpp"
#include "esp_spiffs.h"
#include "ili9341.hpp"
#include "stream.hpp"
#include "gfx_bitmap.hpp"
#include "gfx_image.hpp"
#include "gfx_drawing.hpp"
#include "gfx_color_cpp14.hpp"
#include "../fonts/Bm437_ATI_8x16.h"
using namespace espidf;
using namespace io;
using namespace gfx;
#ifdef CONFIG_IDF_TARGET_ESP32
#define LCD_HOST HSPI_HOST
#define DMA_CHAN 2
#define PIN_NUM_MISO GPIO_NUM_25
#define PIN_NUM_MOSI GPIO_NUM_23
#define PIN_NUM_CLK GPIO_NUM_19
#define PIN_NUM_CS GPIO_NUM_22
#define PIN_NUM_DC GPIO_NUM_21
#define PIN_NUM_RST GPIO_NUM_18
#define PIN_NUM_BCKL GPIO_NUM_5
#elif defined CONFIG_IDF_TARGET_ESP32S2
#define LCD_HOST SPI2_HOST
#define DMA_CHAN LCD_HOST
#define PIN_NUM_MISO GPIO_NUM_37
#define PIN_NUM_MOSI GPIO_NUM_35
#define PIN_NUM_CLK GPIO_NUM_36
#define PIN_NUM_CS GPIO_NUM_34
#define PIN_NUM_DC GPIO_NUM_4
#define PIN_NUM_RST GPIO_NUM_5
#define PIN_NUM_BCKL GPIO_NUM_6
#elif defined CONFIG_IDF_TARGET_ESP32C3
#define LCD_HOST SPI2_HOST
#define DMA_CHAN LCD_HOST
#define PIN_NUM_MISO GPIO_NUM_2
#define PIN_NUM_MOSI GPIO_NUM_7
#define PIN_NUM_CLK GPIO_NUM_6
#define PIN_NUM_CS GPIO_NUM_10
#define PIN_NUM_DC GPIO_NUM_9
#define PIN_NUM_RST GPIO_NUM_18
#define PIN_NUM_BCKL GPIO_NUM_19
#endif
#define PARALLEL_LINES 16
spi_master g_spi_host(nullptr,
LCD_HOST,
PIN_NUM_CLK,
PIN_NUM_MISO,
PIN_NUM_MOSI,
GPIO_NUM_NC,
GPIO_NUM_NC,
PARALLEL_LINES*320*2+8,
DMA_CHAN);
using lcd_type = ili9341<LCD_HOST,
PIN_NUM_CS,
PIN_NUM_DC,
PIN_NUM_RST,
PIN_NUM_BCKL
>;
using lcd_color = gfx::color<typename lcd_type::pixel_type>;
lcd_type lcd;
void raw_driver_batch_demo() {
lcd.batch_write_begin(0,0,lcd_type::width-1,lcd_type::height-1);
for(uint16_t y=0;y<lcd_type::height;++y) {
for(uint16_t x=0;x<lcd_type::width;++x) {
uint16_t v=0xFFFF*((x+y)%2);
if(lcd_type::result::success!=lcd.batch_write(&v,1)) {
printf("write pixel failed\r\n");
y=lcd_type::height;
break;;
}
}
}
lcd.batch_write_commit();
}
void app_main(void)
{
if(!g_spi_host.initialized()) {
printf("SPI host initialization error.\r\n");
abort();
}
esp_err_t ret;
esp_vfs_spiffs_conf_t conf = {};
conf.base_path="/spiffs";
conf.format_if_mount_failed=false;
conf.max_files=5;
conf.partition_label="storage";
ret=esp_vfs_spiffs_register(&conf);
ESP_ERROR_CHECK(ret);
raw_driver_batch_demo();
lcd.clear(lcd.bounds());
using bmp_type = bitmap<rgb_pixel<3> >;
using bmp_color = color<typename bmp_type::pixel_type>;
const size16 bmp_size(64,64);
uint8_t* bmp_buffer = (uint8_t*)malloc(bmp_type::sizeof_buffer(bmp_size));
if(nullptr==bmp_buffer) {
printf("out of memory\r\n");
abort();
}
bmp_type bmp(bmp_size,bmp_buffer);
bmp.clear(bmp.bounds());
srect16 bounds=(srect16)bmp.bounds();
rect16 ubounds=(rect16)bounds;
draw::filled_ellipse(bmp,bounds,bmp_color::yellow);
srect16 eye_bounds_left(spoint16(bounds.width()/5,
bounds.height()/5),
ssize16(bounds.width()/5,
bounds.height()/3));
draw::filled_ellipse(bmp,eye_bounds_left,bmp_color::black);
srect16 eye_bounds_right(
spoint16(
64-eye_bounds_left.x1-eye_bounds_left.width(),
eye_bounds_left.y1
),eye_bounds_left.dimensions());
draw::filled_ellipse(bmp,eye_bounds_right,bmp_color::black);
srect16 mouth_bounds=bounds.inflate(-bounds.width()/7,
-bounds.height()/8).normalize();
srect16 mouth_clip(mouth_bounds.x1,
mouth_bounds.y1+mouth_bounds.height()/(float)1.6,
mouth_bounds.x2,
mouth_bounds.y2);
draw::ellipse(bmp,mouth_bounds,bmp_color::black,&mouth_clip);
draw::bitmap(lcd,bounds.offset((lcd_type::width-bmp_size.width)/2,0),
bmp,
ubounds);
const font& f = Bm437_ATI_8x16_FON;
const char* text = "Have a nice day!";
srect16 sr = (srect16)lcd.bounds().offset(0,bmp_size.height).crop(lcd.bounds());
ssize16 tsiz = f.measure_text(sr.dimensions(),text);
sr=sr.offset((sr.width()-tsiz.width)/2,0);
draw::text(lcd,sr,text,f,lcd_color::antique_white);
vTaskDelay(3000/portTICK_PERIOD_MS);
io::file_stream fs("/spiffs/image3.jpg");
if(!fs.caps().read) {
printf("image file not found\r\n");
abort();
}
gfx_result gr=image::load(&fs,[](const image::region_type& region,
point16 location,
void* state) {
lcd_type* plcd = (lcd_type*)state;
return gfx_result::success==
draw::bitmap(*plcd,
srect16((spoint16)location,
(ssize16)region.dimensions()),
region,region.bounds());
},&lcd);
if(gr!=gfx_result::success) {
printf("image draw error %d\r\n",(int)gr);
}
vTaskDelay(portMAX_DELAY);
}
First up are our includes. We didn't have to include every GFX header explicitly, nor the stream.hpp header because they will be included with other includes. However, I wanted to show most of the possibilities in terms of what you might include in your applications. We also include the ILI9341 driver, and the SPI classes. Lastly, there's an embedded font which was included via the font includes in ./fonts. These headers were generated from raster fonts stored in old Windows 3.1 .FON files. These were chosen because they were originally designed for 16-bit systems and are low overhead. The fontgen tool used to generate the headers is under ./lib/gfx/tools. It's an ELF binary and was tested on Ubuntu Linux. Headers are already included for every font in the folder.
Most of the rest of the first half is just configuration settings. Change these to match your setup.
Next, we configure the SPI bus which must be done before the display driver. After that, we instantiate and initialize the display driver.
We declare some type aliases to make our life easier later.
Now we're in our main routine. Since we didn't grab a result from the constructor, we need to ensure the SPI got initialized properly.
After that, there's some raw ESP-IDF code to mount the SPIFFS partition.
Next, we clear the entire screen and then do the raw_batch_driver() demo which quickly draws a hatched pattern on the screen using raw driver calls. We immediately move on without delay here, just to demonstrate how fast it is to do batches. The larger your display driver's buffer, the faster this will be up to a point, which you can find by tuning. Normally, you won't use raw driver calls, but this was included for completeness.
After that, we declare a 64x64 3-bit per pixel bitmap. This bit depth is ridiculously low, and it's only there for demonstration purposes - because we can. Note that since there's only one value each for red, green, and blue, the colors you draw with will end up reducing to that. The result is usually... not subtle, but here we can get away with it. On the upside, this uses a lot less memory than 16 bits per pixel. On the other hand, reading and writing from it is slightly slower, since it works in partial bytes. The fastest option would be a RGB565 pixel, 16 bits per, since that's the same type the LCD uses. Note how we have to declare the memory buffer for our bitmap separately. There are a number of reasons for this. In part, not all memory is created equal on all platforms. Some memory might not be DMA capable for example, such as the PSRAM memory on a ESP32 WROVER. Another reason is so you can declare the buffer for smaller bitmaps on the stack if you like. Anyway, we just malloc() it. We never free() since there's no reason to because we just halt at the end.
Now we clear the bitmap, and use several drawing operations to draw a classic smiley face by drawing the head, the eyes, and the mouth in that order. The mouth was drawn by clipping an elipse about halfway down its vertical axis so we just got the bottom of it.
After that, we center the bitmap horizontally on the screen and then draw it. We didn't have to do it this way. We could have drawn directly to the screen, but first I wanted to demonstrate how to use bitmaps, and second, it can be more efficient to use a bitmap to stage a bunch of drawing operations and then draw that to the screen in one go like we did here, as long as you have the memory for it.
After that, we use an embedded font to draw "Have a nice day!" on the screen. We center this horizontally by using the font's measure_text() method to get the dimensions first so we know how big it is in order to center it. We draw that directly to the screen in a slightly off-white color, but it's subtle.
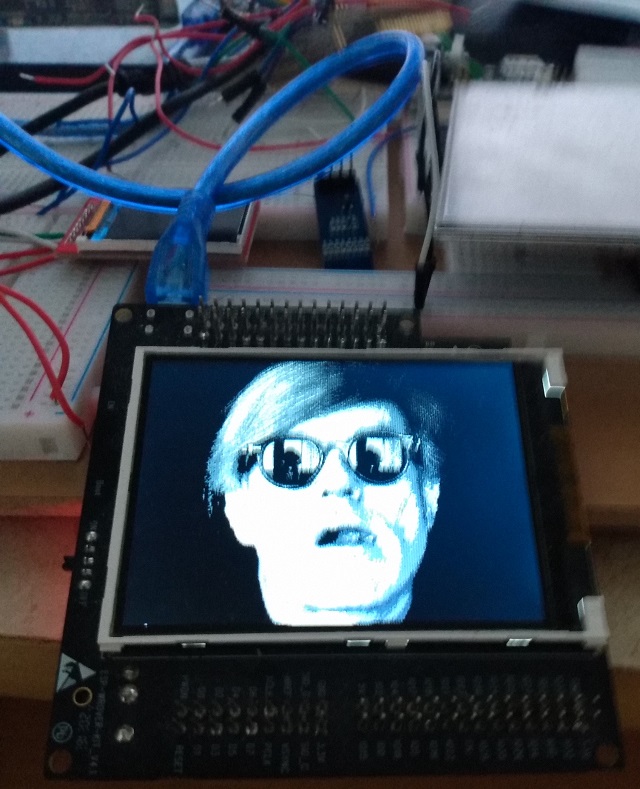
Now we load a JPEG of Andy Warhol's slackjawed, sunglassed face, just because why not? This is done by using image::load() and passing it an io::stream. In this case, we simply used a file_stream. We also give it a callback. You can pass state with that callback. Even though it's global and we didn't need to, we pass lcd down to the routine through the state parameter. We used a flat lambda for this, and all that's done in that routine is drawing the bitmap. The commented code here is actually simpler, but it can do less. The main complication with the draw::bitmap() method is translating the coordinates, since it takes a signed rectangle and an unsigned rectangle, and we have to produce those. Other than that, it's pretty straightforward, since all the pixel conversion and such is done for us. Note that if you really wanted to you could do an effect in this output routine, but if you do, it will be far more efficient to convert() your pixels to RGB565 (rgb_pixel<16>) at the same time as you apply the effect. If you don't do this, then the draw routine has to retraverse the bitmap and convert each pixel in turn. Since you are already traversing to produce your effect, it's much better to simply kill both birds with the same rock.
I almost put asynchronous drawing in this demo, but I didn't because currently there is no GFX API for it. There are simply the raw driver calls on ili9351<>. I also didn't do it because this article is long enough and I wanted some room to explain how to queue operations as well as deep diving the techniques and concepts for writing effective asynchronous GFX code. When I finish this, I'll produce another article. Once this is done, you'll be able to do simple real-time full screen animations where you're redrawing entire LCD frames many times a second on an ESP32 at least.
What's Next
I'm actually not sure. I think I'll probably finish and cover the asynchronous queuing. At some point soon, I want to produce a roll up article with the entire API explained in one place, so that is a possibility as well. We'll see.
History
- 4th May, 2021 - Initial submission
Just a shiny lil monster. Casts spells in C++. Mostly harmless.


