Here we’ll create a container to handle the inference on the ARM processor with Raspberry Pi, and build and run TensorFlow predictions on Raspberry Pi. We also create basic containers for experiments, training, and inference.
Introduction
Container technologies, such as Docker, significantly simplify dependency management and portability of your software. In this series of articles, we explore Docker usage in Machine Learning (ML) scenarios.
This series assumes that you are familiar with ML, containerization in general, and Docker in particular. You are welcome to download the project code.
In the previous article, we created basic containers for experimentation, training, and inference using a regular Intel/AMD CPU. In this one, we’ll create a container to handle the inference on the ARM processor with Raspberry Pi.
Setting Up Docker on Raspberry Pi
With official support for Raspberry Pi, the installation of Docker is pretty straightforward.
We have successfully tested it on Raspberry Pi 4/400 with 4GB RAM, with both Raspberry Pi OS (32-bit) and Ubuntu Server 20.04.2 LTS (64 bit).
You can find detailed installation instructions for any supported OS at the official Docker website.
The easiest way to carry out installation involves a convenience script. It is not recommended for production environments though. Luckily, the "manual" installation is not too complex either.
For the 64-bit Ubuntu server OS it looks like that:
$ sudo apt-get update
$ sudo apt-get install apt-transport-https ca-certificates curl gnupg
$ curl -fsSL https:
$ echo \
"deb [arch=arm64 signed-by=/usr/share/keyrings/docker-archive-keyring.gpg] https://download.docker.com/linux/ubuntu $(lsb_release -cs) stable" | sudo tee /etc/apt/sources.list.d/docker.list > /dev/null
$ sudo apt-get update
$ sudo apt-get install docker-ce docker-ce-cli containerd.io
For different OS versions, the bolded ubuntu and arm64 need to be updated accordingly.
To have access to Docker commands as a non-root user, you should also log out and back in after executing:
$ sudo usermod -aG docker <your-user-name>
Dockerfile for ARM
Although base Python images we’ve used in the previous articles are available for ARM processors, they may not be the best choice. For ARM architectures, similarly to the Alpine OS, many Python libraries are not available pre-compiled and packaged as wheels. They need to be compiled during the installation, which can take a very long time.
Alternatively, we can rely on Python included in the OS. It is not something we would do often, but there is no harm in it with Docker. A single Python environment per container is all we need. We’ll lose some flexibility with the Python version we use, but the ability to choose from many compiled system-level Python libraries will save us lots of time and reduce the generated image size.
This is why we will use debian:buster-slim image as our base. It comes with Python 3.7, which should be sufficient for all our purposes, because it meets the requirements of all the libraries and AI/ML code we're going to run with it
After a few attempts and adding missing system libraries along the way, we ended up with the following Dockerfile to handle our inference:
FROM debian:buster-slim
ARG DEBIAN_FRONTEND=noninteractive
RUN apt-get update \
&& apt-get -y install --no-install-recommends build-essential libhdf5-dev pkg-config protobuf-compiler cython3 \
&& apt-get -y install --no-install-recommends python3 python3-dev python3-pip python3-wheel python3-opencv \
&& apt-get autoremove -y && apt-get clean -y && rm -rf /var/lib/apt/lists/*
RUN pip3 install --no-cache-dir setuptools==54.0.0
RUN pip3 install --no-cache-dir https://github.com/bitsy-ai/tensorflow-arm-bin/releases/download/v2.4.0/tensorflow-2.4.0-cp37-none-linux_aarch64.whl
ARG USERNAME=mluser
ARG USERID=1000
RUN useradd --system --create-home --shell /bin/bash --uid $USERID $USERNAME
USER $USERNAME
WORKDIR /home/$USERNAME/app
COPY app /home/$USERNAME/app
ENTRYPOINT ["python3", "predict.py"]
Note that this time we install the python3-opencv system library in the apt-get section instead of using pip. We can't install NumPy the same way though, because the OS version doesn't match the TensorFlow requirements. Unfortunately, this means that we need to compile NumPy, along with some other TensorFlow dependencies.
Still, the main packages don't need compilation because we use a wheel for Raspberry Pi published on GitHub. If you prefer to use the 32-bit Raspberry PI OS, you/ll need to update the TensorFlow link in the Dockerfile accordingly.
Building Image and Running Container
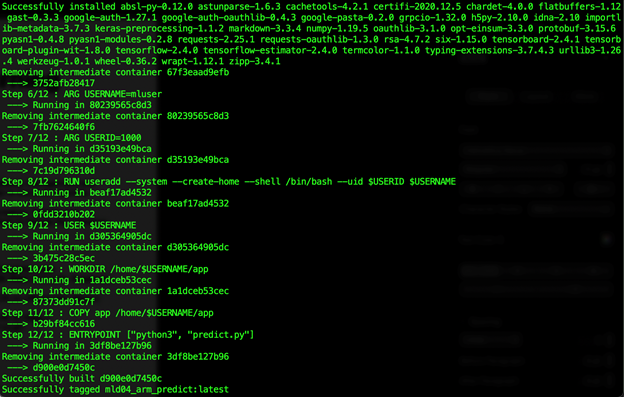
After downloading the project code (with the trained model and sample data), we can build our image:
$ docker build --build-arg USERID=$(id -u) -t mld04_arm_predict .
This operation can take over 30 minutes to complete (at least on Raspberry Pi 4/400). Not lightning-fast by any means, but it could take several times longer if the compilation was required for many libraries.
Finally, we can run our predictions on the "edge":
$ docker run -v $(pwd)/data:/home/mluser/data --rm --user $(id -u):$(id -g) mld04_arm_predict --images_path /home/mluser/data/test_mnist_images
Similarly to the previous article, we map only the data folder as the app and model are stored in the container.
The expected outcome is as follows:

Summary
We have successfully built and run TensorFlow predictions on Raspberry Pi. We have sacrificed some flexibility by relying on precompiled system Python libraries. However, the reduced image build time and final size were well worth it.
In the last article of the series, we’ll go back to the Intel/AMD CPUs. This time, we will speed up our calculations using a GPU.
Jarek has two decades of professional experience in software architecture and development, machine learning, business and system analysis, logistics, and business process optimization.
He is passionate about creating software solutions with complex logic, especially with the application of AI.


