Here we are going to connect all of the previous parts to create a magical emotion detection hat that recognizes and responds to our facial expressions when we wear it virtually.
Introduction
Apps like Snapchat offer an amazing variety of face filters and lenses that let you overlay interesting things on your photos and videos. If you’ve ever given yourself virtual dog ears or a party hat, you know how much fun it can be!
Have you wondered how you’d create these kinds of filters from scratch? Well, now’s your chance to learn, all within your web browser! In this series, we’re going to see how to create Snapchat-style filters in the browser, train an AI model to understand facial expressions, and do even more using Tensorflow.js and face tracking.
You are welcome to download the demo of this project. You may need to enable WebGL in your web browser for performance.
You can also download the code and files for this series.
We are assuming that you are familiar with JavaScript and HTML and have at least a basic understanding of neural networks. If you are new to TensorFlow.js, we recommend that you first check out this guide: Getting Started with Deep Learning in Your Browser Using TensorFlow.js.
If you would like to see more of what is possible in the web browser with TensorFlow.js, check out these AI series: Computer Vision with TensorFlow.js and Chatbots using TensorFlow.js.
Wearing virtual accessories is fun but it is only one step away from wearing them in real life. We could easily build an app that lets you virtually try on a hat—exactly the kind of application you might want to build for an eCommerce website. But if we're going to do that, why not have a little extra fun at the same time? What is magical about software is that we can bring our imagination to life.
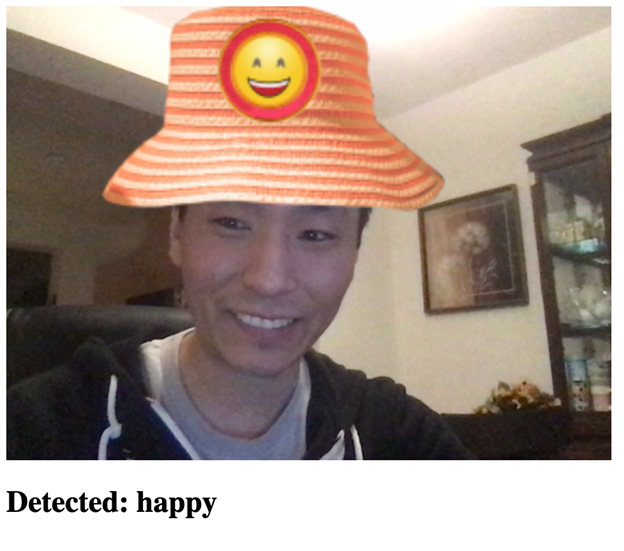
In this article, we are going to connect all of the previous parts to create a magical emotion detection hat that recognizes and responds to our facial expressions when we wear it virtually.
Building a Magical Hat
Remember when we built Real-Time Facial Emotion Detection earlier in this series? Now let’s add some graphics to this project – give it a “face,” so to speak.
To create our living virtual hat, we are going to add the graphics assets to the web page as hidden <img> elements:
<img id="hat-angry" src="web/hats/angry.png" style="visibility: hidden;" />
<img id="hat-disgust" src="web/hats/disgust.png" style="visibility: hidden;" />
<img id="hat-fear" src="web/hats/fear.png" style="visibility: hidden;" />
<img id="hat-happy" src="web/hats/happy.png" style="visibility: hidden;" />
<img id="hat-neutral" src="web/hats/neutral.png" style="visibility: hidden;" />
<img id="hat-sad" src="web/hats/sad.png" style="visibility: hidden;" />
<img id="hat-surprise" src="web/hats/surprise.png" style="visibility: hidden;" />
The key to this project will be making sure we show a hat at all times, at the proper position and size, so we’ll save the hat “states” as a global variable:
let currentEmotion = "neutral";
let hat = { scale: { x: 0, y: 0 }, position: { x: 0, y: 0 } };
To draw the hat with this size and at this position, we’ll use 2D canvas transformations at each frame.
async function trackFace() {
    ...

    output.drawImage(
        video,
        0, 0, video.width, video.height,
        0, 0, video.width, video.height
    );
    let hatImage = document.getElementById( `hat-${currentEmotion}` );
    output.save();
    output.translate( -hatImage.width / 2, -hatImage.height / 2 );
    output.translate( hat.position.x, hat.position.y );
    output.drawImage(
        hatImage,
        0, 0, hatImage.width, hatImage.height,
        0, 0, hatImage.width * hat.scale, hatImage.height * hat.scale
    );
    output.restore();

    ...
}
Using the key facial points provided by TensorFlow, we can calculate the hat’s size and position relative to the face to set the above values.
We can use the distance between the eyes to estimate the size of the head and approximate an “up” vector using the midwayBetweenEyes point and the noseBottom point, which can be used to move the hat up near the top of the face (unlike the virtual glasses in the previous article).
const eyeDist = Math.sqrt(
    ( face.annotations.leftEyeUpper1[ 3 ][ 0 ] - face.annotations.rightEyeUpper1[ 3 ][ 0 ] ) ** 2 +
    ( face.annotations.leftEyeUpper1[ 3 ][ 1 ] - face.annotations.rightEyeUpper1[ 3 ][ 1 ] ) ** 2 +
    ( face.annotations.leftEyeUpper1[ 3 ][ 2 ] - face.annotations.rightEyeUpper1[ 3 ][ 2 ] ) ** 2
);

const faceScale = eyeDist / 80;
let upX = face.annotations.midwayBetweenEyes[ 0 ][ 0 ] - face.annotations.noseBottom[ 0 ][ 0 ];
let upY = face.annotations.midwayBetweenEyes[ 0 ][ 1 ] - face.annotations.noseBottom[ 0 ][ 1 ];
const length = Math.sqrt( upX ** 2 + upY ** 2 );
upX /= length;
upY /= length;

hat = {
    scale: faceScale,
    position: {
        x: face.annotations.midwayBetweenEyes[ 0 ][ 0 ] + upX * 100 * faceScale,
        y: face.annotations.midwayBetweenEyes[ 0 ][ 1 ] + upY * 100 * faceScale,
    }
};
Once we save the predicted emotion to currentEmotion, the corresponding hat image will be shown – and we are ready to try it on!
if( points ) {
    let emotion = await predictEmotion( points );
    setText( `Detected: ${emotion}` );
    currentEmotion = emotion;
}
else {
    setText( "No Face" );
}

Finish Line
Here is the full code for this project:
<html>
<head>
<title>Building a Magical Emotion Detection Hat</title>
<script src="https://cdn.jsdelivr.net/npm/@tensorflow/tfjs@2.4.0/dist/tf.min.js"></script>
<script src="https://cdn.jsdelivr.net/npm/@tensorflow-models/face-landmarks-detection@0.0.1/dist/face-landmarks-detection.js"></script>
</head>
<body>
<canvas id="output"></canvas>
<video id="webcam" playsinline style="
visibility: hidden;
width: auto;
height: auto;
">
</video>
<h1 id="status">Loading...</h1>
<img id="hat-angry" src="web/hats/angry.png" style="visibility: hidden;" />
<img id="hat-disgust" src="web/hats/disgust.png" style="visibility: hidden;" />
<img id="hat-fear" src="web/hats/fear.png" style="visibility: hidden;" />
<img id="hat-happy" src="web/hats/happy.png" style="visibility: hidden;" />
<img id="hat-neutral" src="web/hats/neutral.png" style="visibility: hidden;" />
<img id="hat-sad" src="web/hats/sad.png" style="visibility: hidden;" />
<img id="hat-surprise" src="web/hats/surprise.png" style="visibility: hidden;" />
<script>
function setText( text ) {
document.getElementById( "status" ).innerText = text;
}
function drawLine( ctx, x1, y1, x2, y2 ) {
ctx.beginPath();
ctx.moveTo( x1, y1 );
ctx.lineTo( x2, y2 );
ctx.stroke();
}
async function setupWebcam() {
return new Promise( ( resolve, reject ) => {
const webcamElement = document.getElementById( "webcam" );
const navigatorAny = navigator;
navigator.getUserMedia = navigator.getUserMedia ||
navigatorAny.webkitGetUserMedia || navigatorAny.mozGetUserMedia ||
navigatorAny.msGetUserMedia;
if( navigator.getUserMedia ) {
navigator.getUserMedia( { video: true },
stream => {
webcamElement.srcObject = stream;
webcamElement.addEventListener( "loadeddata", resolve, false );
},
error => reject());
}
else {
reject();
}
});
}
const emotions = [ "angry", "disgust", "fear", "happy", "neutral", "sad", "surprise" ];
let emotionModel = null;
let output = null;
let model = null;
let currentEmotion = "neutral";
let hat = { scale: { x: 0, y: 0 }, position: { x: 0, y: 0 } };
async function predictEmotion( points ) {
let result = tf.tidy( () => {
const xs = tf.stack( [ tf.tensor1d( points ) ] );
return emotionModel.predict( xs );
});
let prediction = await result.data();
result.dispose();
let id = prediction.indexOf( Math.max( ...prediction ) );
return emotions[ id ];
}
async function trackFace() {
const video = document.querySelector( "video" );
const faces = await model.estimateFaces( {
input: video,
returnTensors: false,
flipHorizontal: false,
});
output.drawImage(
video,
0, 0, video.width, video.height,
0, 0, video.width, video.height
);
let hatImage = document.getElementById( `hat-${currentEmotion}` );
output.save();
output.translate( -hatImage.width / 2, -hatImage.height / 2 );
output.translate( hat.position.x, hat.position.y );
output.drawImage(
hatImage,
0, 0, hatImage.width, hatImage.height,
0, 0, hatImage.width * hat.scale, hatImage.height * hat.scale
);
output.restore();
let points = null;
faces.forEach( face => {
const x1 = face.boundingBox.topLeft[ 0 ];
const y1 = face.boundingBox.topLeft[ 1 ];
const x2 = face.boundingBox.bottomRight[ 0 ];
const y2 = face.boundingBox.bottomRight[ 1 ];
const bWidth = x2 - x1;
const bHeight = y2 - y1;
const features = [
"noseTip",
"leftCheek",
"rightCheek",
"leftEyeLower1", "leftEyeUpper1",
"rightEyeLower1", "rightEyeUpper1",
"leftEyebrowLower",
"rightEyebrowLower",
"lipsLowerInner",
"lipsUpperInner",
];
points = [];
features.forEach( feature => {
face.annotations[ feature ].forEach( x => {
points.push( ( x[ 0 ] - x1 ) / bWidth );
points.push( ( x[ 1 ] - y1 ) / bHeight );
});
});
const eyeDist = Math.sqrt(
( face.annotations.leftEyeUpper1[ 3 ][ 0 ] - face.annotations.rightEyeUpper1[ 3 ][ 0 ] ) ** 2 +
( face.annotations.leftEyeUpper1[ 3 ][ 1 ] - face.annotations.rightEyeUpper1[ 3 ][ 1 ] ) ** 2 +
( face.annotations.leftEyeUpper1[ 3 ][ 2 ] - face.annotations.rightEyeUpper1[ 3 ][ 2 ] ) ** 2
);
const faceScale = eyeDist / 80;
let upX = face.annotations.midwayBetweenEyes[ 0 ][ 0 ] - face.annotations.noseBottom[ 0 ][ 0 ];
let upY = face.annotations.midwayBetweenEyes[ 0 ][ 1 ] - face.annotations.noseBottom[ 0 ][ 1 ];
const length = Math.sqrt( upX ** 2 + upY ** 2 );
upX /= length;
upY /= length;
hat = {
scale: faceScale,
position: {
x: face.annotations.midwayBetweenEyes[ 0 ][ 0 ] + upX * 100 * faceScale,
y: face.annotations.midwayBetweenEyes[ 0 ][ 1 ] + upY * 100 * faceScale,
}
};
});
if( points ) {
let emotion = await predictEmotion( points );
setText( `Detected: ${emotion}` );
currentEmotion = emotion;
}
else {
setText( "No Face" );
}
requestAnimationFrame( trackFace );
}
(async () => {
await setupWebcam();
const video = document.getElementById( "webcam" );
video.play();
let videoWidth = video.videoWidth;
let videoHeight = video.videoHeight;
video.width = videoWidth;
video.height = videoHeight;
let canvas = document.getElementById( "output" );
canvas.width = video.width;
canvas.height = video.height;
output = canvas.getContext( "2d" );
output.translate( canvas.width, 0 );
output.scale( -1, 1 );
output.fillStyle = "#fdffb6";
output.strokeStyle = "#fdffb6";
output.lineWidth = 2;
model = await faceLandmarksDetection.load(
faceLandmarksDetection.SupportedPackages.mediapipeFacemesh
);
emotionModel = await tf.loadLayersModel( 'web/model/facemo.json' );
setText( "Loaded!" );
trackFace();
})();
</script>
</body>
</html>
What’s Next? Can We Use Our Eyes and Mouth as a Controller?
This project brought together all of the pieces we’ve built so far in this series for some visual reflection fun. Now, what if we could make it interactive using our face?
In the next and final article of this series, we’ll detect eye blinks and the mouth opens to make an interactive scene. Stay tuned!
Raphael Mun is a tech entrepreneur and educator who has been developing software professionally for over 20 years. He currently runs Lemmino, Inc and teaches and entertains through his Instafluff livestreams on Twitch building open source projects with his community.


