Here we’ll build a pipeline to compose a complete end-to-end object detection model, ready to use in an iOS application with the Vision framework.
Introduction
This series assumes that you are familiar with Python, Conda, and ONNX, as well as have some experience with developing iOS applications in Xcode. You are welcome to download the source code for this project. We’ll run the code using macOS 10.15+, Xcode 11.7+, and iOS 13+.
Getting Rid of the Redundant Boxes
Before we wrap all the models into a single pipeline, there is one last thing to address. When we ran predictions the last time, our model produced the following results.
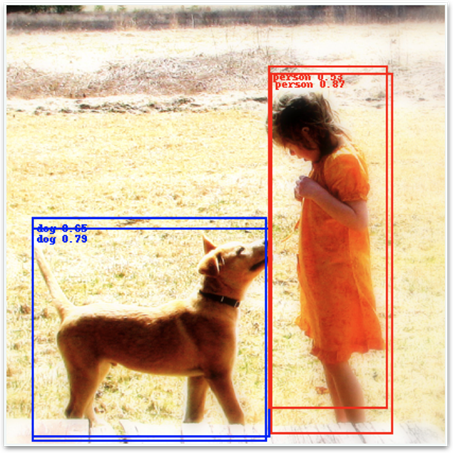
The predictions are correct, but the independent detections generated for each cell and box led to redundant and overlapping boxes. Luckily for us, there is a proven way of addressing such issues: the non-maximum suppression algorithm. Because it is already implemented and available in Core ML as either a model layer or a dedicated model, we will not describe it here in detail. It is enough to understand that this algorithm accepts a list of detections (boxes and classes with the confidence score) and returns only boxes corresponding with the maximum confidence, without redundant overlapping ones. At this moment, only the output from the nonMaximumSuppresion model (not layer) is properly recognized by the iOS Vision framework, so we’ll stick to it.
Let’s start exactly where we have finished the last time – with the created model_decoder instance - see the source code you have downloaded.
Now, we continue as follows (borrowing the code from this article):
nms_spec = ct.proto.Model_pb2.Model()
nms_spec.specificationVersion = 3
nms = nms_spec.nonMaximumSuppression
nms.confidenceInputFeatureName = "all_scores"
nms.coordinatesInputFeatureName = "all_boxes"
nms.confidenceOutputFeatureName = "scores"
nms.coordinatesOutputFeatureName = "boxes"
nms.iouThresholdInputFeatureName = "iouThreshold"
nms.confidenceThresholdInputFeatureName = "confidenceThreshold"
Now we can define basic parameters:
nms.iouThreshold = 0.5
nms.confidenceThreshold = 0.4
nms.pickTop.perClass = True

labels = np.loadtxt('./models/coco_names.txt', dtype=str, delimiter='\n')
nms.stringClassLabels.vector.extend(labels)
The iouThreshold parameter has a value in the [0, 1] range. It determines when two boxes for a single class can be considered redundant. The value of 1 means that only exactly the same boxes are treated as overlapping and redundant, while the value of 0 means that even boxes without any actual overlap may be treated as redundant. It stands to reason that the value should be somewhere between 0 and 1.
The confidenceThreshold parameter allows us to filter out detections with a confidence score below the configured value. If the pickTop.perClass value is set to False, boxes may be treated as overlapping and redundant even if they refer to the different classes, so for multi-class detection you usually want it set to True. Finally, the labels are added to the model, so we will not have to look up labels by class ID in the iOS application.
Now, we can map the model_decoder outputs to our new model inputs:
for i in range(2):
    decoder_output = model_decoder._spec.description.output[i].SerializeToString()

    nms_spec.description.input.add()
    nms_spec.description.input[i].ParseFromString(decoder_output)

    nms_spec.description.output.add()
    nms_spec.description.output[i].ParseFromString(decoder_output)

nms_spec.description.output[0].name = 'scores'
nms_spec.description.output[1].name = 'boxes'

output_sizes=[80, 4]
for i in range(2):
    ma_type = nms_spec.description.output[i].type.multiArrayType
    ma_type.shapeRange.sizeRanges.add()
    ma_type.shapeRange.sizeRanges[0].lowerBound = 0
    ma_type.shapeRange.sizeRanges[0].upperBound = -1
    ma_type.shapeRange.sizeRanges.add()
    ma_type.shapeRange.sizeRanges[1].lowerBound = output_sizes[i]
    ma_type.shapeRange.sizeRanges[1].upperBound = output_sizes[i]
    del ma_type.shape[:]
Let’s save the non-maximum suppression model:
model_nms = ct.models.MLModel(nms_spec)
model_nms.save('./models/yolov2-nms.mlmodel')
Building the Pipeline
With all the models in place (model_converted, model_decoder, and model_nms), we can build a pipeline which binds them together:
input_features = [ ('input.1', datatypes.Array(1,1,1)),
('iouThreshold', datatypes.Double()),
('confidenceThreshold', datatypes.Double())
]
output_features = [ 'scores', 'boxes' ]
pipeline = ct.models.pipeline.Pipeline(input_features, output_features)
pipeline.spec.specificationVersion = 3
pipeline.add_model(model_converted)
pipeline.add_model(model_decoder)
pipeline.add_model(model_nms)
The last thing to do is to replace the pipeline’s input and outputs placeholders with the inputs and outputs of the actual models, then save the pipeline:
pipeline.spec.description.input[0].ParseFromString(model_converted._spec.description.input[0].SerializeToString())
pipeline.spec.description.output[0].ParseFromString(model_nms._spec.description.output[0].SerializeToString())
pipeline.spec.description.output[1].ParseFromString(model_nms._spec.description.output[1].SerializeToString())

model_pipeline = ct.models.MLModel(pipeline.spec)
model_pipeline.save("./models/yolov2-pipeline.mlmodel")
Predictions on the Pipeline
Because our pipeline returns data in a slightly different format than the one we’ve used before (boxes and class confidences in two arrays instead of a single one), we need to update our annotate_image function:
def annotate_image(image, preds):
    annotated_image = copy.deepcopy(image)
    draw = ImageDraw.Draw(annotated_image)

    w,h = image.size
    colors = ['red', 'orange', 'yellow', 'green', 'blue', 'white']

    boxes = preds['boxes']
    scores = preds['scores']

    for i in range(len(scores)):
        class_id = int(np.argmax(scores[i]))
        score = scores[i, class_id]

        xc, yc, w, h = boxes[i]
        xc = xc * 416
        yc = yc * 416
        w = w * 416
        h = h * 416

        x0 = xc - (w / 2)
        y0 = yc - (h / 2)
        label = labels[class_id]
        color = ImageColor.colormap[colors[class_id % len(colors)]]

        draw.rectangle([(x0, y0), (x0 + w, y0 + h)], width=2, outline=color)
        draw.text((x0 + 5, y0 + 5), "{} {:0.2f}".format(label, score), fill=color)

    return annotated_image
Now we can go back to the Open Images dataset to see how the completed model works on our favourite image:
image = load_and_scale_image('https://c2.staticflickr.com/4/3393/3436245648_c4f76c0a80_o.jpg')
preds = model_pipeline.predict(data={'input.1': image})
annotate_image(image, preds)

A couple more samples.
Next Steps
We finally have the completed model, with no redundant detections left. In the next article, we’ll start working on the iOS application that will use that model.
Jarek has two decades of professional experience in software architecture and development, machine learning, business and system analysis, logistics, and business process optimization.
He is passionate about creating software solutions with complex logic, especially with the application of AI.


