In this article, we’ll start with the conversion of a YOLO Object Detection model from Open Neural Network Exchange format (ONNX) to Core ML.
Introduction
In the previous article series, we have created an iOS application for image classification. However, in many scenarios, assigning a single label to a picture is not enough. For example, in a security system, you would like to know not only if there is a suitcase somewhere in the picture, but also where it is, and whether it is surrounded by people or abandoned.
Object detection models can help us achieve exactly that. In this series, we’ll use a pretrained model to create an iOS application that will detect multiple persons and objects in a live camera feed rather than in a static picture.
This series assumes that you are familiar with Python, Conda, and ONNX, as well as have some experience with developing iOS applications in Xcode. You are welcome to download the source code for this project. We’ll run the code using macOS 10.15+, Xcode 11.7+, and iOS 13+.
To create the coreml Conda environment, use the env-coreml.yml file from the downloaded code and the following commands:
$ conda env create -f env-coreml.yml
$ conda activate coreml
$ jupyter notebook
In this article, we’ll start with the conversion of a YOLO Object Detection model from Open Neural Network Exchange format (ONNX) to Core ML. While you could train your own object detector from scratch, it would be an exercise in frustration. Unless you have a massive training dataset and many dollars to spend on GPU time, you’ll get far more accurate results using a pre-trained YOLO object detection model.
Object Detection with YOLO
An object detection model accepts an image as an input and returns a list of detected objects with corresponding labels and bounding boxes.
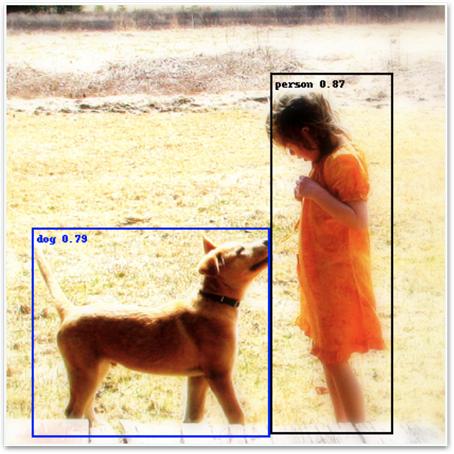
The above image is taken from the Open Images dataset.
In this series, we’ll use the YOLO architecture, first introduced in the article "YOLO9000: Better, Faster, Stronger," or YOLO v2, to be more precise. YOLO stands for "You Only Look Once," which reflects its basic idea: a single pass of image data through the neural network produces the detection results. Many articles are explaining how YOLO works in detail; for example, "YOLO: Real-Time Object Detection" or "Real-time object detection with YOLO." Here, we’ll focus on the bare basics.
YOLO divides an input image into a grid. For each of the grid cells, it calculates multiple boxes with the corresponding object labels. To make things a little easier (for the model, not for those who use it), it doesn’t calculate absolute box coordinates but rather a set of factors to scale predefined "anchor" boxes.

YOLO v2, which we’ll use in this article series, uses a grid with 169 cells (13 x 13), with five boxes per cell. Together, these provide 845 bounding boxes the model processes for each image.
Before we go deeper into YOLO’s output, let’s focus on the first step: converting a YOLO model to the Core ML format.
Finding the Right Model
There are many models available in the ONNX Model Zoo, although not all are equally easy to use or convert, mostly due to lack of documentation. We selected YOLO v2 after a few failed attempts to convert YOLO v4 or v3. That was a valuable lesson: even though Core ML supports the same set of operations ("opset") version declared by the source ONNX model, the conversion may fail.
The selected model was trained on the COCO dataset, including 80 various classes of objects, such as a person, dog, knife and so on.
Converting ONNX to Core ML
Once the model has been downloaded to the path stored in the onnx_model_path variable, we can load it:
import os
import coremltools as ct
import onnx
import urllib

onnx_model_path = './models/yolov2-coco-9.onnx'

with open(onnx_model_path, 'rb') as f:
    model_onnx = onnx.load(f)
Next, let’s inspect the model’s input:
print(model_onnx.graph.input)
So the input node has the name "input.1," and it accepts an array with dimensions (1, 3, 416, 416), which corresponds with a batch of 3-channel images (RGB), 416 x 416 pixels each.
Documentation for this particular model on the ONNX Model Zoo page is very vague. However, as the available preprocessing code for both YOLO v3 and v4 scale input values to the range [0 - 1], we’ll assume that this is true for v2 as well. We can now run the conversion:
cml_model = ct.converters.onnx.convert(
    model=onnx_model_path,
    image_input_names=['input.1'],
    preprocessing_args={
        'image_scale': 1/255.0,
            'is_bgr': False
    },
    minimum_ios_deployment_target='13',
)
Make sure that you assign a single element list to the image_input_names parameter. If you miss the square brackets there, everything will seem to work fine, but the input scaling defined by the preprocessing_args parameter will be silently ignored during predictions. It may not seem like much – but it is. It messes up the results the model returns, and you may spend a long time trying to figure out what went wrong and questioning the deterministic nature of the world. We’ve been there!
When the conversion completes, you should see a confirmation in the log:
We can save the converted model and take a look at its details:
cml_model_path = './models/yolov2-coco-9.mlmodel'
cml_model.save(cml_model_path)
print(cml_model)
Fine: The input is an RGB image with dimensions 416 x 416. Now let’s quickly check if we can use it for predictions. To do it, we need to crop and scale our image to 416 x 416 pixels:
def load_and_scale_image(image_url):
    image = Image.open(urlopen(image_url))
    w,h = image.size
    min_dim = min(w,h)
    x0 = int((w - min_dim)/2)
    y0 = int((h - min_dim)/2)
    box = (x0, y0, x0 + min_dim, y0 + min_dim)
    return image.crop(box=box).resize((416,416))

image = load_and_scale_image('https://c2.staticflickr.com/4/3393/3436245648_c4f76c0a80_o.jpg')
pred = cml_model.predict(data={INPUT_NODE: image})
As you can see, the model’s output is an array shaped (1, 425, 13, 13). The first dimension represents a batch, and the last two represent the 13 x 13 YOLO’s grid we’ve mentioned above. But what about the "425" value in each cell? Continue to the next article in the series to find out.
Next Steps
In the next article of this series, we’ll discuss how to convert the output values into the detected object labels, confidence scores, and the corresponding boxes.
History
- 20th November, 2020: Initial version
Jarek has two decades of professional experience in software architecture and development, machine learning, business and system analysis, logistics, and business process optimization.
He is passionate about creating software solutions with complex logic, especially with the application of AI.


