In this article, we'll write a small program using oneAPI and DPC++ from scratch and subsequently deploy and run our program on hardware in the DevCloud.
Introduction
In this article, we'll be accelerating an existing C++ program with GPUs by porting the application to use Intel's oneAPI toolkit and compiler. The application we'll be porting is a C++ program that computes the discrete cosine transform of an image.
This operation is very common in image and video compression codecs (e.g. H.264, WebM, JPEG, WebP, etc.) and also highly amenable to parallelization. First, we'll present the C++ application and briefly describe how it works. For a fuller description of the underlying mathematics of the DCT, you'll want to consult the wiki page which gives not only an accessible description of the calculation, but also a worked computation. Then, we'll demonstrate how we can take advantage of Intel's oneAPI libraries to parallelize the application.
Intel's oneAPI is an open, standards-based programming model, empowering C++ developers to target different accelerator architectures with in a uniform manner. This is in contrast to specialized APIs such as Vulkan, CUDA, or D3D12 which target GPUs in a bespoke manner, or Verilog and VHDL which target FPGAs. When programming with oneAPI, the same code can be used to target CPUs, GPUs, and FPGAs alike. The only thing you need to get started is a working installation of the oneAPI toolkit which ships with DPC++, Intel's extension to the Clang compiler, needed to compile C++ code to target the various supported acclerator types.
An additional benefit of using oneAPI is the ability to deploy applications to Intel's DevCloud, a sandbox environment providing access to compute clusters provisioned with powerful CPUs and FPGAs. Practitioners familiar with the complexity of managing FPGA toolchains will likely be pleased to deploy software in a nearly turnkey environment, targeting FPGAs such as the Arria 10 without needing an immediate investment in hardware. In this article, we'll be writing a small program using oneAPI and DPC++ from scratch and subsequently deploy and run our program on hardware in the DevCloud.
Why Port to a GPU?
It may seem straightforward to think that porting C++ applications to a GPU are a strict win. However, it's important to consider the way in which CPUs and GPUs perform differently and analyze the tradeoffs involved. CPUs are topologically simple processors. A CPU consists of multiple cores (which may be further subdivided into logical cores, e.g., Intel's hyperthreading). Each logical core has its own instruction cache, data cache, and command queue. While a thread is assigned to a core, it has exclusive access to the core's resources and can fetch instructions from memory for evaluation.
In contrast, a GPU's architecture is hierarchical in nature, and designed to maximize throughput. To achieve this, instead of having each core maintain its own caches and command queue, individual processing units are instead grouped into subgroups (also known as warps on Nvidia hardware). Instructions across an entire subgroup are single issue, that is, all threads within a subgroup operate on the same instruction at a given time. Furthermore, while each thread has its own set of vector registers, the entire subgroup has access to fast device memory that is shared. It should be relatively clear why this arrangement of silicon results in higher throughput, fewer resources and instructions are needed to drive more work.
Algorithms that map cleanly to GPUs are those that are amenable to high degrees parallelization. In particular, if a task can be split into subtasks such that the subtasks can work in relative isolation from one another, the GPU is a prime candidate for accelerating the work. The Discrete Cosine Transform is one such algorithm easily accelerated by GPUs which we'll look at in this article.
C++ Discrete Cosine Transform
Without going too much into the mechanics of the Discrete Cosine Transform (henceforth, the DCT), let's just recount a few facts about the DCT:
-
Like the Fourier Transform, the DCT is a fully invertible transform from the spatial domain to the frequency domain
-
Unlike the Fourier Transform, the DCT is built on only even functions (cosines)
-
The DCT is commonly used in image and video compression algorithms; after the DCT is applied, fewer bits are allocated to store the higher frequency components because they are perceptually less significant
When the DCT is actually applied to an image or video frame, it's commonly applied to individual blocks within the raster (8x8 blocks are a typical size). For this demonstration, we'll be performing the following operations:
-
Load an image and convert it to greyscale
-
For each 8x8 block within the image, we'll map it to an 8x8 block of frequency amplitudes (applying the DCT)
-
Immediately, we'll invert the DCT to recover the original image and write it to disk for comparison
This application won't "produce" any result other than an image that should hopefully be identical to the original image. However, the intermediate frequency amplitude values can be quantized and compressed in a typical image or video codec. The encoding and decoding we perform here is largely illustrative of the technique, and the decoded output is a useful visual metric to determine if our code works as intended. While, we won't delve any further into the DCT or its properties, interested readers are encouraged to read the excellent introduction on wikipedia.
Without further ado, let's jump into the code!
Image Loading and Greyscale Conversion
To read and write images, we'll be using the single-file libraries stb_image and stbimagewrite respectively. After putting these files in your source tree, create a main.cpp file with the following included headers at the top.
#include <CL/sycl.hpp>
#include <cmath>
#include <cstdint>
#include <cstdio>
#include <cstdlib>
#include <cstring>

#define STB_IMAGE_WRITE_IMPLEMENTATION
#include "stb_image_write.h"

#define STB_IMAGE_IMPLEMENTATION
#include "stb_image.h"
Then, we can load an image like so:
int channels;
int width;
int height;
uint8_t* image = stbi_load(path, &width, &height, &channels, 3);
Each individual RGB pixel can be mapped to greyscale with the following function:
float luminance(uint8_t r, uint8_t g, uint8_t b)
{
float r_lin = static_cast<float>(r) / 255;
float g_lin = static_cast<float>(g) / 255;
float b_lin = static_cast<float>(b) / 255;
return 0.2126f * r_lin + 0.7152 * g_lin + 0.0722 * b_lin;
}
If you aren't familiar with color-theory, just remember that green is perceptually brighter than red and blue, with blue being the least perceptually bright color component of the three.
Then, we can simply map the entire image to greyscale like so:
uint8_t* out = reinterpret_cast<uint8_t*>(std::malloc(width * height));
int8_t* grey = reinterpret_cast<int8_t*>(std::malloc(width * height));
for (int y = 0; y != height; ++y)
{
for (int x = 0; x != width; ++x)
{
int offset = y * width + x;
uint8_t* pixel = &image[3 * offset];
float lum = luminance(pixel[0], pixel[1], pixel[2]);
grey[offset] = static_cast<int>(lum * 255) - 128;
out[offset] = static_cast<uint8_t>(lum * 255);
}
}
stbi_write_png("grey.png", width, height, 1, out, width);
DCT and Back Again
Next, we'll loop through each 8x8 block within our image, apply the DCT, reverse the DCT, and write the result to a new image.
constexpr static int block_size = 8;
constexpr static float inv_sqrt2 = 0.70710678118f;
constexpr static float pi = 3.14159265358979323846f;
constexpr static float scale = 0.25f;
int block_count = width / block_size;
for (int block_x = 0; block_x != block_count; ++block_x)
{
for (int block_y = 0; block_y != block_count; ++block_y)
{
float dct[block_size * block_size];
for (int u = 0; u != block_size; ++u)
{
float a_u = u == 0 ? inv_sqrt2 : 1.f;
for (int v = 0; v != block_size; ++v)
{
float& out = dct[v * block_size + u];
float a_v = v == 0 ? inv_sqrt2 : 1.f;
float a = scale * a_u * a_v;
out = 0.f;
for (int x = 0; x != block_size; ++x)
{
for (int y = 0; y != block_size; ++y)
{
int8_t value = grey[width * (block_y * block_size + y)
+ block_x * block_size + x];
float cosu = std::cosf((2 * x + 1) * u * pi / 2 / block_size);
float cosv = std::cosf((2 * y + 1) * v * pi / 2 / block_size);
out += cosu * cosv * value;
}
}
out *= a;
}
}
for (int x = 0; x != block_size; ++x)
{
for (int y = 0; y != block_size; ++y)
{
uint8_t& value = out[width * (block_y * block_size + y)
+ block_x * block_size + x];
float acc = 0.f;
for (int u = 0; u != block_size; ++u)
{
float a_u = u == 0 ? inv_sqrt2 : 1.f;
for (int v = 0; v != block_size; ++v)
{
float a_v = v == 0 ? inv_sqrt2 : 1.f;
float a = scale * a_u * a_v;
float amplitude = dct[v * block_size + u];
float cos_u = std::cosf((2 * x + 1) * u * pi / 2 / block_size);
float cos_v = std::cosf((2 * y + 1) * v * pi / 2 / block_size);
acc += a * amplitude * cos_u * cos_v;
}
}
value = static_cast<uint8_t>(acc + 128);
}
}
}
}
stbi_write_png("grey_dct.png", width, height, 1, out, width);
This code snippet might seem like a mouthful at first blush, but the general structure is that we have two sets of loops. The outermost duet of loops iterates through each 8x8 block. In inner loops iterate within the sixty-four entires of an individual 8x8 block.
With any luck, this code should produce a pair of images like the following (they are supposed to look identical):
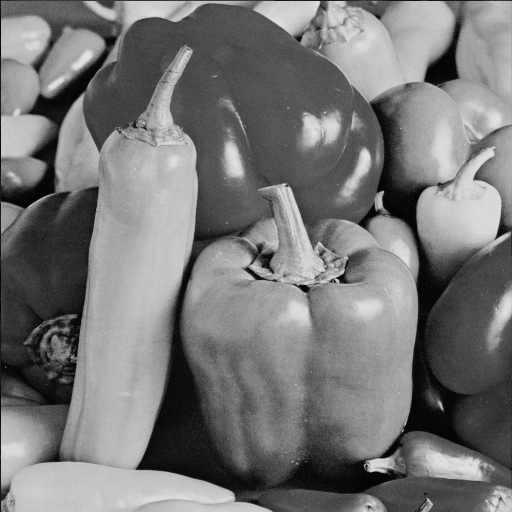

The second image here has undergone a DCT and back, and the resemblance should be striking (any error you encounter is likely related to floating point error).
Running on a GPU with Intel's DPC++
Those loops should look extremely parallelizable. After all, each block can be evaluated without any knowledge of what's happening to any other block. Furthermore, within a block, each frequency amplitude can be evaluated independently of the others. After all frequency amplitudes are available, the inverse transform can once again proceed in parallel.
Our strategy then, is to dispatch each 8x8 block as an independent workgroup. Within the workgroup, all frequencies can be evaluated in parallel. Then, we want each thread in the workgroup to block until the forward DCT is complete. After this barrier, all threads will once again be able to resume parallel execution, this time, performing the inverse transform and writing out the data needed.
Initializing a SYCL Device and Queue
In order to submit hardware-accelerated commands, we need to construct a cl::sycl::queue. Queues are needed to marshall commands and memory to a device.
class gen9_gpu_selector : public cl::sycl::device_selector
{
public:
gen9_gpu_selector()
: cl::sycl::device_selector()
{}
int operator()(cl::sycl::device const& device) const override
{
if (device.get_info<cl::sycl::info::device::name>()
== "Intel(R) Gen9 HD Graphics NEO")
{
return 100;
}
return 0;
}
};
cl::sycl::queue queue{gen9_gpu_selector{}};
Here, we make a custom selector to prioritize the Gen9 integrated GPU on recent Intel CPUs. You can also choose built-in selectors such as the cl::sycl::gpu_selector, cl::sycl::fpga_selector, cl::sycl::host_selector, or just the cl::sycl::default_selector.
Greyscale Conversion
To perform the greyscale conversion, we first need to allocate memory writable by the device but readable by the host. To do this, we'll use DPC++'s unified memory abstractions. Note that this abstraction is not provided by the SYCL standard, but is an extension provided by Intel. We'll also need a buffer to house device memory for the intermediate 0-centered greyscale data.
uint8_t* out = reinterpret_cast<uint8_t*>(
    cl::sycl::malloc_shared(width * height, queue));

cl::sycl::buffer<int8_t, 1> greyscale_buffer{width * height};
The greyscale conversion routine itself is fairly similar to our C++ code. Instead of directly executing on the host, however, the code is submitted to the device queue created earlier.
queue.submit([&greyscale_buffer, &image_buffer, out, width, height](
cl::sycl::handler& h) {
auto data = greyscale_buffer.get_access<cl::sycl::access::mode::discard_write>(h);
auto image = image_buffer.get_access<cl::sycl::access::mode::read>(h);
h.parallel_for(cl::sycl::range<1>(width * height),
[image, data, out](cl::sycl::id<1> idx) {
int offset = 3 * idx[0];
float lum = luminance(image[offset],
image[offset + 1],
image[offset + 2]);
data[idx[0]] = static_cast<int>(lum * 255) - 128;
out[idx[0]] = static_cast<uint8_t>(lum * 255);
});
});
The get_access<M> method of the SYCL buffer allows us to advertise that code submitted to the queue will access memory in a particular way. The SYCL runtime, in turn, will sequence queue submissions along with any need memory synchronization. Furthermore, note that while we wrote the luminance function with vanilla C++, the compiler is able to compile it to executable code suitable for the device we target.
Another distinction between the DPC++ code an our C++ code is that loops are expressed in terms of range abstractions. For example, cl::sycl::range<1>(20) represents a 1-dimensional range consisting of 20 items. In the kernel function itself, a cl::sycl::id<1> index object is passed to communicate to the thread which item in the range the thread is assigned to. We'll see another important type of range in the next section.
Forward and Inverse DCT Workgroup Submission
As we mentioned before, we want to submit 8x8 blocks in parallel, with another layer of parallelism within each block. The way in which this is expressed in SYCL is with a different type of range, namely, the cl::sycl::nd_range. We'll also need a way to request memory that is transient but shared across the workgroup. Let's show what the structure of our forward and inverse DCT submission will look like:
int block_count = width / block_size;
queue.submit([&greyscale_buffer, out, width, height, block_count](
cl::sycl::handler& h) {
auto data = greyscale_buffer.get_access<cl::sycl::access::mode::read>(h);
cl::sycl::range<1> local_memory_range(block_size * block_size);
cl::sycl::accessor<float,
1,
cl::sycl::access::mode::read_write,
cl::sycl::access::target::local>
dct(local_memory_range, h);
cl::sycl::range<2> workgroup_count(block_count, block_count);
cl::sycl::range<2> workgroup_size(block_size, block_size);
auto global = workgroup_count * workgroup_size;
h.parallel_for(
cl::sycl::nd_range<2>(global, workgroup_size),
[data, out, width, dct](cl::sycl::nd_item<2> item) {
int block_x = item.get_group(0);
int block_y = item.get_group(1);
int u = item.get_local_id(0);
int v = item.get_local_id(1);
});
});
Here, we use an nd_range<2> object to denote a two-tier hierarchical range. The top-level hierarchy spans across the entire image, but we supply a second range (called workgroup_size here) to specify the dimensions of the inner-hierarchy. In addition, we create a local memory accessor to create space for 8x8 floats needed to store the temporary DCT data. The cl::sycl::nd_item object received by the lambda passed to the parallel_for has a number of methods needed to retrieve the invocation's position within a workgroup, and workgroup within the global dispatch context. The ranges the group and local ids correspond to can be derived from the workgroup size and counts as illustrated in the comments above.
With this in place, the interior of the parallel-for is relatively straightforward to write:
float a_u = u == 0 ? inv_sqrt2 : 1.f;
float a_v = v == 0 ? inv_sqrt2 : 1.f;
float a = scale * a_u * a_v;
float amp = 0.f;
for (int x = 0; x != block_size; ++x)
{
for (int y = 0; y != block_size; ++y)
{
int8_t value = data[width * (block_y * block_size + y)
+ block_x * block_size + x];
float cosu = cl::sycl::cos((2 * x + 1) * u * pi / 2 / block_size);
float cosv = cl::sycl::cos((2 * y + 1) * v * pi / 2 / block_size);
amp += cosu * cosv * value;
}
}
amp *= a;
dct[v * block_size + u] = amp;
item.mem_fence<cl::sycl::access::mode::write>(
cl::sycl::access::fence_space::local_space);
item.barrier(cl::sycl::access::fence_space::local_space);
int x = item.get_local_id(0);
int y = item.get_local_id(1);
uint8_t& value = out[width * (block_y * block_size + y)
+ block_x * block_size + x];
float acc = 0.f;
for (u = 0; u != 8; ++u)
{
a_u = u == 0 ? inv_sqrt2 : 1.f;
for (v = 0; v != 8; ++v)
{
a_v = v == 0 ? inv_sqrt2 : 1.f;
a = scale * a_u * a_v;
amp = dct[v * block_size + u];
float cos_u = cl::sycl::cos((2 * x + 1) * u * pi / 2 / block_size);
float cos_v = cl::sycl::cos((2 * y + 1) * v * pi / 2 / block_size);
acc += a * amp * cos_u * cos_v;
}
}
value = static_cast<uint8_t>(acc + 128);
There are a few important callouts to make here. While the bulk of the code is similar to our C++ program, we also needed a mem_fence and barrier. The memory fence as written above ensures that all writes to local shared memory are visible to all invocations within the workgroup, and the barrier ensures that all threads wait until every other thread has encountered the memory fence.
Without this synchronization, invocations in the second half of the kernel may attempt to read memory before the write has occurred or been made visible. Another callout is that our calls to std::cos before are now replaced by calls to cl::sycl::cos. The kernels are compiled just-in-time during program execution, and math functions such as transcental functions here must be sourced from the SYCL runtime.
Deploying to DevCloud
Now that we have a working program, we can deploy the source code and any build scripts to the Intel oneAPI DevCloud. After signing up for the program, you should receive an email with instructions on how to obtain your SSH credentials to login to the DevCloud platform. After following the instructions, you should be able to upload your source file and test image with the following command:
scp main.cpp devcloud:~
scp stb_image.h devcloud:~
scp stb_image_write.h devcloud:~
scp peppers.png devcloud:~
This uploads your source file to the home directory of your assigned DevCloud user account. Then, you can login to deploy your program:
ssh devcloud
Create a script that compiles your program and runs it like so:
source /opt/intel/inteloneapi/setvars.sh
dpcpp main.cpp -o dct -std=c++17 -fsycl -lOpenCL
./dct peppers.png
Then, we can use the qsub (queue submission) command to invoke our script on the various compute nodes available on the DevCloud. To see a list of available hosts, run the pbsnodes command. This will list the nodes by id with additional information such as the type of processor running, and any accelerators available to it.
To submit a job to a host with a GPU for example, we can run the following command:
qsub -l nodes=1:gpu:ppn=2 -d . run.sh
The options in short, indicate that we want to run our script on a single node with a GPU, we want to occupy the node fully (the ppn=2 option), we want the working directory to be the current directory, and we want the node to run the run.sh script.
To see the status of your job, you can run qstat which will produce output like the following:
Job ID                    Name             User            Time Use S Queue
------------------------- ---------------- --------------- -------- - -----
681510.v-qsvr-1            run.sh           u47956                 0 R batch
The Job ID can be used as an argument to the qdel command in order to cancel a pending job.
Once the job completes, you'll have files like run.sh.o681510 and run.sh.e068150 in your current directory, corresponding to the script stdout and stderr output respectively. If our program ran successfully, you should also have the grey.png and grey_dct.png images you can compare for correctness. Logout using the exit command, and transfer the image back to your host with scp:
scp devcloud:~/grey.png .
scp devcloud:~/grey_dct.png .
Conclusion
In this article, we ported a C++ application to the SYCL runtime with additional extensions provided by the Intel DPC++ compiler. The application demonstrates how a unified programming model can target different architectures, as well as the abstractions the SYCL runtime provides for coordinating access to memory and author parallel code with implicit dependency graphs. Furthermore, we showcase how to express code that maps in a hierarchical fashion specifically in the manner that corresponds to a GPU's architecture for improved performance.
Finally, we showed how to deploy and test our code against different hardware profiles provided by the Intel DevCloud. To learn more about the SYCL runtime, the Intel DevCloud, or the Intel DPC++ compiler, you are encouraged to read more at the Intel DevZone here.
History
- 9th November, 2020: Initial version
Jeremy is a Principal Engineer at WB Games. He's worked throughout the game engine tech stack, touching everything from rendering and animation, to gameplay scripting and virtual machines, to netcode and server code. He's most passionate about the boundary between applied mathematics and computer science, and you'll often find him puzzling over one or the other in roughly equal parts. When he's not coding, Jeremy is probably spending time with his wife and dog, climbing, enjoying a chess game, or some combination of the above.


 General
  News
News  Suggestion
  Question
  Bug
Bug  Answer
  Joke
Joke  Praise
  Rant
Rant  Admin
Admin 


