Here we will shift our focus towards speed-oriented solutions for object detection. We’ll learn about YOLO and how to implement it for object detection.
In the previous articles of this series, we implemented object detection from scratch. We observed that training a model from scratch requires a lot of computing resources as well as time. These algorithms are slow to train and test, and it is almost impossible to efficiently implement them in real time. Shifting our focus towards speed-oriented solutions, You Only Look Once (YOLO) is the most popular method for object detection these days.
An Introduction to YOLO
YOLO, as the name suggests, requires only one forward propagation to detect objects in the given image. The same property enables YOLO to process real-time videos with minimal delay while maintaining a reasonable accuracy.
All the object detection algorithms we discussed earlier in the series use regions to localize the object within the image. They take part of the images which have a high probability of containing the objects of interest and do not look at the complete image. On the other hand, YOLO takes an image and splits it into grids. We then run a localization algorithm on each grid cell which results in let’s say m bounding boxes. The network will output a class probability for each bounding box and offset value for the bounding box. Lastly, the algorithm selects the bounding box with a class probability above threshold and locates the object within the image. Let’s see a simple implementation of YOLO3 to understand how detection happens.
Creating and Loading the Model
Let’s begin by importing the necessary libraries. We’ll use Keras for our implementation.
import cv2
import numpy as np
Since we’re working with a pre-trained model, we need to download certain weight and configuration files. Get the weights file from here and the configuration file from here. The specified model is trained on the MS COCO dataset, which can recognize 80 classes of objects. You can download or copy coco.names from here.
Once the required files are downloaded, we can proceed with creating and loading our model. OpenCV provides a readNet function, which is used to load the deep learning network to the system. The deep learning network must be represented in one of the supported formats, such as xml and prototxt. After loading the model, we’ll feed our model the classes to identify from the coco.names file. We then retrieve the output layers using the getLayerNames function and store them as an output layer list using getUnConnectedOutLayers.
net=cv2.dnn.readNet("./yolov3.weights", "./yolov3.cfg")
Classes = []
with open("coco.names","r") as f:
classes = [line.strip() for line in f.readlines()]
layer_names =net.getLayerNames()
output_layers = [layer_names[i[0]-1] for i in net.getUnconnectedOutLayers()]
Preprocessing the Input
Now we can pass the image through our model, but the model expects the image to be of a particular shape. To make the shape of our image compatible with that of the model input, we’ll use blobFromImage. The function will reshape the image and re-order the color channel of our image in proper order. We then give the image to the model to perform the forward pass. The forward pass outputs a list of detections.
blob = cv2.dnn.blobFromImage(img,1/255,(416,416),(0,0,0),True,crop=False)
net.setInput(blob)
results = net.forward(outputlayers)
Getting the Bounding Boxes
We can use this output result to obtain the coordinates of the bounding box for each detected object. As mentioned before, we then use a threshold to get accurate bounding boxes.
class_ids=[]
confidences=[]
boxes=[]
confidence_threshold = 0.5
for result in results:
for detection in result:
scores = detection[5:]
class_id = np.argmax(scores)
confidence = scores[class_id]
if confidence> confidence_threshold:
center_x=int(detection[0]*width)
center_y=int(detection[1]*height)
w=int(detection[2]*width)
h=int(detection[3]*height)
x=int(center_x-w/2)
y=int(center_y-h/2)
boxes.append([x,y,w,h])
confidences.append(float(confidence))
class_ids.append(class_id)
Now that we have the bounding box coordinates, we can go ahead and draw the box over the detected object and label it. But we don’t know the number of occurrences of any given object beforehand. To overcome the problem, we’ll use the NMSBoxes function that employs Non-Maximum Suppression. After that, we finally display the image.
indexes = cv2.dnn.NMSBoxes(boxes, confidences, 0.4, 0.6)
font = cv2.FONT_HERSHEY_PLAIN
count = 0
for i in range(len(boxes)):
if i in indexes:
x,y,w,h = boxes[i]
label = str(classes[class_ids[i]])
color = COLORS[i]
cv2.rectangle(img, (x,y), (x+w, y+h), color, 2)
cv2.putText(img, label, (x, y-5), font, 1, color, 1)
The final step is to put all the pieces together and show the final image with detected objects.
cv2.imshow("Detected_Images",img)

That was easy, right? But wait — can we modify the same code to count the number of people in an image? Let’s see.
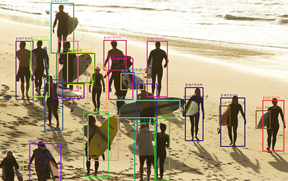
The MS COCO dataset can recognize 80 different classes, including people. We can easily count the number of people present in an image by counting the number of occurrences of class ‘people’.
if int(class_ids[i] == 0):
       count +=1
The above small modification returns the number of people present in the image. The number of people returned for the previous image is two, and the count for the following image is 18:
What’s next?
In this article, we learned a basic implementation of YOLO for object detection. We saw that it is rather easy to use a pre-trained model to save time as well as computational resources. In the next article, we’ll see if we can implement YOLO on video feeds for queue length detection. As an endnote, we’ll also discuss the scenarios where we would want to use our custom trained models rather than pre-trained models.
C# Corner MVP, UGRAD alumni, student, programmer and an author.


