Here we complete building a TensorFlow Lite-based application for performing recognition of objects using a network model that came from the ONNX Model Zoo.
The output was stored in a set of numerical arrays. The numerical arrays by themselves do not tell us much about the examined image unless we do a bit more work to interpret the values within them. One of the array’s holding values looks like this:
float[][][][][] buf2 = new float[1][13][13][3][85];
Let’s unpackage this array. The first dimension of the array, which is one, is for selecting which image in a set of images is being examined. For our implementation only one image is being examined at any time. The next two dimensions on the array, [13][13], are for selecting a grid row and column. Each row and column contains information about a 32x32 pixel section of the image. An image section contains 3 bounding box definitions for objects that were discovered. The last dimension is for the array that contains the interesting data about the objects that were found.
The first four elements of this dimension contain the bounding rectangle of the element found: X, Y, WIDTH, HEIGHT. The fifth element contains a confidence number between 0 and 1. If the confidence is less than some threshold then we conclude that there is nothing of interest being pointed to and can skip the evaluation of the rest of the data in this row. There are 80 items of data left. These 80 data items represent 80 classes of objects that the model can recognize. A class is an object type. Examples of classes include "cat", "dog", "remote", "TV", "person", and many others. For each class, there is a confidence value for the object being in the class.
There is a bit of processing that is required on this data. The values are not in the form that we would like them to be. A bit of scaling and adjustment is needed to make the numbers align with our image. When we have an item of acceptable confidence, it is added to the list of discovered items so that boxes marking the discovered items can be rendered on the screen.
   float[][][][][] result = buf2;
   for(int y=0;y<IMAGE_SEGMENT_ROWS;++y) {
       for(int x=0;x<IMAGE_SEGMENT_COLS;++x) {
           for(int b=0;b<BOXES_PER_SEGMENT;++b) {

               final float confidence = expit(result[0][y][x][b][4]);
               int classIndex = -1;
               float maxConfidence = 0;
               float[] classConfidence = new float[OBJECT_CLASS_COUNT];

               for(int k=0;k<OBJECT_CLASS_COUNT;++k) {
                   float currentConfidence = classConfidence[k]= result[0][y][x][b][5 + k];
                   if(currentConfidence > maxConfidence) {
                       classIndex = k;
                       maxConfidence = currentConfidence;
                   }
               }

               float combinedConfidence = maxConfidence * confidence;
               if(combinedConfidence > DETECTION_THRESHOLD) {
                   final float xPos = (x + expit(result[0][y][x][b][0])) * (float)IMAGE_SEGMENT_WIDTH;
                   final float yPos = (y + expit(result[0][y][x][b][1])) * (float)IMAGE_SEGMENT_HEIGHT;
                   final float w = (float)(Math.exp(result[0][y][x][b][2]))*ANCHORS[b*2+0];
                   final float h = (float)(Math.exp(result[0][y][x][b][3]))*ANCHORS[b*2+1];
                   final RectF boundary = new RectF(
                           Math.max(0, xPos - w/2),
                           Math.max(0, yPos - h/2),
                           Math.min(IMAGE_WIDTH-1, xPos + w / 2),
                           Math.min(IMAGE_HEIGHT-1, yPos + h/2)
                   );
                   RecognizedBox box = new RecognizedBox(
                           labels.get(classIndex),
                           combinedConfidence,
                           boundary
                   );
                   recognizedItems.add(box);
               }
           }
       }
   }
}
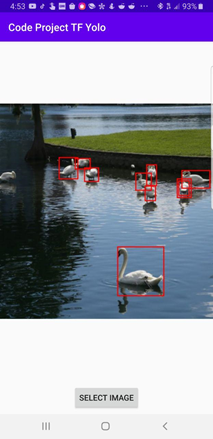
With all of the boxes added, the bounding boxes of the recognized items can be rendered on the screen marking what has been recognized.
Next Steps
We’ve come a long way! So far, we have taken a pre-trained model, converted it from ONNX to Tensorflow Lite format, and use it to detect objects in an Android app. In the next article, we’ll examine some best practices and optimization tips to follow when working with Tensorflow Lite.


