This article will show you how to start building applications using the QuantumGate peer-to-peer networking library. The library allows you to focus on your application specific features while not having to worry about the networking, cryptography, security and privacy.
Introduction
This sample chat application demonstrates how to start using the QuantumGate peer-to-peer networking library. QuantumGate is a peer-to-peer (P2P) communications protocol, library and API written in C++. The long-term goal for QuantumGate is to become a platform for distributed computing based on a mesh networking model. In the short term, the goal is to provide developers with networking technology that they can easily integrate and use in their own applications.
QuantumGate takes care of all the low level networking and cryptography for you and allows you to focus on the specific features of your application. Among other things, it takes care of data compression, encryption/decryption, authentication and even more advanced features such as relays (similar to TOR) and providing padding and cover traffic to make traffic analysis and censorship more difficult. In addition, it gives you control over security and access settings at the IP, network and peer level. For more details, see the overview in the documentation on GitHub.
Creating the Project
For this chat application, I've chosen to use the Microsoft C++/WinRT framework for the UI. You can download the C++/WinRT extension for Visual Studio from the marketplace. The extension adds some additional C++ project templates in Visual Studio. For this article, I used Visual Studio 2019, and chose the Blank App (C++/WinRT) template while creating a new solution.

After you've gone through the "Create a new project" wizard, you will also need to install the Microsoft.Windows.CppWinRT NuGet package in Visual Studio. You'll also need the QuantumGate library; you can build from source if you want, but you can also download pre-built binaries from the releases page on GitHub, which include the .lib and .dll files that you will link to. In that case, you can only use the source code for the required header files in order to use the QuantumGate API.
You'll now need to specify in the project properties (right click on the project name in Visual Studio and choose Properties) where the compiler can look for the QuantumGate header file and library files. This can be done in the VC++ Directories section as seen in the screenshot below. At the Include Directories, you will need to add the QuantumgateLib\API subfolder that comes with QuantumGate so that the compiler will find the QuantumGate.h header file located there. And at the Library Directories, you will need to specify the location of the QuantumGate*.lib files that you will link to. Note in the screenshot that variables have been used in the path for the Configuration and Platform subfolder names so that the compiler will choose the right one based on the configuration and platform you're compiling for.
Since QuantumGate requires C++20 features as of this writing, you'll also need to configure your project to use the latest C++ features. This can be done under the C++ Language Standard option as seen in the below screenshot. You'll need to specify "Features from the latest C++ working draft (/std:c++latest)".
Next, you'll have to actually include the QuantumGate header and library files in your project. There are various ways of doing this, but in this project, I've chosen to add it to the pch.h precompiled header file that Visual Studio generated for the project. You'll need to add the following piece of code in that file:
#include <QuantumGate.h>
#if defined(_DEBUG)
#if !defined(_WIN64)
#pragma comment (lib, "QuantumGate32D.lib")
#else
#pragma comment (lib, "QuantumGate64D.lib")
#endif
#else
#if !defined(_WIN64)
#pragma comment (lib, "QuantumGate32.lib")
#else
#pragma comment (lib, "QuantumGate64.lib")
#endif
#endif
Apart from including the header file, we also include the library file based on the configuration (Debug or Release) and platform (Win32 or Win64).
Now that things are set up, we can continue to actually build the application.
Chat Application
If you download the sample code for the chat application, you will find the following files of specific importance:
- MainPage.xaml: Generated by the Visual Studio wizard, this file contains the UI for the main window. It has been customized with the UI for the chat application.
- MainPage.cpp and MainPage.h, generated by the Visual Studio wizard, which contain the code behind the UI defined in the previous .xaml file.
- ChatExtender.cpp and ChatExtender.h which contain the code for our custom QuantumGate extender that will implement the specific chat functionality we need on top of QuantumGate.
- ChatTab.cpp and ChatTab.h which contains the code for managing tabs that we have open in the chat application and updating the UI.
You'll find that the actual code needed for our chat extender and the use of QuantumGate is very little compared to all the UI code for the application. This is because QuantumGate does most of the heavy lifting for us under the hood. About the only work we have to do is define what data we will send and what data we will receive and handle those events.
Our Chat Extender
The way QuantumGate works is that in order to make use of it in our application, we'll need to write a custom extender for it. You can view an extender as a plugin that will run on top of QuantumGate and provide additional functionality. There's a specific QuantumGate::Extender (documentation) class that we need to derive from when building our extender and we need to provide implementations for a few callback functions depending on what we want to do. All of these functions are implemented in the ChatExtender.* files. The class definition is as follows:
class ChatExtender final : public QuantumGate::Extender
{
};
The constructor for our extender is as follows:
ChatExtender::ChatExtender() :
QuantumGate::Extender(QuantumGate::ExtenderUUID(L"c055850e-2a88-f990-4e58-ad915552a375"),
QuantumGate::String(L"Chat Extender"))
{
}
You'll note that we provide a UUID and a name for our extender to the base class. New UUIDs can be created via the QuantumGate::UUID class; in this case we're using a pre-generated one and passing it in. Every extender should have its own unique ExtenderUUID.
In ChatExtender.cpp, you'll find definitions for the following callback functions, most of which we don't actually use in this case:
bool OnStartup();
void OnPostStartup();
void OnPreShutdown();
void OnShutdown();
void OnPeerEvent(QuantumGate::Extender::PeerEvent&& event);
QuantumGate::Extender::PeerEvent::Result OnPeerMessage
                    (QuantumGate::Extender::PeerEvent&& event);
The comments in the provided sample source code go into much more detail about each callback function. The callback functions are registered with QuantumGate in the constructor of our extender as follows:
if (!SetStartupCallback(QuantumGate::MakeCallback(this, &ChatExtender::OnStartup)) ||
!SetPostStartupCallback(QuantumGate::MakeCallback(this, &ChatExtender::OnPostStartup)) ||
!SetPreShutdownCallback(QuantumGate::MakeCallback(this, &ChatExtender::OnPreShutdown)) ||
!SetShutdownCallback(QuantumGate::MakeCallback(this, &ChatExtender::OnShutdown)) ||
!SetPeerEventCallback(QuantumGate::MakeCallback(this, &ChatExtender::OnPeerEvent)) ||
!SetPeerMessageCallback(QuantumGate::MakeCallback(this, &ChatExtender::OnPeerMessage)))
{
throw std::exception("Failed to set one or more extender callbacks");
}
The callback functions of importance to us are the OnPeerEvent() and OnPeerMessage() functions, where we handle peer connection, disconnection and message events sent by QuantumGate. It's important to keep in mind that these functions can be called by multiple threads and in case you access data members from these functions, you will need to add synchronization (such as mutexes) to prevent concurrency issues. In the sample code, you will see two mutexes in use to access peer data and the nickname we're using.
We keep track of connecting and disconnecting peers in the OnPeerEvent() function and add them to a container named m_Peers. The messages we send using our extender are defined as follows in ChatExtender.h:
enum class MessageType : std::uint8_t
{
    Unknown = 0,
    NicknameChange,
    PrivateChatMessage,
    BroadcastChatMessage
};
These are the messages we handle in the OnPeerMessage() function.
We also define some of our own callback functions in the extender which get set by the MainPage window to receive events in order to update the UI. These are the following functions declared in ChatExtender.h:
void OnPeerConnect(PeerConnectCallbackType&& cb) noexcept;
void OnPeerDisconnect(PeerDisconnectCallbackType&& cb) noexcept;
void OnPeerNicknameChanged(PeerNicknameChangeCallbackType&& cb) noexcept;
void OnPeerChatMessage(PeerChatMessageCallbackType&& cb) noexcept;
Our extender is instantiated and used in the MainPage of our application in the MainPage::InitializeChatExtender() member function. In that function, we add the above mentioned callbacks for updating the UI. The comments in the code for that function in the sample file explains what each callback does.
Our Local QuantumGate Instance
In order to use QuantumGate in our application, we have to define and use an object of type QuantumGate::Local (documentation). This is done in the MainPage.h header file as a data member of the MainPage struct which represents our main window. This object gets initialized in the MainPage::StartLocalInstance() member function. The comments in the included sample files explain what's going on, but in summary, we configure the identity used by the local instance:
QuantumGate::StartupParameters params;
{
auto [success, uuid, keys] = QuantumGate::UUID::Create(QuantumGate::UUID::Type::Peer,
QuantumGate::UUID::SignAlgorithm::EDDSA_ED25519);
if (success)
{
params.UUID = uuid;
params.Keys = std::move(*keys);
}
else
{
ShowErrorMessage(L"Failed to create peer UUID.");
return false;
}
}
This identity (the UUID, public key and private key) can be used for authentication purposes if we were to create it once and save it and distributing the UUID along with the public key to peers. But for this simple example, we just create a new identity every time.
Then we set the supported algorithms:
params.SupportedAlgorithms.Hash = {
    QuantumGate::Algorithm::Hash::BLAKE2B512
};
params.SupportedAlgorithms.PrimaryAsymmetric = {
    QuantumGate::Algorithm::Asymmetric::ECDH_X25519
};
params.SupportedAlgorithms.SecondaryAsymmetric = {
    QuantumGate::Algorithm::Asymmetric::KEM_NTRUPRIME
};
params.SupportedAlgorithms.Symmetric = {
    QuantumGate::Algorithm::Symmetric::CHACHA20_POLY1305
};
params.SupportedAlgorithms.Compression = {
    QuantumGate::Algorithm::Compression::ZSTANDARD
};
Note that for each category of algorithms, we can add more (documentation) and QuantumGate will select one based on what both peers support (there has to be some overlap). However in this code, we only provide one for each category.
We then tell QuantumGate to start listening for incoming connections on TCP port 999 and immediately start any extenders that we have added.
params.Listeners.TCP.Enable = true;
params.Listeners.TCP.Ports = { 999 };
params.EnableExtenders = true;
Then we also set the security and access settings for the local instance:
params.RequireAuthentication = false;
m_Local.GetAccessManager().SetPeerAccessDefault
(QuantumGate::Access::PeerAccessDefault::Allowed);
if (!m_Local.GetAccessManager().AddIPFilter
(L"0.0.0.0/0", QuantumGate::Access::IPFilterType::Allowed) ||
!m_Local.GetAccessManager().AddIPFilter
(L"::/0", QuantumGate::Access::IPFilterType::Allowed))
{
ShowErrorMessage(L"Failed to add an IP filter.");
return false;
}
We add our custom extender to the local instance. We just add our own extender here, but it's possible to add more if needed.
if (const auto result = m_Local.AddExtender(m_Extender); result.Failed())
{
    ShowErrorMessage(L"Failed to add the ChatExtender to the QuantumGate local instance.");
    return false;
}
And finally start the local instance:
const auto result = m_Local.Startup(params);
if (result.Failed())
{
    std::wstring str{ L"Failed to start the QuantumGate local instance
                    (" + result.GetErrorString() + L")." };
    ShowErrorMessage(str.c_str());
    return false;
}
After the local instance has successfully started, we can start using it for things like making connections to other peers.
Making connections to peers is handled in the MainPage::ConnectToPeer() member function. As soon as the local instance has started, other peers can also connect to it using the specified listener port. It's important that any routers on the network and firewalls on the machine (Windows firewall for example) are configured to allow incoming and outgoing connections on that port.
QuantumGate provides a console window where log messages are displayed that can make it much easier to troubleshoot any (connection) problems. The included chat application has a "Show Console" button on the main window that lets you open the console. If you're having trouble connecting, open the window and check the messages for any clues. It's also good to mention that QuantumGate allows you to redirect console output to your own custom class where you can save it to a file or display it in a UI control.
Installing the Pre-Built Sample
The sample files include a pre-built version of the ChatApp sample as a Windows AppX distribution package. You'll only be able to install the application on Microsoft Windows 10 version 10.0.18362 or later mostly because of the C++/WinRT requirements.
In order to run the application, you will have to sideload it on Windows using the provided Install.ps1 script. If you are unable to run the script, you may need to configure PowerShell first to allow running scripts using the following command on the PowerShell command line:
Set-ExecutionPolicy RemoteSigned -Scope CurrentUser
During installation, the script will also ask you to enable developer mode in Windows in order to be able to sideload Windows Store applications.
Building the Sample From Source
There are instructions in the README file on GitHub for building the included sample source code and running it from Visual Studio.
Using the Sample ChatApp
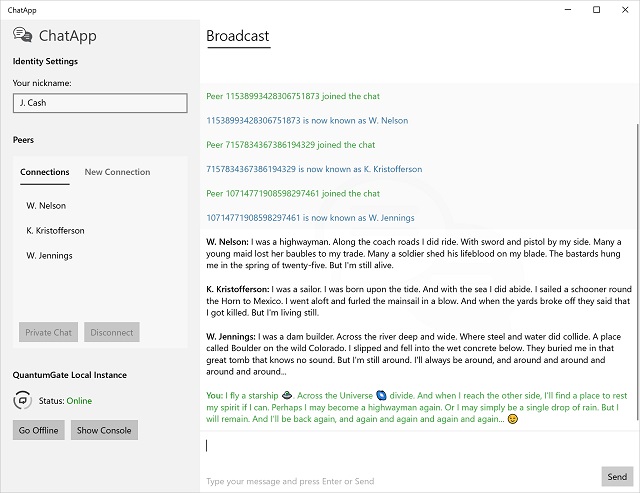
After starting the ChatApp, you can set your nickname and then click on the "Go Online" button to start the local instance. The app will then listen for incoming connections from peers. Alternatively, you can also click on the "New Connection" tab and connect to a peer using their IP address. You'll see all connected peers in the "Connections" tab. In the "Broadcast" window, you can send messages to all connected peers, or you can select a peer and click the "Private Chat" button to open a new private chat window and only send messages to that peer.
Further Reading
Once you're familiar with the basic setup provided in this sample, you can start to look at the more advanced features offered by QuantumGate, such as providing cover traffic (called "Noise" in QuantumGate) and using relays for better security and privacy. There are more examples and tutorials available in the wiki on GitHub and the complete API is documented in the wiki on GitHub. You can try adding these extra features to the ChatApp or go on to build a completely new and different application based on what you've seen in this sample. Feel free to contact me with any questions you may have.
History
- 17th August, 2020: Initial version
I'm an IT Consultant / Software Engineer, Graphic Designer and Photographer based in Suriname. Check my website for details at https://www.kareldonk.com/


 General
  News
News  Suggestion
  Question
  Bug
Bug  Answer
  Joke
Joke  Praise
  Rant
Rant  Admin
Admin 


