The blog post outlines the step-by-step process of building a web application to store ideas efficiently, emphasizing speed, reliability, and security. It covers topics like configuring the technology stack, dependency injection, MongoDB setup, CRUD operations, exception handling, model binding, and querying embedded documents, providing practical solutions and updates based on user feedback.
What is it About
Problem / solution format brings an easier understanding on how to build things, giving an immediate feedback. Starting from this idea, in the blog post, I will present step by step how to build:
a web application to store your ideas in an easy way, adding text notes, either from desktop or mobile, with few characteristics: run fast, save on the fly whatever you write, and be reasonably reliable and secure.
This article will implement just the backend, WebApi and the database access, in the most simple way.
A Couple of Updates Made to the Original Article
- Following Peter’s comment, I have simplified the documents returned, see
HttpGet requests - Following Luciano’s comment, I have extended the
update function, making update of the full MongoDB documents at once, not just to some of the properties. There is a new section below, describing this change. - Trying to read from Angular 2, find the article here, I have ran into CORS problems. An error message was displayed “No ‘
Access-Control-Allow-Origin’ header is present on the requested resource”. I have added a new section to describe the solution. - I have updated the project to .NET Core 1.1 as well to MongoDB .NET Driver 2.4
- Added a basic level of exception management
- Following Peter’s comment, I have converted the solution to Visual Studio 2017.
- Updated to .NET Core 2.0
- Following Matthew’s comment, I have updated the interface
INoteRepository to not be coupled to MongoDB libraries. - Added a compound MongoDb index
- Following the comments from Kirk and Andrea, I have added to the structure the MongoDb BSonId and added a section of model binding of JSON Posts.
- Following comments from Manish and Zahn, I have extended the example with a nested class; Updated to
MongoDb.Driver 2.7, which add support for new features of the MongoDB 4.0 Server.
The GitHub project is updated and includes all these changes. You could directly download the sources or clone the project locally.
Topics Covered
Articles You Might Also Find Interesting
The ASP.NET Core Web API has the big advantage that it can be used as HTTP service and it can be subscribed by any client application, ranging from desktop to mobiles, and also be installed on Windows, macOS or Linux.
MongoDB is a popular NoSQL database that makes a great backend for Web APIs. These lend themselves more to document store type, rather than to relational databases. This blog will present how to build a .NET Core Web API connected asynchronously to MongoDB, with full support for HTTP GET, PUT, POST, and DELETE.
To Install
Here are all the things needed to be installed:
Launch Visual Studio and then access File > New Project > .NET Core > ASP.NET Core Web Application.
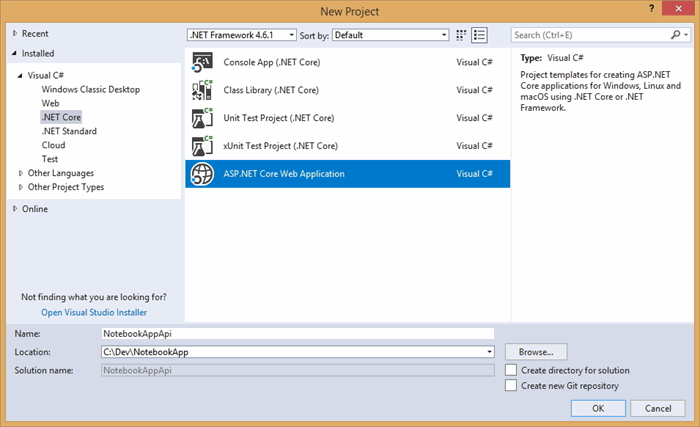
and then:

There are multiple file formats, supported out of the box for the configuration (JSON, XML, or INI). By default, the WebApi project template comes with JSON format enabled. Inside the setting file, order matters, and include complex structures. Here is an example with a 2 level settings structure for database connection.
AppSettings.json – Update the File
{
  "MongoConnection": {
    "ConnectionString": "mongodb://admin:abc123!@localhost",
    "Database": "NotesDb"
  },

  "Logging": {
    "IncludeScopes": false,
    "Debug": {
      "LogLevel": {
        "Default": "Warning"
      }
    },
    "Console": {
      "LogLevel": {
        "Default": "Warning"
      }
    }
  }
}
Constructor injection is one of the most common approaches to implementing Dependency Injection (DI), though not the only one. ASP.NET Core uses constructor injection in its solution, so we will also use it. ASP.NET Core project has a Startup.cs file, which configures the environment in which our application will run. The Startup.cs file also places services into ASP.NET Core’s Services layer, which is what enables dependency injection.
To map the custom database connection settings, we will add a new Settings class.
namespace NotebookAppApi.Model
{
    public class Settings
    {
        public string ConnectionString;
        public string Database;
    }
}
Here is how we modify Startup.cs to inject Settings in the Options accessor model:
public void ConfigureServices(IServiceCollection services)
{
services.AddMvc();
services.Configure<Settings>(options =>
{
options.ConnectionString
= Configuration.GetSection("MongoConnection:ConnectionString").Value;
options.Database
= Configuration.GetSection("MongoConnection:Database").Value;
});
}
Further in the project, settings will be access via IOptions interface:
IOptions<Settings>
Once you have installed MongoDB, you would need to configure the access, as well as where the data is located.
To do this, create a file locally, named mongod.cfg. This will include setting path to the data folder for MongoDB server, as well as to the MongoDB log file, initially without any authentication. Please update these local paths, with your own settings:
systemLog:
  destination: file
  path: "C:\\tools\\mongodb\\db\\log\\mongo.log"
  logAppend: true
storage:
  dbPath: "C:\\tools\\mongodb\\db\\data"
Run in command prompt next line. This will start the MongoDB server, pointing to the configuration file already created (in case the server is installed in a custom folder, please update first the command).
"C:\Program Files\MongoDB\Server\3.2\bin\mongod.exe"
    --config C:\Dev\Data.Config\mongod.cfg
Once the server is started (and you could see the details in the log file), run mongo.exe in command prompt. The next step is to add the administrator user to the database. Run mongodb with the full path (example: “C:\Program Files\MongoDB\Server\3.2\bin\mongo.exe”).
and then copy paste the next code in the console:
use admin
db.createUser(
  {
	user: "admin",
	pwd: "abc123!",
	roles: [ { role: "root", db: "admin" } ]
  }
);
exit;
Then stop the server and update the configuration file, including the security option.
systemLog:
  destination: file
  path: "C:\\tools\\mongodb\\db\\log\\mongo.log"
  logAppend: true
storage:
  dbPath: "C:\\tools\\mongodb\\db\\data"
security:
  authorization: enabled
From now on, we’ll connect to MongoDb using admin user. There is a good practice to not use the superuser role (in our case administrator) for normal operations, but in order to keep things simple, we will continue to have just a single user.
To connect to MongoDB, add via Nuget the package named MongoDB.Driver. This is the new official driver for .NET, fully supporting the ASP.NET Core applications.
The model class (POCO) associated with each entry in the notebook is included below:
using System;
using MongoDB.Bson.Serialization.Attributes;
namespace NotebookAppApi.Model
{
public class Note
{
[BsonId]
public ObjectId InternalId { get; set; }
public string Id { get; set; }
public string Body { get; set; } = string.Empty;
[BsonDateTimeOptions]
public DateTime UpdatedOn { get; set; } = DateTime.Now;
public NoteImage HeaderImage { get; set; }
public int UserId { get; set; } = 0;
}
}
Note: By default, using the parameter BsonDateTimeOptions, Bson serializer tries to serialize as a DateTime, as UTC. Adding the attribute as follows, we allow saving in local time instead: [BsonDateTimeOptions(Kind = DateTimeKind.Local)].
Assuming the Note would have a header image, here would be a sample embedded class:
public class NoteImage
{
	public string Url { get; set; } = string.Empty;
	public string ThumbnailUrl { get; set; } = string.Empty;
	public long ImageSize { get; set; } = 0L;
}
In order to keep the functions for accessing the database in a distinct place, we will add a NoteContext class. This will use the Settings defined above.
public class NoteContext
{
    private readonly IMongoDatabase _database = null;

    public NoteContext(IOptions<Settings> settings)
    {
        var client = new MongoClient(settings.Value.ConnectionString);
        if (client != null)
            _database = client.GetDatabase(settings.Value.Database);
    }

    public IMongoCollection<Note> Notes
    {
        get
        {
            return _database.GetCollection<Note>("Note");
        }
    }
}
Using a repository interface, we will implement the functions needed to manage the Notes. These will also use Dependency Injection (DI) to be easily access from the application (e.g., controller section):
public interface INoteRepository
{
Task<IEnumerable<Note>> GetAllNotes();
Task<Note> GetNote(string id);
Task<IEnumerable<Note>> GetNote
(string bodyText, DateTime updatedFrom, long headerSizeLimit);
Task AddNote(Note item);
Task<bool> RemoveNote(string id);
Task<bool> UpdateNote(string id, string body);
Task<bool> UpdateNoteDocument(string id, string body);
Task<bool> RemoveAllNotes();
}
The access to database will be asynchronous. We are using the new driver here, which offers a full async stack.
Just as an example: to get all the Notes, we make an async request:
public async Task<IEnumerable<Note>> GetAllNotes()
{
    var documents = await _context.Notes.Find(_ => true).ToListAsync();
    return documents;
}
Here is the full implementation, for all basic CRUD operations:
public class NoteRepository : INoteRepository
{
private readonly NoteContext _context = null;
public NoteRepository(IOptions<Settings> settings)
{
_context = new NoteContext(settings);
}
public async Task<IEnumerable<Note>> GetAllNotes()
{
try
{
return await _context.Notes
.Find(_ => true).ToListAsync();
}
catch (Exception ex)
{
throw ex;
}
}
public async Task<Note> GetNote(string id)
{
try
{
ObjectId internalId = GetInternalId(id);
return await _context.Notes
.Find(note => note.Id == id
|| note.InternalId == internalId)
.FirstOrDefaultAsync();
}
catch (Exception ex)
{
throw ex;
}
}
public async Task<IEnumerable<Note>> GetNote
(string bodyText, DateTime updatedFrom, long headerSizeLimit)
{
try
{
var query = _context.Notes.Find(note => note.Body.Contains(bodyText) &&
note.UpdatedOn >= updatedFrom &&
note.HeaderImage.ImageSize <= headerSizeLimit);
return await query.ToListAsync();
}
catch (Exception ex)
{
throw ex;
}
}
private ObjectId GetInternalId(string id)
{
ObjectId internalId;
if (!ObjectId.TryParse(id, out internalId))
internalId = ObjectId.Empty;
return internalId;
}
public async Task AddNote(Note item)
{
try
{
await _context.Notes.InsertOneAsync(item);
}
catch (Exception ex)
{
throw ex;
}
}
public async Task<bool> RemoveNote(string id)
{
try
{
DeleteResult actionResult
= await _context.Notes.DeleteOneAsync(
Builders<Note>.Filter.Eq("Id", id));
return actionResult.IsAcknowledged
&& actionResult.DeletedCount > 0;
}
catch (Exception ex)
{
throw ex;
}
}
public async Task<bool> UpdateNote(string id, string body)
{
var filter = Builders<Note>.Filter.Eq(s => s.Id, id);
var update = Builders<Note>.Update
.Set(s => s.Body, body)
.CurrentDate(s => s.UpdatedOn);
try
{
UpdateResult actionResult
= await _context.Notes.UpdateOneAsync(filter, update);
return actionResult.IsAcknowledged
&& actionResult.ModifiedCount > 0;
}
catch (Exception ex)
{
throw ex;
}
}
public async Task<bool> UpdateNote(string id, Note item)
{
try
{
ReplaceOneResult actionResult
= await _context.Notes
.ReplaceOneAsync(n => n.Id.Equals(id)
, item
, new UpdateOptions { IsUpsert = true });
return actionResult.IsAcknowledged
&& actionResult.ModifiedCount > 0;
}
catch (Exception ex)
{
throw ex;
}
}
public async Task<bool> UpdateNoteDocument(string id, string body)
{
var item = await GetNote(id) ?? new Note();
item.Body = body;
item.UpdatedOn = DateTime.Now;
return await UpdateNote(id, item);
}
public async Task<bool> RemoveAllNotes()
{
try
{
DeleteResult actionResult
= await _context.Notes.DeleteManyAsync(new BsonDocument());
return actionResult.IsAcknowledged
&& actionResult.DeletedCount > 0;
}
catch (Exception ex)
{
throw ex;
}
}
}
In order to access NoteRepository using DI model, we add a new line in ConfigureServices:
services.AddTransient<INoteRepository, NoteRepository>();
where:
Transient: Created each timeScoped: Created only once per requestSingleton: Created the first time they are requested. Each subsequent request uses the instance that was created the first time.
Adding the Main Controller
First, we present the main controller. It provides all the CRUD interfaces, available to external applications.
The Get actions have NoCache directive, to ensure web clients always make requests to the server.
[Produces("application/json")]
[Route("api/[controller]")]
public class NotesController : Controller
{
private readonly INoteRepository _noteRepository;
public NotesController(INoteRepository noteRepository)
{
_noteRepository = noteRepository;
}
[NoCache]
[HttpGet]
public async Task<IEnumerable<Note>> Get()
{
return await _noteRepository.GetAllNotes();
}
[HttpGet("{id}")]
public async Task<Note> Get(string id)
{
return await _noteRepository.GetNote(id) ?? new Note();
}
[NoCache]
[HttpGet(template: "{bodyText}/{updatedFrom}/{headerSizeLimit}")]
public async Task<IEnumerable<Note>> Get(string bodyText,
DateTime updatedFrom,
long headerSizeLimit)
{
return await _noteRepository.GetNote(bodyText, updatedFrom, headerSizeLimit)
?? new List<Note>();
}
[HttpPost]
public void Post([FromBody] NoteParam newNote)
{
_noteRepository.AddNote(new Note
{
Id = newNote.Id,
Body = newNote.Body,
CreatedOn = DateTime.Now,
UpdatedOn = DateTime.Now,
UserId = newNote.UserId
});
}
[HttpPut("{id}")]
public void Put(string id, [FromBody]string value)
{
_noteRepository.UpdateNoteDocument(id, value);
}
[HttpDelete("{id}")]
public void Delete(string id)
{
_noteRepository.RemoveNote(id);
}
}
Adding the Admin Controller
This will be a controller dedicated to administrative tasks (we use to initialize the database with some dummy data). In real projects, we should very cautiously use such interface. For development only and quick testing purpose, this approach may be convenient.
To use it, we will just add the url in the browser. Running the code below, the full setup will be automatically created (e.g., new database, new collection, sample records). We can use either http://localhost:5000/api/system/init (when using IIS) or http://localhost:53617/api/system/init (when using IIS Express, enabled as default on this sample project). We could even extend the idea, adding more commands. However, as mentioned above, these kind of scenarios should be used just for development, and be never deployed to a production environment.
[Route("api/[controller]")]
public class SystemController : Controller
{
private readonly INoteRepository _noteRepository;
public SystemController(INoteRepository noteRepository)
{
_noteRepository = noteRepository;
}
[HttpGet("{setting}")]
public string Get(string setting)
{
if (setting == "init")
{
_noteRepository.RemoveAllNotes();
var name = _noteRepository.CreateIndex();
_noteRepository.AddNote(new Note()
{
Id = "1",
Body = "Test note 1",
UpdatedOn = DateTime.Now,
UserId = 1,
HeaderImage = new NoteImage
{
ImageSize = 10,
Url = "http://localhost/image1.png",
ThumbnailUrl = "http://localhost/image1_small.png"
}
});
_noteRepository.AddNote(new Note()
{
Id = "2",
Body = "Test note 2",
UpdatedOn = DateTime.Now,
UserId = 1,
HeaderImage = new NoteImage
{
ImageSize = 13,
Url = "http://localhost/image2.png",
ThumbnailUrl = "http://localhost/image2_small.png"
}
});
_noteRepository.AddNote(new Note()
{
Id = "3",
Body = "Test note 3",
UpdatedOn = DateTime.Now,
UserId = 1,
HeaderImage = new NoteImage
{
ImageSize = 14,
Url = "http://localhost/image3.png",
ThumbnailUrl = "http://localhost/image3_small.png"
}
});
_noteRepository.AddNote(new Note()
{
Id = "4",
Body = "Test note 4",
UpdatedOn = DateTime.Now,
UserId = 1,
HeaderImage = new NoteImage
{
ImageSize = 15,
Url = "http://localhost/image4.png",
ThumbnailUrl = "http://localhost/image4_small.png"
}
});
return "Database NotesDb was created,
and collection 'Notes' was filled with 4 sample items";
}
return "Unknown";
}
}
In order to have a quick display of the values, once the project will run, please update the file launchSettings.json.
Here is the full file content, pointing by default to api/notes url.
{
  "iisSettings": {
    "windowsAuthentication": false,
    "anonymousAuthentication": true,
    "iisExpress": {
      "applicationUrl": "http://localhost:53617/",
      "sslPort": 0
    }
  },
  "profiles": {
    "IIS Express": {
      "commandName": "IISExpress",
      "launchBrowser": true,
      "launchUrl": "api/notes",
      "environmentVariables": {
        "ASPNETCORE_ENVIRONMENT": "Development"
      }
    },
    "NotebookAppApi": {
      "commandName": "Project",
      "launchBrowser": true,
      "launchUrl": "http://localhost:5000/api/notes",
      "environmentVariables": {
        "ASPNETCORE_ENVIRONMENT": "Development"
      }
    }
  }
}
Before running the project, please make sure the MongoDB is running (either as an Windows Service, or via console application, as presented above).
Run first the initialization link:
http://localhost:53617/api/system/init
and then run the default application link
http://localhost:53617/api/notes
Using Robo 3T, we could check the actual entries inside the database. Connecting to the database, using the credentials, we could see all records.
Even if the unique id has the name _id, the MongoDb .NET Driver maps it to our variable InternalId using the tag [BsonId].
Running Project on GitHub
Full source for this example is available on GitHub -> https://github.com/fpetru/WebApiMongoDB
Being different applications, running on separate domains, all calls back to ASP.NET WebAPI site are effectively cross domain calls. With Angular 2, there is first a pre-flight request, before the actual request, (an OPTIONS request). Doing this pre-check, we verify first that cross domain calls are allowed (CORS).
I have enabled CORS by applying two changes:
public void ConfigureServices(IServiceCollection services)
{
services.AddCors(options => { options.AddPolicy("CorsPolicy",
builder => builder.AllowAnyOrigin()
.AllowAnyMethod()
.AllowAnyHeader()
.AllowCredentials());
});
services.AddMvc();
}
public void Configure(IApplicationBuilder app)
{
app.UseCors("CorsPolicy");
app.UseMvc(routes => {
}
- First register CORS functionality in
ConfigureServices() of Startup.cs: - and then enable the policy globally to every request in the application by calling
app.useCors() in the Configure() method of Startup, before UseMVC.
Even if this could be further and more selective applied, the rest of the article remains unchanged.
Initially, the sample project included only selective update of the properties. Using ReplaceOneAsync, we could update the full document. Upsert creates the document, in case it doesn’t already exist.
public async Task<ReplaceOneResult> UpdateNote(string id, Note item)
{
     return await _context.Notes
                          .ReplaceOneAsync(n => n.Id.Equals(id)
                                            , item
                                            , new UpdateOptions { IsUpsert = true });
}
Test the Update
To be able to test the update, I have used Postman. It is an excellent tool to test APIs.
I have selected the command type POST, then entered the local URL, and added a new Header (Content-Type as application/json).
And then set the Body as raw and updated a dummy value.
Using RoboMongo, we can see the value updated.
Starting with C# 5.0, async and await were introduced into the language to simplify using the Task Parallel Library. We can simply use a try/catch block to catch an exception, like so:
public async Task<IEnumerable<Note>> GetAllNotes()
{
try
{
return await _context.Notes.Find(_ => true).ToListAsync();
}
catch (Exception ex)
{
throw ex;
}
}
In this way, we handle a faulted task by asynchronously waiting for it to complete, using await. This will rethrow the original stored exception.
Initially, I have used void as return. Changing the return type, the exception raised in the async method will get safely saved in the returning Task instance. When we await the faulty method, the exception saved in the Task will get rethrown with its full stack trace preserved.
public async Task AddNote(Note item)
{
try
{
await _context.Notes.InsertOneAsync(item);
}
catch (Exception ex)
{
throw ex;
}
}
Model binding is the conversion of the raw HTTP request into the arguments for an action method invocation on a controller.
[FromBody] parameter tells the .NET Core Framework to use the content-type header of the request, to decide which of the configured IInputFormatters to use for model binding.
By default, when you call AddMvc() in Startup.cs, a JSON formatter (JsonInputFormatter) is automatically configured. You could add additional formatters if you need to, for example, to bind XML to an object.
[HttpPost]
public void Post([FromBody] NoteParam newNote)
To add a new Note, we need first to set Content-Type, to be application/json.
Then we send a JSON object, and we successfully add a new Note. Since UserId is not set, the object will take the default value.
CSharp driver of MongoDB makes the query on the embedded documents easy. In the example below, we mix two filters, one comparing the date from the main document, and one comparing a long member of the nested class.
note.UpdatedOn >= updatedFrom && note.HeaderImage.ImageSize <= headerSizeLimit
Accessing the application using IIS Express, we could use the Get function that contain all the notes with Test, created after 2018-01-01 and size smaller than 10000. Once the project is started, this function could be called by using the next URL in the browser: http://localhost:53617/api/notes/Test/2018-01-01/10000.
At the End
Hope this helped! Let me know if you have questions or some things needs to be updated.
The post Using MongoDB .NET Driver with .NET Core WebAPI appeared first on Quality App Design.


