Introduction
Smart devices should be connected to the database in order improve performance and facilities. Users generally find it a bit challenging when they want to implement smart device application with database support. Using this article, I want to provide a sample demo to get in touch with smart device application with database support using Microsoft Visual Studio 2008 and MSSQL Server CE database. This article has source code in C# .NET. I used a simple data base connection and created a login page so that user can easily understand the smart device application and database connection.
Using the Code
Open Microsoft Visual Studio 2008 and Select File -> New Project -> Smart device application under Visual C# project types (as shown in Figure 1):
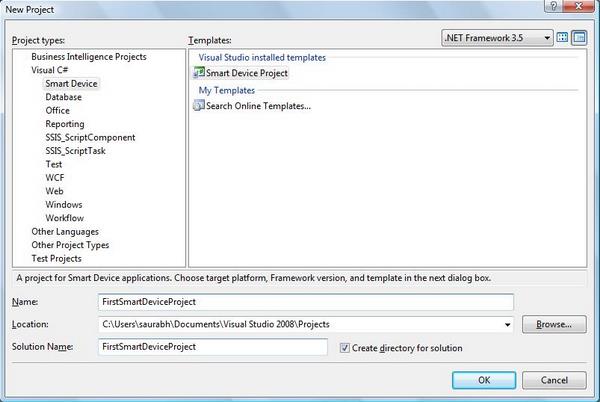
Figure 1: New Project Smart Device Application.
After creating a smart device application project, immediately a second popup window will appear and gives the user an option to select “Target Platform” and “.NET Compact version”.
Target Platforms types are:
- Pocket PC 2003
- Windows CE
- Windows Mobile 5.0 Pocket PC SDK
- Windows Mobile 5.0 Smart Phone SDK
- Windows Mobile 6 Professional SDK
If you want to use a different emulator from the above, then use the download link of pop up window.
.NET Compact Framework types are:
- .NET Compact Framework version 2.0
- .NET Compact Framework version 3.5
I am going with Device Application as shown in figure 2 below:

Figure 2: Select Project Type Application.
Now, smart device projects itself and gives you a default Mobile Form named Form1.cs.
If you want to create more than one form in a project, then Right click on Project and
Add --> New Item --> choose Windows Form and give an appropriate name. Click on OK.
If you want to change the Mobile Form that has to run first, then you have to use program.cs file inside the project.
static void Main()
{
Application.Run(new Form1());
}
Now, you have to make a proper User Interface in the project. If you want to make a simple application, then make login form using .NET smart device project. First put two labels, two text boxes and two buttons on the form. Then, give them appropriate names via setting the ID in Property windows.
I have set these IDs for controls txtuname, txtpasssword, lbluname, lblpassword, btnsubmit and btnreset.
Note: In the login form, care should be taken about the password textbox, it should not display any character. Fill with * or any symbol into password char field of textbox.
Figure 3: Smart Device Form in Design Mode.
The last step for setting up the project is to add SqlServerCE database file into the current project. Right click on project --> Add --> New Item --> Database File. Give an appropriate name to this database file and then click OK. It adds appropriate database file into the project, you need to set Data Source Configuration wizard. At the first time of creation, we don't have any tables and dataset, so click on finish to create an empty dataset.
Figure 4: Add New Item Database File.
Figure 5: Data Source Configuration Wizard.
Now, go to Server Explorer window, explore your database and create a new table. This can be done using right click on table folder and selecting “Create table” option. This opens a new “Table Creation Wizard” which prompts you to enter an appropriate table name, column names, types and size.
Figure 6: Create New Table.
Figure 7: Choose Data Connection.
My table Structure is as follows:
Table Name: user
uname      nvarchar(100)
password   nvarchar(100)
Reset Function
private void btnreset_Click(object sender, EventArgs e)
{
txtuname.Text = "";
txtpassword.Text = "";
}
Login Function
How to connect your mobile application with database
First double click on the dataset in the Solution Explorer that we have already created. Now, add one table adapter in that dataset using the right click --> Add --> Table Adapter.
It automatically takes existing dataset as a connection for table adapter. Click on Next and Select Command Type as Use SQL Statements and click on Next. Use query builder option and select table user to select all its rows and click on Next. Select all methods to use via table adapter and click on Next. It generates a message saying that your data table and table adapter is configured successfully.
It displays data table adapter as shown in the following figure:
Figure 8: View of Table
Add this data table adapter into your form when you are using this. In our case, we have added userdatatableadpter1 into Form1.cs design mode. You cannot see this table adapter control in your toolbox until you build the smart device project. The first step is to build your project, after which you can see a frame created in your toolbox. Drag this new toolbox control in your project.
Go to the form code window and add “using System.Data.SqlServerCe;” namespace in your project.
And add the below mentioned code into your code window:
private void btnlogin_Click(object sender, EventArgs e)
{
AppDatabase1DataSet ds = new AppDatabase1DataSet();
AppDatabase1DataSet.userDataTable dt = new
AppDatabase1DataSet.userDataTable();
this.userTableAdapter1.Fill(dt);
foreach (DataRow dr in dt.Rows)
{
if (dr[0].ToString() == txtuname.Text && dr[1].ToString() == txtpassword.Text)
{
txtpassword.Text = "";
txtpassword.Text = dr[0].ToString();
MessageBox.Show("Login Valid!");
}
}
}
How to Run?
- Click on F5 or click on start debugging.
- After building project, Visual Studio pops up one selection window for user to choose target device options.
- Select the device and click on ok. It takes some time to load your application into device emulator.
- Enter the username and password and click on login. If you want to clear username and password textboxes, then click on Reset button code.
Figure 9: USA Windows Mobile 5.0 Pocket PC R2 Emulator.
Points of Interest
While implementing smart device applications using Visual Studio 2008 with the backend SQL Server CE database, I learnt by successfully handling lot of issues with SQL Server Database and smart device application. Finally, I came to the conclusion that SQL server compact edition is a reliable SQL Server database to connect with the smart device application. Most of the users are trying to connect smart device application to the existing Microsoft SQL Server database which is not possible. The limitation of Smart Device applications is that it is not possible to connect high concurrent database with Microsoft SQL Server 2005.
Thank you for reading this article. I would really appreciate your feedback.


 General
  News
News  Suggestion
  Question
  Bug
Bug  Answer
  Joke
Joke  Praise
  Rant
Rant  Admin
Admin 


 . See the classes for