Introduction
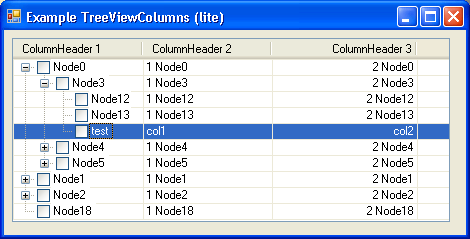
This projects shows a TreeView user control having columns.
Background
There are TreeView controls adding columns to tree nodes. Most of these controls have a lot of code to make things work. If the specifications are lowered, a more simple approach can be taken to deliver a TreeViewColumns User Control lite edition.
The heart of the user control consists of a hybrid made out of a TreeView control and a ListView control. The TreeView control is positioned directly on the ListView control, hiding its body. Only the columns header of the ListView is visible. The columns of the ListView control are only used to set the column width, text alignment, and titles of the columns of the user control.
The TreeView's DrawMode property is set to OwnerDrawAll, and a DrawNode event handler paints the columns next to the TreeNodes.
private void treeView1_DrawNode(object sender, DrawTreeNodeEventArgs e)
{
e.DrawDefault = true;
Rectangle rect = e.Bounds;
if ((e.State & TreeNodeStates.Selected) != 0)
{
if ((e.State & TreeNodeStates.Focused) != 0)
e.Graphics.FillRectangle(SystemBrushes.Highlight, rect);
else
e.Graphics.FillRectangle(SystemBrushes.Control, rect);
}
else
e.Graphics.FillRectangle(Brushes.White, rect);
e.Graphics.DrawRectangle(SystemPens.Control, rect);
for (int intColumn = 1; intColumn < this.listView1.Columns.Count;
intColumn++)
{
rect.Offset(this.listView1.Columns[intColumn - 1].Width, 0);
rect.Width = this.listView1.Columns[intColumn].Width;
e.Graphics.DrawRectangle(SystemPens.Control, rect);
string strColumnText;
string[] list = e.Node.Tag as string[];
if (list != null && intColumn<=list.Length)
strColumnText = list[intColumn - 1];
else
strColumnText = intColumn + " " + e.Node.Text;
TextFormatFlags flags = TextFormatFlags.EndEllipsis;
switch(this.listView1.Columns[intColumn].TextAlign)
{
case HorizontalAlignment.Center:
flags |= TextFormatFlags.HorizontalCenter;
break;
case HorizontalAlignment.Left:
flags |= TextFormatFlags.Left;
break;
case HorizontalAlignment.Right:
flags |= TextFormatFlags.Right;
break;
default:
break;
}
rect.Y++;
if ((e.State & TreeNodeStates.Selected) != 0 &&
(e.State & TreeNodeStates.Focused) != 0)
TextRenderer.DrawText(e.Graphics,
strColumnText,
e.Node.NodeFont,
rect,
SystemColors.HighlightText,
flags);
else
TextRenderer.DrawText(e.Graphics,
strColumnText,
e.Node.NodeFont,
rect,
e.Node.ForeColor,
e.Node.BackColor,
flags);
rect.Y--;
}
}
To give the user control a VisualStyles appearance, only these two lines of code are used:
public TreeViewColumns()
{
    InitializeComponent();

    this.BackColor = VisualStyleInformation.TextControlBorder;
    this.Padding = new Padding(1);
}
The last thing the user control needs are some event handlers which are triggered by the user when clicking the 'rows' or the 'columns' of the user control.
private void treeView1_Click(object sender, EventArgs e)
{
    Point p = this.treeView1.PointToClient(Control.MousePosition);
    TreeNode tn = this.treeView1.GetNodeAt(p);
    if (tn != null)
        this.treeView1.SelectedNode = tn;
}

private void listView1_ColumnWidthChanged(object sender,
    ColumnWidthChangedEventArgs e)
{
    this.treeView1.Focus();
    this.treeView1.Invalidate();
}

private void listView1_ColumnWidthChanging(object sender,
    ColumnWidthChangingEventArgs e)
{
    this.treeView1.Focus();
    this.treeView1.Invalidate();
}
I have kept the project simple, which makes it easier for others to expand the control by adding more and more features. It is by far the smallest TreeView having columns on CodeProject. But, it is a 'lite' version. So, don't complain if things are not working correctly under specific conditions.
Using the Code
To make use of the user control, the only thing you have to add is some string array to the Tag property of each TreeNode.
Really?
Yes!!
The user control has two properties which can be used to do the job. The TreeView itself can be accessed by the this.treeViewColumns1.TreeView property. For adjusting the columns, the this.treeViewColumns1.Columns property must be used. Keep in mind, Columns[0] is te space reserved for the TreeView itself.
An example of adding a TreeNode and columns to the user control:
TreeNode treeNode = new TreeNode("test");
treeNode.Tag = new string[] { "col1", "col2" };
this.treeViewColumns1.TreeView.Nodes.Add(treeNode);
Points of Interest
Because it is a 'lite' control, you can change the columns to values where the TreeView looks garbled. So, you have to add code to do some boundary checking.
History
As of writing (March 2009), version 1.0.0.0 is presented.
