Introduction
This article is the second part of a series of articles that I am writing to illustrate the use of EMC Centera SDK and the .NET wrapper being developed as an open source project to store "fixed content" on the EMC Centera storage appliance. But before I start, I would like to explain what is "fixed content" and give an overview of the reasoning behind the emerging of this type of storage. The first article was published on this site under the title "How To Retrieve the Centera Cluster Capabilities".
Note: To run the demo, YOU WILL NEED TO DOWNLOAD THE EMC CENTERA SDK. I CANNOT DISTRIBUTE THE NEEDED SDK DLL(S). Please read the section "What you will need to be able to develop against the appliance" in this article to obtain these SDKs.
Fixed Content Definition
Fixed content is information that never changes after creation. It's actively referenced, typically shared among users and must be retained (maintaining a copy of fixed content for a mandatory period of time) for a long period of time. Examples include electronic documents, presentations and e-books; rich media such as movies, videos, digital photographs and audio files; check images and financial statements; bioinformatics, X-rays, MRIs and CAT scans; CAD/CAM diagrams and blueprints and e-mail messages.
Example of "Fixed Content"
- An average enterprise (a 250-person organization) generates approximately 1.5TB of e-mails per year
- A picture archive in a large hospital may generate more than 5TB per year in digital X-rays or MRIs
- Banks are scanning millions of check images per year, requiring multiple terabytes of storage.
State of the Industry
Large portion of all digital information is fixed content. It is expected that fixed content will be the largest portion of digital content created by the human race in the next century exceeding all dynamic content put together.

Also, information life cycle drives to more fixed content. Enterprises embracing things like e-mail and electronic documents are increasing the need for fixed content storage exponentially. Finally, emerging regulations requiring retention (maintaining a copy of fixed content for a mandatory period of time) in the Financial and Healthcare industries are creating a huge need for fixed content storage and fixed content solutions.
EMC Centera appliance is one of the appliances that are available in the market today to satisfy that need. Other companies like NETApp have solutions equivalent to Centera. But this series of articles is specific to showing how to code using the Centera SDK.
What You Will Need to be Able to Develop Against the Appliance
To start writing content to the Centera Appliance you will need to have the Centera SDK. You will need to register on the EMC site to download the SDK. There are a number of versions of the SDK available for download. Use 3.1SP1 version. This link will take you to the site to download the SDK.
Note that the only way to save content on most "fixed content" storage device is through the use of the device propriety API(s) that the manufacture of the device publishes. Some manufactures do offer an open standard (CIFS, NFS, HTTP and WebDAV interfaces) to read/write to their own devices. But, usually, you end up losing a lot of the device power. Things like WORM (Write-once-read-many) functionality, or retention capabilities are usually lost with the open standards.
You also will need the .NET wrapper for the Centera SDK. The latest version of the opensource.net project is on sourceForge.
You need to have access to the "Public Centera" appliances. EMC recognized that the Centera device is not available everywhere and did set up an appliance on the internet that developers can develop against. The content of this appliance is purged periodically by EMC. The latest IP(s) can be found on the EMC site. As of this writing the valid IP(s) are:
- EMEA1 - 152.62.65.11, 152.62.65.12, 152.62.65.13, 152.62.65.14
- EMEA2 - 152.62.65.16, 152.62.65.17, 152.62.65.18, 152.62.65.19
- EMEA3 - 212.3.248.41, 212.3.248.42, 212.3.248.43, 212.3.248.44
- EMEA4 - 212.3.248.46, 212.3.248.47
- EMEA5 - 152.62.65.21, 152.62.65.22
- US1 - 128.221.200.56, 128.221.200.57, 128.221.200.58, 128.221.200.59
- US2 - 128.221.200.60, 128.221.200.61, 128.221.200.62, 128.221.200.63
- US3 - 128.221.200.64, 128.221.200.65, 128.221.200.66, 128.221.200.67
- US4 - 128.221.200.116, 128.221.200.117, 128.221.200.118, 128.221.200.119
- US5 - 128.221.200.120, 128.221.200.121, 128.221.200.122, 128.221.200.123
Special Architecture Knowledge You Need
Centera Appliance stores content. This content is stored using an address. This content/address combination is called CAS (or content addressable storage). So you will hear/read about this term in the industry these days.
The smallest block of data that can be stored must be housed inside a memory block the SDK calls "C-Clip". In another word, you have to create a C-Clip and place your content inside the C-Clip first. Then you send the C-Clip to the Centera to be saved. The C-Clip itself is made of 2 other components, the Content Descriptor File or CDF for short and the BLOB.
The Content Descriptor File or CDF for short is an XML file that holds metadata. The CDF contains TAGS and ATTRIBUTES.
Tag
- An XML Tag in the CDF
- A user defined name
Example: <application_name>ImageStore2004
Attribute
- An XML attribute in the CDF
- A user defined value
The C-Clip also holds a BLOB. The BLOB is usually the content you wanted to store.
BLOBs have the following characteristics:
- They hold objects stored on Centera
- They are represented as distinct bit sequence of the object you are trying to store.
Centera runs an OS called "CenteraStar". This OS is optimized for writing and reading the C-Clip objects.
Centera object have Metadata. The applications you develop create metadata associated with one or more objects. Then these objects are stored independent of volume/directory information as in the image below:
Overall Process Overview
Centera Three Modes
Basic Mode
Centera acts like a standard magnetic storage. An object marked for deletion is deleted immediately.
Compliance Mode
Active retention protection ensures availability of objects for a configurable period of time. An object marked for deletion is not deleted until the retention period passes.
Compliance Plus Mode
Similar to compliance mode, compliance plus mode uses retention periods. The default retention period is infinite. Unlike compliance mode, data never purges.
Benefits of the Compliance Modes
- Retention enforcement
- Retention is set on the clip. Applies to all blobs that are referenced by the clip
- Cannot delete a clip/blob when retention has not expired
- Once retention expires, clip is eligible for deletion
- Data deletion enhancements: Shredding
- Overwrites data multiple times with a random bit pattern
Centera SDK
Centera-supplied Software Development Kit (SDK) contains
- C callable libraries
- Java Interface utilizes JNI
- Documentation
- Sample code
It can be downloaded from this link.
You will need to create an account with EMC to be able to download the full SDK.
Why Is It needed?
- Provides content addressing Framework
- No file system and associated drawbacks
- Applications access the Centera via API calls only
Centera Cluster
A cluster is a logical CAS archive that appears to your application as a single unit.
A cluster can be accessed by one or more applications via a set of node IP addresses and access profiles.
Pool
A pool is an SDK object that represents one or more clusters. Your application must OPEN a pool by providing a series of node IP addresses and access profile credentials for the desired set of clusters. The first accessible IP address in the list represents the primary cluster, while subsequent IP addresses are considered the secondary clusters (assuming that they represent distinct clusters). The pool object also auto-discovers any replica clusters that are configured via the primary or secondary clusters.
Profiles
The system administrator creates access profiles to applications. Profiles are a means to enforce authentications and authorization. The system administrator can determine which applications have access to a cluster and what operations they can perform. An application can only log into a Centera if a profile for that application has been created on the Centera cluster and the credentials for that profile have been made available to the application server. Once the profiles have been created on the Centera cluster, the system administrator exports the profile information to a Pool Entry Authorization (PEA) file and copies this file to the application server. The system administrator can set an environment variable that points to the PEA file or can leave it to the application to give the path to this file. So when you code your application you can either ignore the PEA file and the cluster will point the SDK to the location of the PEA file to use or as a developer, your enterprise may have created specific PEA files and distributed them to the development team. At this point you can give the full path of the PEA file in your code when opening the pool. It is important to note that for these articles, the public available .PEA profiles will be used.
The files have the following naming convention: ClusterName_ProfileName_CapabilitiesList.peaFor example, us2_armTest2_rdqeDcwh.pea, translates to:
- Application Profile belongs to Centera Cluster US2
- Profile Test2, Advanced Retention Management (arm) enabled
- Capabilities: All enabled – please refer to the list below
Capabilities Definitions
- r: read
- w: write
- d: delete
- q: query
- e: exists
- D: privileged delete
- c: clip copy
- h: retention hold
- monitor – All profiles except "Profile1" are configured to enable the monitor capability.
Each profile also comes enabled with name/secret combination that corresponds to the profile name. Thus to access a profile definedbyus2_armTest2_rdqeDcwh.peafile, the application could alternatively use "name=armTest2,secret=armTest2" in the connect string.
Conclusion
And as "Forest Gump" said in the drama movie with the same name "That's all I am going to say about that".
This introduction should give you enough knowledge to be able to read the SDK and be able to write code to use the Centera appliance.
Since this article is one in a series of articles I am writing about different functionalities, each individual article will have this introduction and then will discuss the specific Centera functionality the article will address.
How to Setup the Development Environment
In Visual Studio, create a new project called AdrdProjectCentera1 as in the figure below:
Note: I am creating the project on my E drive in the CAS directory. The project name in this article is AdrdProjectCentera1.
This will create the directory structure needed by Visual Studio. The directory of interest in this solution structure is the debug directory that gets created by Visual Studio. In this article the full path of the directory of interest is as follows: E:\CAS\AdrdProjectCentera1\AdrdProjectCentera1\AdrdProjectCentera1\bin\Debug
Note that your path will be different depending on the location of your project.
The next step is to unzip the EMC Centera SDK files. The SDK is delivered from the EMC site as a single zipped file. The default zip file name is 3[1].1_SDK_Windows_gcc.zip (as of Oct 13, 2007). Once the file is unzipped, a number of directories will be created. Copy the files in the lib directory to the debug directory created by Visual Studio in step 1. The files that you will copy are FPLibrary.dll, fpos32.dll, fpparser.dll, pai_module.dll. There is also an FPLibrary.jar file that exists in that lib directory. You do not need to copy that file. The FPLibrary.jar file is the Java wrapper for FPLibrary.dll. This .jar is the equivalent of the .NET wrapper that the "sourceForge" project is all about. Also, all the .lib files are to be used if you are developing using "C" or "C++". Just ignore these files for this article.
Next download all the PEA files to be able to develop against the "public Centera". I will used the "US X" PEA files from the EMC website. Here is the link(as of Oct 13th, 2007). Make sure you copy the .pea files to the debug directory described in step 1 above.
The next step would be to unzip the .NET wrapper you downloaded from "sourceForge" site. The default zipped file that you downloaded would be FPApi.NET.zip. Once it is fully unzipped, the following directories would be created:
After you unzip the file, the directory should look like the figure below:
The zip file from "sourceForge" does not include the binary file of the wrapper (compiled version of the code). So you will need to compile the code to generate the final wrapper that you will use in this article project. To do so, double click on the Wapper.sln the zip file extraction created. This should start a new instance of Visual Studio and the solution should look as follows:
Compile the solution by selectingBuild->Build Solution menu options as in the next figure:
Once the build is complete, copy the files FPSDK.dll and FPSDK.pdb that are generated as a result of the solution build to the debug directory created in step 1.
The final debug directory for the solution should look like this:
Final step is to set a reference to the FPSDK.DLL in your solution. To do so, open the original solution you created in step 1 (if it is not already open).
The Article "How to Write to Centera Storage Appliances"
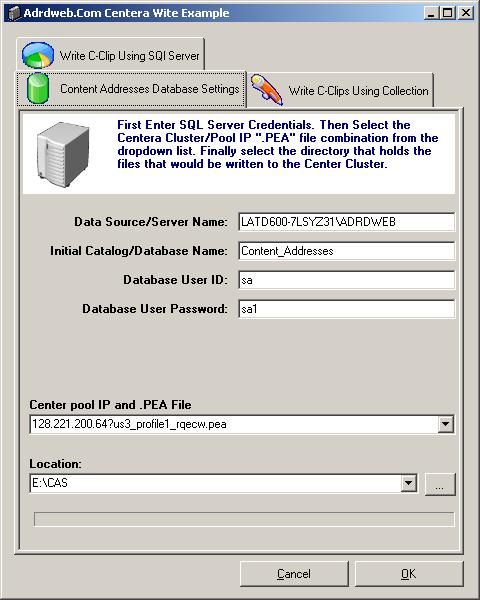
The following is the UI screenshot. Please supply the SQL Server Credentials and Select the Pool IP and the Directory that you want files copied from.
Please Note that you are writing to a publicly accessible storage device.
DO NOT COY PERSONAL FILES TO THE PUBLIC CENTERA. ALSO, EMC does purge the public centera periodically.
DO NOT USE THE PUBLIC CENTERA AS OFF-SITE STORAGE
The code sample associated with this article describes the following scenario:
- The user supplies SQL Server credentials
- The user selects the Pool/Cluster IP and .PEA files to write to
- The user selects a directory on the local machine that the files will be copied from
- The User will click the OK button to start the process of copying the files.
This project is organized as one form and four helper classes. The form class object holds most of the code needed to run the application to demonstrate how to write content to the EMC Centera appliance.
Three of the helper classes/objects are used extensively by the associated code for this article. These classes are:
AdrdcasclassItemAdrdcasclassItemCollectionGlobals
The fourth class/object AdrdCenteraRetentionInfoItem is inherited from the previous article code sample I wrote titled "How to Retrieve EMC Centera Cluster/Pool Capabilities" that you can search for on this site. I also have a copy of the article here.
The associated code sample classes:
AdrdcasclassItem: An object that abstracts a row in the table Adrd_CAS_ClipIDs. This database table holds the constant address on the appliance. It also has a number of methods that can read, and update the SQL Server database.AdrdcasclassItemCollection: A collection of AdrdcasclassItem objects.Globals: Is used to hold values that can be passed between different objects and threads. The database to use EMC Centera appliance or any content addressable appliance, you, the programmer, has to save the ID (whatever the Unique Identifier the appliance uses) that the appliance supplies you once the content is written. In the EMC Centera world, this ID is called the ClipID and the code associated with this article will save these clip ID(s) in a SQL Server 2005 database.
The Data Modification Language (DML) to create the database used with the associated code sample is as follows:
CREATE DATABASE [Content_Addresses] ON PRIMARY (
NAME = N'Content_Addresses', FILENAME = N'c:\Program Files\Microsoft SQL
Server\MSSQL.1\MSSQL\DATA\Content_Addresses.mdf' ,
SIZE = 2048KB ,
MAXSIZE = UNLIMITED,
FILEGROWTH = 1024KB )
LOG ON
(
NAME = N'Content_Addresses_log',
FILENAME = N'c:\Program Files\Microsoft SQL Server\MSSQL.1\_
    MSSQL\DATA\Content_Addresses_log.ldf' ,
SIZE = 1024KB ,
MAXSIZE = 2048GB ,
FILEGROWTH = 10%)

GO
The database created is called Content_Addresses. You can create a database with whatever name you want.
The name of the database is not really used with any of the classes/objects associated with the code sample. You will need to update the App.Config file with the database name you are planning to use. The Table that is one of the most important helper classes in this project is AdrdcasclassItem class.
This class abstracts the table Adrd_CAS_ClipIDs. The DML to create this table is as follows:
CREATE TABLE [dbo].[Adrd_CAS_ClipIDs](
[CLIP_ID] [varchar](255) NOT NULL,
[Clip_CREATE_DATE] [datetime] NOT NULL CONSTRAINT
[DF_Adrd_CAS_ClipIDs_Clip_CREATE_DATE] DEFAULT (getdate()),
[Clip_CLIP_STATUS]
[varchar](255) NULL,
[CLIP_STATUS_DATE] [datetime] NULL,
[CLIP_STATUS_DURING_ACTIVITY] [varchar](1000) NULL
) ON [PRIMARY]
Code Flow
The Form Initialization
In the form constructor all the initialization of the form surface controls take place. Additionally, the application reads the configuration file. The data used with this code sample is all stored in the <appsetting>section of the configuration file. The following are the <appsettings>tags that are used and the definition of each. <add value="cltwks01" key="Server">This is the name of the SQl Server machine.
If you are using an instance on the SQL Server then the format should be:
"ServerName/InstanceName"
This is the name of the database. <add value="sa" key="UID">The user ID is used to login to the SQL Server. <add value="sa1" key="PWD">The password of the user ID is listed above. <add value="Adrd_CAS_ClipIDs" key="ClipIDTable">The name of the table that holds the properties is defined in the AdrdcasclassItem class.
The Form Load Event
This event gets called immediately after the initialization and the purpose of the code here is to show in the third tab on the UI existing records in the database as seen in the figure below:
The Form OK Button Click Event
The next three figures below describe the flow of the process to write the files to the Centera:
When to Use "BlobWrite" and When to Use "BlobWritePartial"?
To write to the Centera, you will invoke the one of the BLOB write methods. Try to always use the BlobWrite method in most of your code unless:
- Your application is multithreaded
- Most of your files are larger than the default allocated TAG buffer of (64*1024). The next two diagrams will show the difference in the way the SDK handles each individual Blob write API call.
Background
You can get the Microsoft or a PDF Version of this article here.
Points of Interest
Centera Storage and Content Addressable Storage
Adel has over 30 years of experience in planning, architecting, developing, and implementing state of the art information technology solutions involving SOA, Microservices, Blockchain, AI, REST, DCOM, CORBA, SSO, SAML, Low Latency, High availability, IoT, Embedded Systems, Robotics, SCADA, VOIP, and OSS Technologies. He is highly technical leader with extensive hands-on experiences that cover architecting, coding, and deployment of complex IT solutions and systems with a strong passion for “all things IT”. Adel Led large cross-functional teams with diverse technical backgrounds and designed and managed all the needed budget controls and deliverables. He is having strong knowledge of financial, medical/pharmaceutical, and industrial domains. He also is having strong Agile and CMMI processes experiences.
Mr. Eddin is known in the DevOps space as a leader in the development of DevOps operations and processes, continuous integration, continuous builds, source control, infrastructure build-outs, and cloud integrations on-premises and on the cloud.
In the last 15 years, Adel led number of large cloud technologies initiatives that that include public clouds (AZURE, AWS), private on-premises cloud (VMware vSphere), and Hybrid cloud implementations (VMware vSphere). He is also recognized as a leader in the security space. He demonstrated extensive knowledge in all aspects of IT security including, but not limited to physical security, coding security, P2PE, Ciphering, and Encryption with both hard (appliance or IOT based) and soft (software code based) implementations.
He has strong background in software development life cycle, software development management, infrastructure management, and IT software and hardware “build-outs”. He also managed multi-million-dollar IT projects that covered all corners of the globe using on-shore and off-shore resources and covering a wide range of the information technology spectrum.


