Introduction
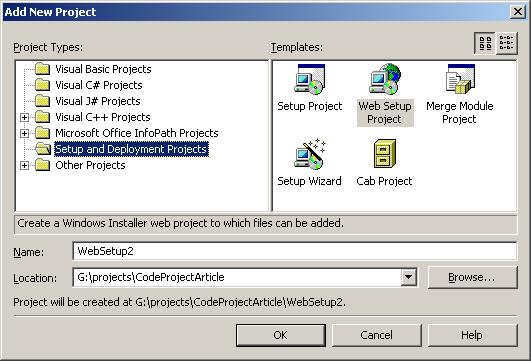
Before you move onto reading the rest of this article make note of the graphic above. If you haven't noticed it previously while working in Visual Studio and you are now thinking about creating an installation for your own software then this is where you will need to go in order to add a new setup project to your current solution.
It is easier for you to add an additional project now to an existing solution that contains the project you wish to create a setup project for. You gain features like automatic dependency recognition this is what makes using this program useful by doing less to accomplish more.
So let me begin with describing what a basic Installation is...
An installation is simply placing a file or files belonging to a software program to a particular location on a computer that currently does not have the program installed or available currently. Alright that's nice but what does it mean? Well not too long ago most program Installations did not require much more then copying the files required and simply typing the command line to start that program. Later on we added Windows and the Mac GUI to our systems and we added the requirement of modifying and adding shortcuts and menus to systems in order to make our programs accessible to the user of the particular computer. The complexity has continued to rise over the years and now we Have .Net assemblies and ActiveX/Com objects that need to be registered. We have services that need to be installed and started, registry entries to add and network security issues to be dealt with but the main function of an installation is still to simply place new files on a machine that currently does not have them installed.
Microsoft has moved us through several iterations of Installation API's and now we are currently at the MSI level and current versions of Visual Studio support the creation of that type of installation. You might wonder (or even groan a bit) about having too many choices and options but if you simplify your own thinking it will be easier to deal with creating you own installation. I won't go into an extremely detailed desciption of MSI itself as there are plenty of articles on that topic. One the best is at http://msdn.microsoft.com/ if you are interested and I think it will be worth your time and effort to add this to your personal list of Programming and Development skills.
So if you are still interested at this point scroll on down and continue reading.....
Basic of Creating an Installation in Visual Studio
First examine the Solution Explorer view of the Web Setup Project

Take note of the dependencies discovered by the project already all I had to do was add the output of the project listed above WebSetup1 and save it and these dependencies were discovered automatically using the api to see what system files were referenced by my program a .Net Library Assembly in this case. You can see Microsoft has done much to make the task of creating an installation easier to do. Also note that the dependencies have the crossed out circle to the left of them. That is because since these are system files I don't want them included as part of my installation file and they should be installed on the target system before my file gets added to a new system. That could be part of a Condition (make note of the term) that needs to be fulfilled in order for the installation to proceed (more on Conditions later on)
Next examine the properties window for the Web Setup project
Most of these entries are optional with the exception of ProductCode and ProductName these entries fortunately are automatically generated for you. You might want consider using a different Product Name as it should reflect the name you gave your program good naming is very helpful, really think about it a bit....
Notice the next image below in this case the Primary Output has been selected I added it by right clicking the bin directory and selecting "Add Project Output" and selecting the output from my Web Part Project. I still needed to do more here in my particular case I needed to add another folder called "wpcatalog" as this is where my Web Part DWP files need to go on the web server that I would deploy too. In the case of the .dwp files I selected the folder and chose "Add Files" which then gave me the option of browsing my project folder for files I wished to install to this directory. Simple enough altogether but I know there is more to do yet and some things I won't get into in this article.
I next selected the root folder Web Application Folder to change the properties view for the root of the installation
The following image is the properties for the main root folder here I had to do some things different then a normal Web Setup because my main project is a Web Part.
In this case my root folder is the main directory of the web site and the entry VirtualDirectory is empty which indicates use the root directory as the base to install too and I am only adding or using two particular folders. MSI has some nice safeguards built in that protect you from doing stupid things. For one it won't create a folder if the folder exists additionally MSI won't overwrite newer files where the version info in the file indicates a newer version is currently installed. That is something to consider when developing software always add and update your version number as it protects you from overwriting users files if they happen to have a newer version then that included in your installation routine. Lots of things to think about when creating installations nothing worse then creating an install that causes problem and it is a great way to get yourself fired or sued so keep such thoughts in mind when developing an installation routine.
Next I show you the Registry Page of a Visual Studio Web setup
In this case I am not adding any registry entries as they are not required for a Web Part Assembly great. Yes it is good in this case other MSI authoring utilities I have used allow me to import entries from the current system I am developing the software on. For instance Wise and Install Shield both do this and it is a real time saver as all I need to do to simply the creation of an installation is to actually compile my output to locations I would use for a final installation. I never used to do this till I became involved in creating installation and have since then maintained the habit just in case I actually do have to create a setup. I wouldn't do this in the earliest stages of development but eventually you will have to think about where you are going to deploy your files so the earlier you do this the easier it will be to do.
The next image is of the File Types Page this is where you add file associations
In this case I am not using it and from previous experience I have not found much opportunity or need to utilize this feature. It is actually an entry in the registry under HKEY_ClASSES_ROOT but in MSI it is handled as a separate item from a regular registry entry. Want to know more go visit MSDN Online.
Next we move onto Launch Conditions and in this case they are important to me and you most likely.
This is where check that the target system fulfills all the requirements to have your program installed. In this particular case the image above tells me that IIS installed is required (you could even check if it was running too), .Net Framework is required (in this case .Net 1.1) and IIS version 6 is required as opposed to IIS 4 or 5. Web Parts won't work without meeting this minimum of requirements so your installation should stop warn the person performing the installation and terminate. I tested my installation on XP which doesn't fulfill the Launch Conditions and my installation ended with the following message.
Good that is what I wanted it to do here is the property windows where I set the Message and some of the conditions.
Moving onto the User Interface window in the case of Visual Studio Setup you can only select which windows are used. In Visual Studio Setup you can only import new graphic so you need to edit them with an external graphic editor. If we were using Wise, InstallShield or some other full featured MSI Authoring Environments you could also modify the graphics used within the environment. In this case you can only change the messages and some other details. Mostly this will not be of concern but later on you might wish to zip up your installation graphics and add some product logos and other nice artwork. For a basic Installation this is unnecessary. I have done this on only two occasions and the were both requests but mostly for corporate installs you don't get asked too often.
Custom Actions that is a very big topic and not covered in its entirety by this article
Custom Actions are really useful for pre install and post install routines but in Visual Studio you don't have any automated functionality. The higher end and more elaborate installation authoring environments have built-in facilities and macro scripting languages which really simplifies matters for you. I don't have to use the Visual Studio environment as I have Wise for MSI and that makes the whole process much quicker. In this case my remaining task would be to add a custom action which would open a web.config file read the contents, find a particular section, and then write a new entry in that file and close it. I have a few options I could create a VBScript that does this or create a programmatic routine in dll or executable form that does the same. Once you complete the creation of that File you can add it to the custom action section Install. You are not done though while you assembled the open read write file routine you really should have created a open read and delete routine to remove your entry, should your product be uninstalled by you or a user. Sometimes authoring installations can be tedious but it is important and you should always do all you can to make sure a users system is left intact and functioning. Before MSI a used a lot of products that had bad install programs many left lots of excess files behind and commonly lots of useless registry entries. MSI takes care of a lot of that for you but changes made by a custom action are not one of them. If you do something custom during an installation you should undo it when the product is uninstalled. There are two case where MSI won't automatically take care of things for you one is custom actions and the other concerns files created after the installation is finished. You may have software that creates registry entries after it is run the first time and these you may need to remove via a custom action when performing an uninstall.
Points of Interest
This article just scratches the surface of all the possible situations that can come up where authoring installations is concerned.
MSI has some additional features available to it MSI files and the setup exe's created by Visual Studio Setup, Wise for MSI, and InstallShield don't do the actual work of installing files and adding registry entries, etc the work is actually performed by a system executable msiexec.exe (usually located in c:\windows\system32. MSI is actually a database file that stores the actions to be performed by msiexec which reads the actions and performs them. you can read more about MSI itself here at MSDN Online
I realize more people would be interested in a regular setup project and not a web setup project so I will try and create one for that type soon.
History
April 4th 2006: Version One I am sure I will be editing it real soon and adding part II soon too
April 6th 2006: I came up with a nice simple trick for adding your own banner graphics to an installation. I came up with this one while fooling around with ORCA a very simple msi editor that comes in the platform sdk more later. The replacement graphic is directly below.
I just got around to updating this article about authoring MSI in Visual Studio 2005. Everything contained in this article or any other MSI article on using Visual Studio Install Builder is applicable to VS 2003 and VS 2005. I forgot to add that tidbit earlier but a recent forum post reminded me to come back and update this article. The interface is nearly identical between VS 2003 and VS 2005 so I don't even need to upgrade the graphics.
This member has not yet provided a Biography. Assume it's interesting and varied, and probably something to do with programming.


 General
  News
News  Suggestion
  Question
  Bug
Bug  Answer
  Joke
Joke  Praise
  Rant
Rant  Admin
Admin 


