Introduction
AutoSPInstaller Online is one of the great projects that facilitate Automated SharePoint installation including Sharepoint 2010, 2013 and 2016.
Auto SP Installer provides a powerful way to deploy and configure a single-server development environment to multiple-server SharePoint farm.
Reference: https://autospinstaller.com/
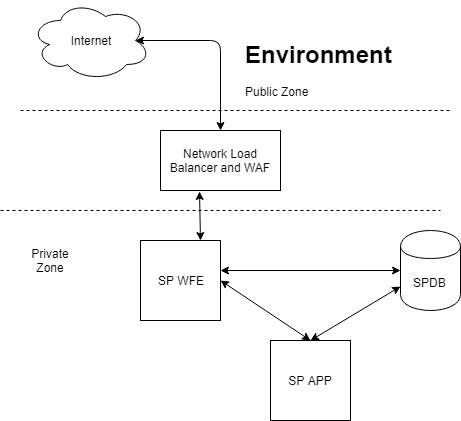
Before doing anything, we will set up the environment for SharePoint three server Farm.
Will name these servers as:
- SPWFE - Share Point Front End Server
- SPAPP - Share Point App server
- SPDB - DB server
Please find the reference for SharePoint minimum requirement and practices from here.
For the medium segregation, we have to create the below list of service accounts.
Service Accounts for Active Directory
Service Account name: spadmin
Rights: Local Admin All Servers (DB,WFE,APP)
SQL DB Rights: SQL DB Creator and Security Admin Rights
Domain Privileges: Service User
Description: Use for set up and Configuration
Service Account name: spfarm
Domain Privileges: Service User
Description: sp timer service, Central Admin Application Pool, Other Configurations
Service Account name: spservices
Domain Privileges: Service User
Description: Service and Pool account user
Service Account name: spsqlservice
Domain Privileges: Service User
Description: Run services in SQL Server (MSSQLSERVER, SQLSERVERAGENT)
Service Account name: spsearch
Domain Privileges: Service User
Description: SP search service, crawlers, search related
Service Account name: spprofile
Domain Privileges: Need Replicating Directory Changes
Description: User profile synchronization account
User Profile User Configuration
Run dsa.msc in Run Windows or open Active Directory Users and Computers.

Then right click the domain and click delegate control.
Then click next and select spprofile user.
Then click next and select Custom Task Delegate and click next.
Then select This folder, Existing objects in this folder, and creation of new objects in this folder and click next.
In here, select Replicating Directory Changes and proceed to finish the wizard.
Configure SQL Server
After installing SQL server, you need to do the following configuration. You might also need to install .NET 3.5 manually in the server by specifying source path manually.
Setting Up DB Server (Login as spadmin)
I installed Windows Server 2012 in the DB server. After installing OS, you need to install the SQL server. Following are the steps you need to perform additionally.
In the feature selection, you can select Database Services and Management Tools – Basic, Management Tools – Complete. Other than these features, you can select other related ones if needed.
Then you can add spadmin as a Administrator for management.
And you should add spsqlservice as service accounts running credentials for MSSQLSERVER, SQLSERVERAGENT.
Then complete the installation and Enable TCP/IP, and start the SQL browser in SQL configuration management.
This member has not yet provided a Biography. Assume it's interesting and varied, and probably something to do with programming.


