This article contains a walkthrough with Docker. It covers getting a Docker container up and running, creating a simple web server in C#, creating an HTTP server in Python, redirecting STDOUT and STDERR, the basic configuration of a Docker image, and basic building of a Docker image.
Contents
First off, a disclaimer -- I am new to Docker and this probably is not the easiest/best way to do this. There are a few ways to implement this concept, and I've chosen one approach. A more typical approach is probably to use something like Nginx and reverse proxies to implement the entire site directly within a Docker container, but I chose not to do that as I don't know Nginx and it would have required working entirely in the *nix world, which I also didn't want to do. There's only so much learning curve that I can take at one time!
So in this implementation:
- The website itself is implemented in C#
- The Docker system runs in Windows
- A Dockerized HTTP server runs in the container
- The C# web server communicates with the Docker container to:
- Uploads the Python script from the browser that you want to run in the container
- Executes the script
- Returns the STDOUT and STDERR of the script back to the browser
- Exposes some behaviors you wouldn't actually expose on a real Fiddle website, but is useful for demonstrating some features in this article.
Besides the download, the latest code can be found on GitHub.
- All about the pain points of getting a Docker container up and running
- Creating a simple web server in C#
- Creating an HTTP server in Python
- Redirecting STDOUT and STDERR
- Dealing with environment variables necessary to launch a Docker container.
- Basic configuration of a Docker image
- Basic building of a Docker image
- Nuances of Python scripts in Windows 7 and Windows 10
Two main reasons, particularly when exposing something as dangerous as letting a user run code on your server:
- Security
- Isolation from other users
Docker creates an isolated container that has no access to your host environment unless you explicitly create a bridge (either shared files or exposed ports). This protects the web application from malicious attacks. If the user decides to explore the file system, delete files or otherwise alter them, they are only affecting the container, not your web server!
For example, if I run a Python application using the "Run on Host" feature that I've implemented in the web app, you'll see that I can list the contents of any directory with my Python app:

Obviously, we don't want the user doing this. On the other hand, if I run the exact same code using the "Run on Docker" feature, we can see that I'm executing the Python code in a completely different OS:
Here the code is running in a container that the web app creates on the fly from a baseline Docker image. Starting the container takes a few seconds, but once the container is running, interacting with it is very fast.
- The number of concurrent containers - you would never deploy this as a real web application because the server could easily be overwhelmed with sessions each creating their own container.
- Memory and CPU usage - there are ways in Docker to throttle memory and CPU usage so that a rogue application doesn't acquire all the resources of your server.
- Allowed application execution time - this is poorly implemented in the "Run on Host" feature and not implemented at all in the "Run on Docker" feature.
- As I mentioned at the beginning of the article, there are probably much better ways of doing this, and services such as Amazon EC2 Container Service should not be ignored.
- Further security improvements even within the container itself -- read/write permissions, a separate user in which the process executing the Python script runs, etc.
- Further restrictions to the outside world -- as you can see from my example, the code running in the container can access anything on the Internet. The last thing you want to discover is that someone is running a DoS attack through your Fiddle web app.
The OS's I used in the development of this demonstration app are Windows 7 Professional and Windows 10 Home editions. Neither of these OS's support Hyper-V (the ability to create virtual machines on X86-64 systems running Windows), so instead, I've had to install the Docker Toolbox which uses Oracle's Virtual Box for the virtual machine. If your OS is Hyper-V capable, then can download the Docker Community Edition instead. Just beware that there might be some minor differences with regards to the contents of this article.
As noted, I installed the Docker Toolbox, which creates these shortcuts in the Start menu:
When you launch the Docker Quickstart Terminal, it'll do some startup things and then display the Docker ASCII art logo, from which you can check that things are working by getting the version information with either docker --version or a more detailed response with docker version.
There are a couple important things to note here!
- As highlighted in the title bar, Docker is running in your Users folder.
- Note the IP address that the Docker machine is running on. We will use that information later on.
The first is very important, because Virtual Box has been set up for you to share this folder between your host (Windows) OS and the Docker VM. You can verify this with the "ls" command which lists the contents of the folder, for example:
Docker images are built from specifications that you create (usually in subfolders) from this directory (in my case, c:\Users\Marc).
On your host (Windows), in your c:\Users\[your username] folder, create a folder called "test" and the following files (I'm using Sublime editor for these files):
- create Dockerfile (no extension!)
In this file, tell Docker that the image is going to use the latest version of Python:
FROM python:latest
WORKDIR /app
ADD . /app
We also tell Docker where the files for the "application" for our Docker image is located using the environment variable WORKDIR and the command ADD. Read more here.
The first instruction must be FROM, as this specifies the base image. Docker's glossary of "base image" is pretty useless: "An image that has no parent is a base image", and I'm not going to get into the details of images, as 1) I'm still learning this stuff and couldn't explain it well enough, and 2) other people have written a lot of good stuff about images and containers. You can read more here on the Docker site.
In this file, create a one line "hello world" app:
print("Hello World!")
Make sure there's a carriage return at the end of that line, otherwise nothing will happen (this is a Python thing.)
We see that these files, in the "test" folder that I put them in, are visible in the terminal:
In the terminal, the image is built with the command docker build -t test ./test
This tells Docker to create an image called "test", and the definition of the image, including the files we want the image to have, are in the ./test folder. The "-t" tells Docker to name the image, which is useful, because otherwise your using a long hex image ID string instead. Read more about Docker build options here.
We can now run the image with docker run test python hello.py
Success! Here we are telling Docker to run the image "test" and we're passing in a command line that the container will execute.
To see what images you've created, you can use the docker image ls command:
Note the image named "test"!
This gets more complicated. Docker communicates between the host (Windows) shell and the Docker VirtualBox VM using named pipes.
The configuration for your host's environment is not automatically done for you when you install the Docker Toolbox. You can figure out what host environment variables need to be set by using docker-machine env default: (note this is running from a Windows shell):
In order to communicate between the host shell and the Docker VM, you must set these environment variables!
Once you've done that, open a new shell and type in the same command you used in the Docker terminal to run the test application:
Success again! We've now demonstrated that a Docker image can be run in a container directly from Windows.
This is, after all, the premise of Docker -- that images are run in isolated containers. We can prove this by writing a small Python application that creates a unique file and verifying that each container sees only its file. We'll write a simple Python app that creates a file given an filename and then lists the contents of the folder. I put this code into the file "containerTest.py" and rebuilt the image before running the image.
import os
import sys

print("Before:")
print(os.listdir())

fn = sys.argv[1]
f = open(fn, "w")
f.close()

print("After:")
print(os.listdir())
When we run the image, we see that each container starts only with the files that were copied over from our test folder, creates the file we tell it to, and the container doesn't see any other files we created in other containers:
This shows us that the Docker container contains only the files that exist when the image was created, and that each container is isolated. There are of course ways to share data between Docker containers (read more here) but that is not what we're interested in.
Now that we have the basics of creating a Docker image and running a container taken care, of the next step is to actually build something useful. The overall plan looks like this:
- A simple web server implemented in C# serves the main page.
- We take advantage of the following three "frameworks":
- jQuery (because everything uses jQuery)
- Boostrap (because it makes layout easier)
- Ace editor (an awesome syntax highlighting editor)
- An HTTP server application implemented in Python that lets our web server talk to the code running in the Docker container
Let's start with the Python HTTP server, as we can test many things without the web server.
Two third party packages that we rely on are:
Flask - Flask is a microframework for Python, itself based on a couple other packages, and it certainly does more than we use it for here, which is as a web server router.
DotMap - DotMap let's us use a dictionary with "dot" notation.
DotMap is worth a brief explanation. It's the difference between writing (in Python):
a = {}
a["foo"] = 1
print(a["foo"])
vs. using "dot" notation to create and access dictionary items:
from dotmap import DotMap
m = DotMap()
m.foo = 1
print(m.foo)
I'm not fond of hard-coded literals in code, and DotMap hides that from us.
Let's add a line to our Dockerfile:
RUN pip install -r requirements.txt
and create the file requirements.txt:
Flask
DotMap
lxml
cssselect
requests
I've also added 3 other dependencies that I'll be using in the demo -- a simple page scraper that returns the "Person of Interest" content from the website onthisday.com. We'll go over that later.
After having changed our Dockerfile and created the requirements.txt, when we go to build the image, Docker's build process will run the pip install command and our dependencies will have been download and installed!
Here's the complete code for the Python HTTP server:
#pylint: disable=I0011, C0103, C0111, W0702, line-too-long
""" HTTP Server """
from dotmap import DotMap # pip install DotMap
from flask import Flask, request # pip install Flask
import ast
import argparse # https:
import base64
import json # https:
import subprocess
import sys
import threading
import time
class StdoutWatcher:
""" Watches stdout and concatenates lines """
def __init__(self, p):
self.p = p
self.stopWatcher = False
self.responseLines = []
def startStdoutThread(self):
commThread = threading.Thread(target=self.stdoutWatcher)
commThread.daemon = True # stop if the program exits.
commThread.start()
def stdoutWatcher(self):
while not self.stopWatcher:
try:
for line in iter(self.p.stdout.readline, ''):
if line != b'':
self.responseLines.append(line.decode('utf-8'))
time.sleep(0.010)
except:
print("stdoutWatcher Exception: " + str(sys.exc_info()[0]))
self.stopWatcher = True
app = Flask(__name__)
def getPacket():
js = str(request.get_json())
js = ast.literal_eval(js)
return DotMap(js)
@app.route("/")
def hello():
return "Hello World!"
"""
Example (the base64 string encodes "Test String"):
{
"Filename": "foo.txt",
"Content": "VGVzdCBTdHJpbmc=",
"Encoding": "base64"
}
"""
@app.route("/uploadfile", methods=['POST'])
def uploadFile():
fileInfo = getPacket()
content = fileInfo.Content
if fileInfo.Encoding == "base64":
# the "decode" method call converts the byte array to a UTF8 string.
content = base64.b64decode(content).decode('utf-8')
f = open(fileInfo.Filename, "w")
f.write(content)
f.close()
return "ok"
"""
Example:
{"Filename": "foo.py"}
"""
@app.route("/run", methods=['POST'])
def run():
runInfo = getPacket()
# The -u trick comes from http:
p = subprocess.Popen(['python', '-u', runInfo.Filename], stdout=subprocess.PIPE, stderr=subprocess.STDOUT)
sw = StdoutWatcher(p)
sw.startStdoutThread()
# Wait for process to exit. We should add a watchdog to prevent hanging the server.
while p.poll() == None:
time.sleep(0.010)
return str(sw.responseLines)
@app.route("/exit", methods=['POST'])
def exit():
sys.exit()
if __name__ == "__main__":
parser = argparse.ArgumentParser()
parser.add_argument("-p", "--port", help="Specifies the port number on which the server listens.")
args = parser.parse_args()
port = 1000
if args.port:
port = args.port
# host cannot be 127.0.0.1!
# Binding to 0.0.0.0 will bind your app in any interface available, localhost (127.0.0.1) does not.
app.run(host='0.0.0.0', port=port)
There are three parts to this:
Application Initialization
This is done in mostly at the bottom of the file (the exception being line 38 app = Flask(__name__)) and what's basically going on here is:
- Make sure the module that is being run is the main application module (not some imported module) -- this is common Python practice to use
if __name__ == "__main__:" - If a port number is specified in the startup parameters, use that port
- Start the Flask HTTP server
Routes
There are four routes:
@app.route("/") - This is used by the C# server to wait (and verify) that the server is running when it launches the container@app.route("/uploadfile", methods=['POST']) - A POST method for uploading a base64 encoded UTF-8 string, representing the code the user wishes to run.@app.route("/run", methods=['POST']) - A POST method for running the user's code.@app.route("/exit", methods=['POST']) - A POST method for exiting the server.
Process Launcher and STDOUT/STDERR Watcher
Launching a process is easy.
p = subprocess.Popen(['python', '-u', runInfo.Filename], stdout=subprocess.PIPE, stderr=subprocess.STDOUT)
Capturing the STDOUT and STDERR output of a process is not easy, which is what the StdoutWatcher class does. While this is only 21 lines of code, it represented several hours worth of investigation!
This is the fun part. We have to launch the container, exposing the port of the Python HTTP server so that it can be seen by our Windows host. We do this using the -p Docker command line option to map a port in the VM to a port on our host. The basic syntax is [host port]:[docker port] and there are several variations on this syntax as well.
So let's launch the Python HTTP server, using port 4001:
docker run -p 4001:4001 fiddlepy python -u server.py -p 4001
What is this "-u" business we see everywhere? Well, basically it tells Python that STDOUT and STDERR are to be unbuffered, meaning each line of output is received immediately received by any STDOUT/STDERR listener. If we don't do this, the subsystem (not Python) may buffer the output for an indeterminate amount of time. This little feature in itself took hours to figure out!
Also note that "fiddlepy" is my image name.
When we start the container, after a couple seconds, we see:
(What, you were expecting unit tests???)
We can now browse to the Docker's IP and the exposed port, and we get:
Yay!
Note that Flask outputs the requests being sent to it:
We can exit the server by posting the exit method. For a Chrome plugin, I prefer to use Postman, as I discovered that Advanced Rest Client has bugs related to the JSON content type.
Observe that the Python HTTP server has exited and we're back to the command line prompt in the console window.
Let's upload a simple Python script to execute in the container. First, we need to convert some text to base64, using www.base64encode.org (the web is great):
Now we'll post that to the server (which, if you exited, you need to "docker run..." again):
Cool, we got an "OK" response.
Now let's run our Python script in the Docker container:
Snazzy!
We have:
- Uploaded a script to the container
- Executed that script
- The result of the script is returned in response!
That was (hopefully) relatively painless.
Now that we've got the Python HTTP server written and tested, it's time to write the front-end that is exposed to the user in their browser.
If you write an HTTP server from the native .NET framework, which is what I did here, it's a little scary how many lines of code it requires (of course, Flask in Python is a lot of lines of code too), and I'll be damned if I'm going to use a behemoth like ASP.NET. I could have used Nancy, but while it looks simple, I didn't really want to go through yet another learning curve.
using System;
using System.Collections.Generic;
using System.Linq;
using System.IO;
using System.Net;
using System.Net.Sockets;
using System.Text;
using System.Threading;
using Clifton.Core.ExtensionMethods;
using FiddleDock.RouteHandlers;
namespace FiddleDock
{
public class LogEventArgs : EventArgs
{
public string Message { get; set; }
}
public class WebServer
{
public event EventHandler<LogEventArgs> Logger;
protected int maxSimultaneousConnections = 20;
protected int httpPort = 80;
protected Semaphore sem;
protected Dictionary<Route, Func<HttpListenerContext, Response>> routeHandlers;
public WebServer()
{
routeHandlers = new Dictionary<Route, Func<HttpListenerContext, Response>>();
}
public void AddRoute(string verb, string path, Func<HttpListenerContext, Response> handler)
{
routeHandlers.Add(new Route(verb, path), handler);
}
public void StartWebServer()
{
sem = new Semaphore(maxSimultaneousConnections, maxSimultaneousConnections);
List<IPAddress> localHostIPs = GetLocalHostIPs();
HttpListener listener = InitializeListener(localHostIPs);
Start(listener);
}
protected void Start(HttpListener listener)
{
listener.Start();
Thread th = new Thread(RunServer);
th.IsBackground = true;
th.Start(listener);
}
protected void RunServer(object l)
{
HttpListener listener = (HttpListener)l;
while (true)
{
try
{
sem.WaitOne();
StartConnectionListener(listener);
}
catch (Exception ex)
{
Logger.Fire(this, new LogEventArgs() { Message = ex.Message });
}
}
}
protected List<IPAddress> GetLocalHostIPs()
{
IPHostEntry host;
host = Dns.GetHostEntry(Dns.GetHostName());
List<IPAddress> ret = host.AddressList.Where(ip => ip.AddressFamily == AddressFamily.InterNetwork).ToList();
return ret;
}
protected HttpListener InitializeListener(List<IPAddress> localhostIPs)
{
HttpListener listener = new HttpListener();
Logger.Fire(this, new LogEventArgs() { Message = "Listening on IP " + "http://locahost:" + httpPort + "/" });
listener.Prefixes.Add("http://localhost:" + httpPort + "/");
localhostIPs.ForEach(ip =>
{
Logger.Fire(this, new LogEventArgs() { Message = "Listening on IP " + "http://" + ip.ToString() + ":" + httpPort + "/" });
listener.Prefixes.Add("http://" + ip.ToString() + ":" + httpPort + "/");
});
return listener;
}
protected void StartConnectionListener(HttpListener listener)
{
HttpListenerContext context = listener.GetContext();
sem.Release();
Logger.Fire(this, new LogEventArgs() { Message = context.Request.Url.LocalPath });
string verb = context.Request.HttpMethod;
string path = context.Request.Url.LocalPath;
string requestData = new StreamReader(context.Request.InputStream, context.Request.ContentEncoding).ReadToEnd();
var routes = routeHandlers.Where(kvp => kvp.Key.IsMatch(verb, path));
int numRoutes = routes.Count();
if (numRoutes == 0)
{
Console.WriteLine("Route not found!");
Respond(context, "<p>Route not found!</p>", "text/html");
}
else if (numRoutes > 1)
{
Console.WriteLine("Multiple handlers match the given route!");
Respond(context, "<p>Multiple handlers match the given route!</p>", "text/html");
}
else
{
try
{
Response response = routes.First().Value(context);
response.Execute(requestData);
Respond(context, response);
}
catch (Exception ex)
{
Console.WriteLine(ex.Message);
Respond(context, "error", "text/html");
}
}
}
protected void Respond(HttpListenerContext context, Response response)
{
context.Response.ContentType = response.ContentType;
var data = response.GetResponseData(context);
context.Response.ContentLength64 = data.Length;
context.Response.OutputStream.Write(data, 0, data.Length);
}
protected void Respond(HttpListenerContext context, string msg, string contentType)
{
byte[] utf8data = Encoding.UTF8.GetBytes(msg);
context.Response.ContentType = contentType;
context.Response.ContentEncoding = Encoding.UTF8;
context.Response.ContentLength64 = utf8data.Length;
context.Response.OutputStream.Write(utf8data, 0, utf8data.Length);
}
}
}
Whew!
I implemented a rather brain dead routing mechanism, which you'll see here:
using System;
using System.IO;

using Clifton.Core.ExtensionMethods;

using FiddleDock.RouteHandlers;

namespace FiddleDock
{
  class Program
  {
    static void Main(string[] args)
    {
      WebServer ws = new WebServer();
      ws.Logger += Logger;
      InitializeRoutes(ws);
      ws.StartWebServer();
      Console.WriteLine("Web server ready.");
      Console.ReadLine();
    }

    private static void Logger(object sender, LogEventArgs e)
    {
      Console.WriteLine(e.Message);
    }

    private static string GetPath()
    {
      return @"c:\projects\FiddleDock\Website";
    }

    private static void InitializeRoutes(WebServer ws)
    {
      ws.AddRoute("GET", "/",
         (context, _) => new StringResponse() { Data = File.ReadAllText(Path.Combine(GetPath(), "index.html")),
         ContentType = "text/html" });
      ws.AddRoute("GET", "/index",
         (context, _) => new StringResponse() { Data = File.ReadAllText(Path.Combine(GetPath(), "index.html")),
         ContentType = "text/html" });
      ws.AddRoute("GET", "/index.html",
         (context, _) => new StringResponse() { Data = File.ReadAllText(Path.Combine(GetPath(), "index.html")),
         ContentType = "text/html" });
      ws.AddRoute("GET", "*.js",
         (context, _) => new StringResponse() { Data = File.ReadAllText(
            Path.Combine(GetPath(), context.Request.Url.LocalPath.WindowsDelimiters().Substring(1))),
         ContentType = "text/javascript" });
      ws.AddRoute("GET", "*.css",
         (context, _) => new StringResponse() { Data = File.ReadAllText(
            Path.Combine(GetPath(), context.Request.Url.LocalPath.WindowsDelimiters().Substring(1))),
         ContentType = "text/css" });
      ws.AddRoute("GET", "*.jpg",
         (context, _) => new BinaryResponse() { ByteData = File.ReadAllBytes(
            Path.Combine(GetPath(), context.Request.Url.LocalPath.WindowsDelimiters().Substring(1))),
         ContentType = "image/jpg" });
      ws.AddRoute("GET", "*.png",
         (context, _) => new BinaryResponse() { ByteData = File.ReadAllBytes(
            Path.Combine(GetPath(), context.Request.Url.LocalPath.WindowsDelimiters().Substring(1))),
         ContentType = "image/png" });
      ws.AddRoute("GET", "*.bmp",
         (context, _) => new BinaryResponse() { ByteData = File.ReadAllBytes(
            Path.Combine(GetPath(), context.Request.Url.LocalPath.WindowsDelimiters().Substring(1))),
         ContentType = "image/bmp" });
      ws.AddRoute("GET", "*.ico",
         (context, _) => new BinaryResponse() { ByteData = File.ReadAllBytes(
            Path.Combine(GetPath(), context.Request.Url.LocalPath.WindowsDelimiters().Substring(1))),
         ContentType = "image/x-icon" });

      ws.AddRoute("POST", "/runOnHost", (context, _) => new RunOnHost() { ContentType = "text/json" });
      ws.AddRoute("POST", "/runOnDocker", (context, session) => new RunOnDocker(session) { ContentType = "text/json" });
      ws.AddRoute("POST", "/createNewInstance", (context, session) => new CreateNewInstance(session) { ContentType = "text/json" });
      ws.AddRoute("POST", "/deleteInstance", (context, session) => new DeleteInstance(session) { ContentType = "text/json" });
    }
  }
}
The salient parts are the last four POST commands, which is the part we're interested in.
This is the UI we're building. [trump-mode]Very simple, it's really great.[/trump-mode]
We import our three dependencies in the header of index.html:
<head>
<meta charset="utf-8" />
<title>FiddleDock</title>
<link type="text/css" rel="stylesheet" href="/css/bootstrap.min.css" />
<link type="text/css" rel="stylesheet" href="/css/bootstrap-custom.css" />
<link type="text/css" rel="stylesheet" href="/css/fiddledock.css" />
<script type="text/javascript" src="/js/ace/ace.js" charset="utf-8"></script>
<script type="text/javascript" src="/js/jquery-1.11.2.min.js"></script>
<script type="text/javascript" src="/js/bootstrap.min.js"></script>
</head>
And the body takes advantage of Bootstrap's grid system:
<body>
  <div class="container-fluid" style="height:90vh">
    <div class="row top-margin-20" style="height:45%">
      <div class="col-xs-1 col-sm-1 col-md-1 col-lg-1"></div>
      <div class="col-xs-8 col-sm-8 col-md-8 col-lg-8" style="height:100%">
        <div class="bottom-margin-10" id="editor" style="width:100%; height:100%"></div>
      </div>
      <div class="col-xs-3 col-sm-3 col-md-3 col-lg-3">
        <div>
          <button id="runOnDocker">Run on Docker</button>
          <button id="runOnHost">Run on Host</button>
        </div>
        <div class="top-margin-10">
           Select Instance:
           <select id="instanceList">
             <option>1</option>
           </select>
        </div>
        <div class="top-margin-10">
          <button id="deleteInstance">Delete Instance</button>
        </div>
        <div class="top-margin-10">
          <button id="createInstance">Create New Instance</button>
        </div>
      </div>
    </div>

    <div class="row" style="padding-top:10px">
      <div class="col-xs-1 col-sm-1 col-md-1 col-lg-1"></div>
      <div class="col-xs-8 col-sm-8 col-md-8 col-lg-8">
        <span style="color:black; font-family:Tahoma; font-size:1em; vertical-align:bottom;">Output:</span>
      </div>
    </div>

    <div class="row" style="height:45%">
      <div class="col-xs-1 col-sm-1 col-md-1 col-lg-1"></div>
      <div class="col-xs-8 col-sm-8 col-md-8 col-lg-8" style="height:100%">
        <textarea id="output" style="width:100%; border:1px solid black; height:100%; padding-left:5px; padding-right:5px"></textarea>
      </div>
    </div>
  </div>
</body>
OK, there's embedded styles that should be in the fiddledock.css file. Do I need to bring Yoda out again?
I like clean Javascript (if I have to write in a dirty language, I tend to try and make the code extra neat):
$(document).ready(function () {
editor = ace.edit("editor");
editor.setTheme("ace/theme/twilight");
editor.getSession().setMode("ace/mode/python");
editor.focus();
$("#runOnDocker").on("click", runCodeOnDocker);
$("#runOnHost").on("click", runCodeOnHost);
$("#createInstance").on("click", createInstance);
$("#deleteInstance").on("click", deleteLastInstance);
});
function runCodeOnDocker() {
var code = editor.getValue();
var instanceNumber = $("#instanceList").val();
postJson("/runOnDocker", { "code": btoa(code), "instanceNumber": instanceNumber }, runResponse, ajaxError)
}
function runCodeOnHost() {
var code = editor.getValue();
postJson("/runOnHost", { "code": btoa(code) }, runResponse, ajaxError)
}
function runResponse(resp) {
$("#output").html(atob(resp["resp"]))
}
function createInstance() {
var numOptions = $("#instanceList > option").length;
var newOption = numOptions + 1;
$("#instanceList").append($('<option>', { value: newOption, text: newOption }));
postJson("/createNewInstance", { "instanceNumber": newOption }, instanceCreated, ajaxError)
}
function instanceCreated(resp) {
alert("Instance created.");
}
function deleteLastInstance() {
if (moreThanOneInstance()) {
var numOptions = $("#instanceList > option").length;
$("#instanceList option[value='" + numOptions + "']").remove();
postJson("/deleteInstance", { "instanceNumber": numOptions }, instanceDeleted, ajaxError)
}
else {
alert("At least one instance must exist.");
}
}
function instanceDeleted(resp) {
alert("Instance deleted.");
}
function moreThanOneInstance() {
return $("#instanceList > option").length > 1
}
function postJson(url, data, onSuccess, onFail) {
$.post(url, JSON.stringify(data),
function (data) {
onSuccess(data);
}
).fail(function (data) {
onFail(data)
})
}
function ajaxError(data) {
alert(data.statusText);
}
Starting with the low level details, this is what we need to do to launch a process that executes the "docker run..." command. Note that we have to explicitly set the environment variables (hmm, what was I saying before about not liking hardcoded strings???):
using System;
using System.Diagnostics;
using Clifton.Core.ExtensionMethods;
namespace FiddleDock
{
public static class Runner
{
public static Process LaunchProcess(string processName, string arguments, Action<string> onOutput, Action<string> onError = null)
{
Process p = new Process();
p.StartInfo.UseShellExecute = false;
p.StartInfo.RedirectStandardOutput = true;
p.StartInfo.RedirectStandardError = true;
p.StartInfo.RedirectStandardInput = true;
p.StartInfo.FileName = processName;
p.StartInfo.Arguments = arguments;
p.StartInfo.CreateNoWindow = true;
string username = System.Security.Principal.WindowsIdentity.GetCurrent().Name.RightOf("\\");
p.StartInfo.EnvironmentVariables["DOCKER_CERT_PATH"] = @"c:\users\" + username + @"\.docker\machine\machines\default";
p.StartInfo.EnvironmentVariables["DOCKER_HOST"] = "tcp://192.168.99.100:2376";
p.StartInfo.EnvironmentVariables["DOCKER_MACHINE_NAME"] = "default";
p.StartInfo.EnvironmentVariables["DOCKER_TLS_VERIFY"] = "1";
p.OutputDataReceived += (sndr, args) => { if (args.Data != null) onOutput(args.Data); };
if (onError != null)
{
p.ErrorDataReceived += (sndr, args) => { if (args.Data != null) onError(args.Data); };
}
p.Start();
p.BeginOutputReadLine();
p.BeginErrorReadLine();
return p;
}
}
}
This is pretty standard configuration stuff using .NET's Process class but you may not often have to redirect STDOUT and STDERR and set up a listener.
For comparison, you can run the script on the Windows host machine (obviously, you wouldn't expose this in the wild wild web):
using System;
using System.Collections.Generic;
using System.IO;
using System.Net;
using System.Text;
using System.Threading;

using Newtonsoft.Json;

namespace FiddleDock.RouteHandlers
{
  public class RunOnHost : Response
  {
    protected List<string> stdout = new List<string>();

    public override void Execute(string requestData)
    {
      PythonCode pcode = JsonConvert.DeserializeObject<PythonCode>(requestData);
      string code = Encoding.ASCII.GetString(Convert.FromBase64String(pcode.Code));
      string fnTemp = Path.GetTempFileName();
      File.WriteAllText(fnTemp, code);
      var process = Runner.LaunchProcess("python", "-u " + fnTemp, (s) => stdout.Add(s), (err) => stdout.Add(err));
      var startTime = DateTime.Now;

      while (!process.HasExited && (DateTime.Now - startTime).TotalMilliseconds < Constants.MAX_RUN_TIME_MS)
      {
        Thread.Sleep(0);
      }

      if (!process.HasExited)
      {
        process.Kill();
      }

      File.Delete(fnTemp);
    }

    public override byte[] GetResponseData(HttpListenerContext context)
    {
      string resp = Convert.ToBase64String(Encoding.ASCII.GetBytes(String.Join("\r\n", stdout)));
      return Encoding.UTF8.GetBytes("{\"status\":\"ok\", \"resp\":\"" + resp + "\"}");
    }
  }
}
A few things to note:
- The script code is sent from the Javascript client in base64, so we have to decode it.
- Again we use the "-u" parameter so that the subsystem doesn't buffer Python's STDOUT and STDERR
- We wait a pre-determined about before killing the process (ooh, look, a constant.)
- The response is sent as a base64 encoded string back to the client.
This executes nice and fast and we get what we expect:
All that happens behind the scenes is that we launch python -u [temp filename] on our host and capture the output.
Here we're going to pay attention to a few things, such as the session, determined by the request endpoint IP, because as a "real" web app, we're going to need to track the containers that we've created for a session and re-use them in the session once they've been created. We also need to create each container with a unique port to the Python HTTP server, so that we can communicate to a specific container! Interestingly enough, the available ports is global, not session specific.
The child class that handles the request is simple enough:
using System;
using System.Collections.Generic;
using System.Net;
using System.Text;
using Newtonsoft.Json;
namespace FiddleDock.RouteHandlers
{
public class RunOnDocker : DockerManagement
{
public RunOnDocker(Session session)
{
this.session = session;
}
public override void Execute(string requestData)
{
PythonCode pcode = JsonConvert.DeserializeObject<PythonCode>(requestData);
int instanceNumber = pcode.InstanceNumber - 1;
var sessionPorts = GetSessionDockerInstancePorts();
instancePort = GetOrCreateContainerPort(ref sessionPorts, instanceNumber);
SaveSessionDockerInstancePorts(sessionPorts);
List<string> stdout = GetStdout();
string code = pcode.Code;
string resp = String.Empty;
try
{
resp = UploadApp(code);
VerifyResponse(resp, "ok");
resp = RunApp();
ResetStdout(resp);
}
catch (Exception ex)
{
stdout.Add(ex.Message);
}
}
public override byte[] GetResponseData(HttpListenerContext context)
{
List<string> stdout = GetStdout();
string resp = Convert.ToBase64String(Encoding.ASCII.GetBytes(String.Join("\r\n", stdout)));
return Encoding.UTF8.GetBytes("{\"status\":\"ok\", \"resp\":\"" + resp + "\"}");
}
}
}
The real work is in the base class, DockerManagement:
using System;
using System.Collections.Generic;
using System.IO;
using System.Linq;
using System.Net;
using Newtonsoft.Json;
using Newtonsoft.Json.Linq;
using FiddleDock.RouteHandlers;
namespace FiddleDock
{
public abstract class DockerManagement : Response
{
protected Session session;
protected int instancePort;
private static List<int> globalUsedPorts = new List<int>();
protected List<int> GetSessionDockerInstancePorts()
{
List<int> usedPorts = session.GetObject<List<int>>("usedPorts");
return usedPorts;
}
protected void SaveSessionDockerInstancePorts(List<int> ports)
{
session["usedPorts"] = ports;
}
protected int GetOrCreateContainerPort(ref List<int> sessionPorts, int instanceNumber)
{
int port;
if (sessionPorts == null)
{
port = CreateContainer();
sessionPorts = new List<int>(new int[instanceNumber + 1]);
sessionPorts[instanceNumber] = port;
}
else
{
port = sessionPorts[instanceNumber];
if (port == 0)
{
port = CreateContainer();
sessionPorts[instanceNumber] = port;
}
}
return port;
}
protected void UpdateSessionPort(List<int> sessionPorts, int instanceNumber, int port)
{
if (sessionPorts.Count == instanceNumber)
{
sessionPorts.Add(port);
}
else
{
sessionPorts[instanceNumber] = port;
}
}
protected void DeleteContainerPort(ref List<int> sessionPorts, int instanceNumber)
{
int port = sessionPorts[instanceNumber];
ExitContainer(port);
sessionPorts.RemoveAt(instanceNumber);
globalUsedPorts.RemoveAt(globalUsedPorts.IndexOf(port));
}
protected int CreateContainer()
{
List<string> stdout = new List<string>();
int port = GetAvailablePort();
SaveStdout(stdout, port);
string parms = String.Format("run -p {0}:{0} fiddlepy python -u server.py -p {0}", port);
var process = Runner.LaunchProcess("docker", parms, (s) => stdout.Add(s), (err) => stdout.Add(err));
string resp;
try
{
resp = WaitForDockerImage(port);
VerifyResponse(resp, "Hello World!");
}
catch (Exception ex)
{
stdout.Add(ex.Message);
}
return port;
}
protected List<string> GetStdout()
{
return session.GetObject<List<string>>(instancePort.ToString());
}
protected void SaveStdout(List<string> stdout, int port)
{
session[port.ToString()] = stdout;
}
protected int GetAvailablePort()
{
int newPort;
if (globalUsedPorts.Count == 0)
{
newPort = 1001;
globalUsedPorts.Add(newPort);
}
else
{
newPort = globalUsedPorts.DefaultIfEmpty(0).Max() + 1;
globalUsedPorts.Add(newPort);
}
return newPort;
}
protected string WaitForDockerImage(int port)
{
string url = GetUrl(port, "/");
HttpWebRequest request = (HttpWebRequest)WebRequest.Create(url);
using (HttpWebResponse response = (HttpWebResponse)request.GetResponse())
{
using (Stream stream = response.GetResponseStream())
{
using (StreamReader reader = new StreamReader(stream))
{
string resp = reader.ReadToEnd();
return resp;
}
}
}
}
protected string GetUrl(int port, string cmd)
{
return String.Format("{0}:{1}{2}", Constants.DOCKER_IP, port, cmd);
}
protected void VerifyResponse(string resp, string expectedResponse)
{
if (resp != expectedResponse)
{
throw new Exception("Did not get expected response: " + resp);
}
}
protected string UploadApp(string code)
{
var httpWebRequest = (HttpWebRequest)WebRequest.Create(GetUrl(instancePort, "/uploadfile"));
httpWebRequest.ContentType = "application/json";
httpWebRequest.Method = "POST";
using (var streamWriter = new StreamWriter(httpWebRequest.GetRequestStream()))
{
string json = "{\"Filename\":\"run.py\"," +
"\"Content\":\"" + code + "\", " +
"\"Encoding\":\"base64\"}";
streamWriter.Write(json);
streamWriter.Flush();
streamWriter.Close();
}
var httpResponse = httpWebRequest.GetResponse();
using (var streamReader = new StreamReader(httpResponse.GetResponseStream()))
{
var result = streamReader.ReadToEnd();
return result;
}
}
protected string RunApp()
{
var httpWebRequest = (HttpWebRequest)WebRequest.Create(GetUrl(instancePort, "/run"));
httpWebRequest.ContentType = "application/json";
httpWebRequest.Method = "POST";
using (var streamWriter = new StreamWriter(httpWebRequest.GetRequestStream()))
{
string json = "{\"Filename\":\"run.py\"}";
streamWriter.Write(json);
streamWriter.Flush();
streamWriter.Close();
}
var httpResponse = httpWebRequest.GetResponse();
using (var streamReader = new StreamReader(httpResponse.GetResponseStream()))
{
var result = streamReader.ReadToEnd();
return result;
}
}
protected void ExitContainer(int port)
{
var httpWebRequest = (HttpWebRequest)WebRequest.Create(GetUrl(port, "/exit"));
httpWebRequest.ContentType = "application/json";
httpWebRequest.Method = "POST";
try { httpWebRequest.GetResponse(); } catch { }
}
protected void ResetStdout(string resp)
{
List<string> stdout = GetStdout();
stdout.Clear();
var ret = (JArray)JsonConvert.DeserializeObject(resp);
stdout.AddRange(ret.Select(t => t.ToString().Trim()));
}
}
}
Note the "cruft" comments in the code. Excuse #138: It's a demo! The salient points to this large piece of code is:
- There is a concept of all ports used across all sessions, managed by
globalUsedPorts - Each session knows about the Docker containers and the port allocated for each container, stored in the session variable
usedPorts - Given this,
GetOrCreateContainerPort gets the port for an already created container, or allocates a port from the global pool and creates a container where the port is mapped and the Python HTTP server is told to use that port. - Additional containers can be created using
CreateContainer and DeleteContainerPort. - Deleting a container port has the side effect of also telling the Python HTTP server to exit, which terminates that container. The allocated port is removed from the session pool and the global pool.
- Another thing that has to be managed in a stateless environment (well, using a
Session container is anything but stateless, but we pretend, don't we) is the buffer (a List<string>) where the STDOUT data is placed. Ideally, we should be using some simple backing data store rather than a session variable to contain all this data. Imagine what would happen if the Python script generates reams of output! The stdout buffer is stored in the session in a non-obvious way: the dictionary key is the port number, the value for each key is the stdout buffer. It was quick and dirty. - By line 149, we're doing some more interesting things:
WaitForDockerImage is an important method as it ensures that the Python HTTP server is up and running before we upload Python script and try to run it.- This is accompanied by
VerifyResponse, which makes sure we get the desired responses from the Python HTTP server.
- Lastly, we have methods to actually talk the Python HTTP server:
UploadApp does just that -- it uploads the Python script the user entered in the Ace editor -- here we expect that the "code" is already base64 encoded.RunApp does just that -- it tells the Python HTTP server to run the script we uploaded.ExitContainer again does what we had tested earlier -- it tells the Python HTTP server to terminate.
- Because there's all sorts of "garbage" (like the Flask output) sent to us before the script runs,
ResetStdout clears the current buffer and reformats the response from the Python HTTP server into line delimited strings.
So there's a lot going on to manage the ports, both in the session and globally, as well as creating / destroying contains, and communicating to the correct Docker instance over the correct port.
The cool thing about persisting the container ports is that the Docker container lives until the instance is destroyed (by you on the UI) and so once the container is created, the response time for running additional scripts is faster.
This leverages the code in the base class:
public class CreateNewInstance : DockerManagement
{
public CreateNewInstance(Session session)
{
this.session = session;
}
public override void Execute(string requestData)
{
PythonCode pcode = JsonConvert.DeserializeObject<PythonCode>(requestData);
int instanceNumber = pcode.InstanceNumber - 1;
var sessionPorts = GetSessionDockerInstancePorts() ?? new List<int>(new int[instanceNumber + 1]);
int port = CreateContainer();
UpdateSessionPort(sessionPorts, instanceNumber, port);
SaveSessionDockerInstancePorts(sessionPorts);
}
public override byte[] GetResponseData(HttpListenerContext context)
{
return Encoding.UTF8.GetBytes("{\"status\":\"ok\"}");
}
}
Again, this leverages the code in the base class (I probably should have implemented the base class as a helper function!)
public class DeleteInstance : DockerManagement
{
public DeleteInstance(Session session)
{
this.session = session;
}
public override void Execute(string requestData)
{
PythonCode pcode = JsonConvert.DeserializeObject<PythonCode>(requestData);
int instanceNumber = pcode.InstanceNumber - 1;
var sessionPorts = GetSessionDockerInstancePorts();
DeleteContainerPort(ref sessionPorts, instanceNumber);
SaveSessionDockerInstancePorts(sessionPorts);
}
public override byte[] GetResponseData(HttpListenerContext context)
{
return Encoding.UTF8.GetBytes("{\"status\":\"ok\"}");
}
}
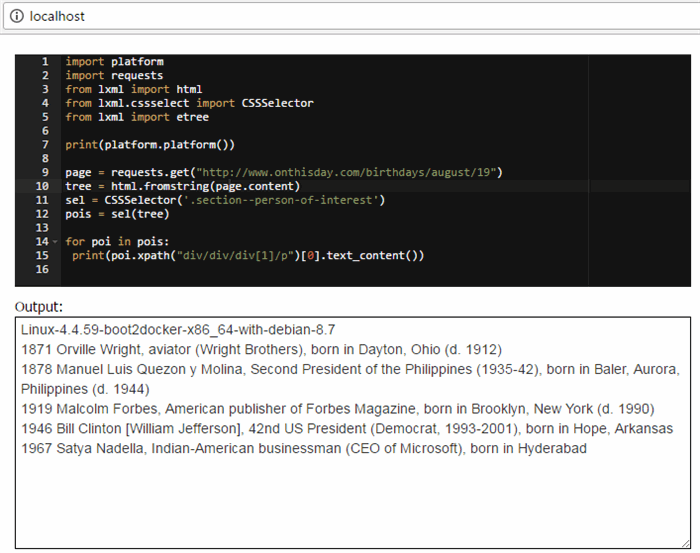
Now that we're all done with the implementation, we can run a fun example in our FiddleDock. This Python code scrapes the website www.onthisday.com, extracting the "Person of Interest" sections and tells you who of interest was born on the same day and month as what you entered in the URL path. Here's the Python code -- it's impressively small:
import requests
from lxml import html
from lxml.cssselect import CSSSelector
from lxml import etree

page = requests.get("http://www.onthisday.com/birthdays/september/11")
tree = html.fromstring(page.content)
sel = CSSSelector('.section--person-of-interest')
pois = sel(tree)

for poi in pois:
  print(poi.xpath("div/div/div[1]/p")[0].text_content())
But small shouldn't deceive you -- besides using several packages, it took quite a while to figure out how to do this! The result is the screenshot at the beginning of this article:
This was clearly a deep learning exercise. While the goal was simple, I was surprised I didn't find an existing implementation. As I mentioned, my implementation is not the best, but it demonstrates a variety of techniques for communicating with Docker containers. I hope you enjoyed this!


 General
  News
News  Suggestion
  Question
  Bug
Bug  Answer
  Joke
Joke  Praise
  Rant
Rant  Admin
Admin 


