Introduction
Usually, we use various graphics software to design game character or resources. But in this article, we will design Chess game pieces using F# language and GDI+ graphics library. Since F# is a .Net language, we can easily access the fantastic graphics library GDI+. GDI+ library has lots of classes and methods which are can be used to work with complex Vector and Raster graphics.
Main Window
Let's start with creating our MainWindow class that will represent the main window of our project.
In F#, class definition begins with type keyword -
type MainWindow() =
    inherit Form()
The MainWindow class inherits the System.Windows.Forms.Form class. So don't forget to open the following namespaces at the beginning of the program -
open System;
open System.Windows;
open System.Windows.Forms;
And these namespaces for using the GDI+ -
open System.Drawing;
open System.Drawing.Drawing2D;
We also have to add all the references for those namespaces through the Reference Manager of Visual Studio -

The Reference Manager of Visual Studio -
Then we create a initializer function in the MainWindow class and we set-up some property of the window -
member this.Init() =
this.Text <- "ChessPiece Design In F#"
this.Size <- new System.Drawing.Size(550, 575)
this.StartPosition <- FormStartPosition.CenterScreen
this.MaximizeBox <- false
this.BackColor <- System.Drawing.Color.FromArgb(255, 225, 235)
After initializing those properties, we will set the DoubleBuffer control style true to prevent flickering on repaint -
this.SetStyle(ControlStyles.DoubleBuffer, true)
this.SetStyle(ControlStyles.AllPaintingInWmPaint, true)
this.SetStyle(ControlStyles.UserPaint, true)
Add a paint event handler for the window -
this.Paint.AddHandler(new Windows.Forms.PaintEventHandler(fun s pe -> this.Event_Paint(s, pe)))
Our paint event handler will be look like this -
member this.Event_Paint(sender : System.Object, e : PaintEventArgs) =
e.Graphics.SmoothingMode <- SmoothingMode.HighQuality
e.Graphics.CompositingQuality <- CompositingQuality.HighQuality
Inside the program entry point function, we will create the window in this way -
let mainWindow = new MainWindow()
mainWindow.Init()
Application.Run(mainWindow)
The Application.Run method will run a standard application message loop until we wish to exit our program via the Close button.
Now, we will load a chess board image file and we will draw it as a background of our main window. Just for making our project good looking.
In the MainWindow class, we create a variable called board and we use null as its initial value -
let mutable board = null
Then inside the initializer function of the class, we load our chess board image by calling a static method called FromFile of GDI+ Image class and we assign the image into the board variable -
board <- Image.FromFile(".\ChessBoard.bmp")
And in the paint event handler, we draw the image using DrawImage method of Graphics class -
e.Graphics.DrawImage(board, 0, 0)
Designing Chess Pieces
In chess game, there is six different type of pieces. King, Queen, Knight, Bishop, Rook and Pawn.
We will use the Object-Oriented technique of F# for that purpose. That means we will create a class for each kind of pieces. class PieceRook, class PieceKing, class PiecePawn etc. All the piece classes will inherit a class called ChessPiece.
Let's see the definition of ChessPiece class -
type ChessPiece() =
Using the let binding, we create private fields in a class.
let mutable bitmap = null
let mutable ofg = null
The bitmap and ofg are such private fields. We use null as their initial value cause we will initialize them through a member function call init -
member this.init() =
        bitmap <- new Bitmap(100, 100)
We initialize the bitmap variable as a GDI+ Bitmap class object. We will use this Bitmap object to do off-screen drawing.
In order to draw chess piece in the off-screen bitmap, we have to create a GDI+ Graphics object from the bitmap. We can do it via using a static member function called FromImage of Graphics class -
ofg <- Graphics.FromImage(bitmap)
Actually, instead of drawing directly into the main window, we create a 100x100 off-screen Bitmap object for every pieces and we draw our chess pieces in the bitmap through the ofg Graphics object. Then we will draw all the bitmaps to the main window graphics.
You may wonder that why we will use such technique?
Well, since we will draw our pieces through GDI+ lines, curve, ellipse etc objects. It will be very difficult for us to resize or move the pieces in later. So in this case, drawing into a bitmap has some advantage -
- We can easily resize our pieces through stretching the bitmap.
- We can also move pieces very easily.
Let's see how -
member this.draw(g :System.Drawing.Graphics, x :int, y :int) =
let dest = new Rectangle(x, y, 82, 82)
g.InterpolationMode <- InterpolationMode.HighQualityBicubic
g.DrawImage(bitmap, dest, 0, 0, bitmap.Width, bitmap.Height, GraphicsUnit.Pixel)
The dest rectangle holds the value for the bitmap position and size. The original size of the bitmap was 100x100. But we stretched it to 82x82 to fit in the chess board image. We also set the InterpolationMode property to HighQualityBicubic so that our scaled image will be high quality. We will call the draw member function inside our main window paint event handler.
Now, we have the ChessPiece class that will be inherited by our other piece classes.
Let's implement the RookPiece class first -
In F#, we inherit a class via the inherit keyword.
type PieceRook() =
    inherit ChessPiece()
Then we implement a init member function inside the class in this way -
member this.init() =
        base.init()
We call the init function of ChessPiece class to initialize the off-screen bitmap and the off-screen graphics through the base keyword.
Now, we will draw our Rook piece in the off-screen graphics of ChessPiece class. Since the ofg field of ChessPiece class is private, we cannot access it in this way -
let g = base.ofg
So, we need a property called getGraphics inside the ChessPiece class to get access to the off-screen graphics object -
member this.getGraphics = ofg
Now we can use the property to get access to the off-screen graphics -
let g = base.getGraphics
We will use the GraphicsPath class of GDI+ to make the drawing easy -
let path = new GraphicsPath()
The GraphicsPath class is very helpful to draw series of connected lines and curves. We start drawing our rook by calling the GraphicsPath.StartFigure method -
path.StartFigure()
We will draw the Rook by adding lines and curves to the path -
path.AddCurve(ptsRookTop)
path.AddLines(ptsRook)
According to MSDN:
A figure that consists of a sequence of connected lines and curves (whose starting and ending points may be coincident) is an open figure, unless it is closed explicitly. A figure can be closed explicitly, by using the CloseFigure method, which closes the current figure by connecting a line from the ending point to the starting point. A figure that consists of a geometric shape primitive is a closed figure.
So, we close our figure explicitly by calling the GraphicsPath.CloseFigure method -
path.CloseFigure()
Since, our Rook figure is a closed shape, so we can easily fill it with LightGray color using Graphics.FillPath method -
g.FillPath(Brushes.LightGray, path)
We also draw border of the path to make the Rook nice.
g.DrawPath(Pens.Brown, path)
The pstRookTop and the ptsRook represents array of PointF structures declared inside the PieceRook class. The ptsRook points will make our Rook body and the pstRookTop points will make the top curve of the Rook piece.
let ptsRook =
[|
PointF(20.0f, 23.0f)
PointF(20.0f, 50.0f)
PointF(32.0f, 50.0f)
PointF(32.0f, 85.0f)
PointF(15.0f, 85.0f)
PointF(15.0f, 95.0f)
PointF(80.0f, 95.0f)
PointF(80.0f, 85.0f)
PointF(63.0f, 85.0f)
PointF(63.0f, 50.0f)
PointF(75.0f, 50.0f)
PointF(75.0f, 23.0f)
|]
let ptsRookTop =
[|
PointF(75.0f, 23.0f)
PointF(57.0f, 27.0f)
PointF(35.0f, 27.0f)
PointF(20.0f, 23.0f)
|]
In F#, we can create arrays in several ways. But in the above codes, we use the easiest array creation technique of F# language. Note that we use the 'f' suffix in every PointF construction argument value, since the PointF uses the floating type for X and Y fields.
Now, for drawing the Knight piece, we will use lines and ellipse -
Our KnightPiece class -
type PieceKnight() =
    inherit ChessPiece()
The following PointF array represents our Knight piece body -
let ptsKnight =
        [|
        PointF(72.0f, 95.0f)
        PointF(15.0f, 95.0f)
        PointF(15.0f, 80.0f)
        PointF(30.0f, 80.0f)

        PointF(38.0f, 60.0f)
        PointF(20.0f, 62.0f)
        PointF(16.0f, 58.0f)
        PointF(23.0f, 53.0f)
        PointF(14.0f, 56.0f)
        PointF(14.0f, 50.0f)
        PointF(35.0f, 32.0f)
        PointF(34.0f, 26.0f)
        PointF(39.0f, 23.0f)

        PointF(58.0f, 27.0f)
        PointF(58.0f, 80.0f)
        PointF(72.0f, 80.0f)
        |]
Then we add all the points to a GraphicsPath object and we fill and draw the path with LightGray and Brown color -
member this.init() =
    base.init()

    let g = base.getGraphics

    let path = new GraphicsPath()

    path.StartFigure()

    path.AddLines(ptsKnight)

    path.CloseFigure()

    g.FillPath(Brushes.LightGray, path)
    g.DrawPath(Pens.Brown, path)
We add a simple eye to our Knight piece -
g.FillEllipse(Brushes.White, 35, 37, 7, 7)
g.DrawEllipse(Pens.Brown, 35, 37, 7, 7)

g.FillEllipse(Brushes.Black, 35, 39, 4, 4)
To draw Bishop, we use 4 PointF array which represent the Bishop body -
type PieceBishop() =
    inherit ChessPiece()

    let ptsBishop =
            [|
            PointF(51.0f, 64.0f)
            PointF(53.0f, 80.0f)

            PointF(67.0f, 80.0f)

            PointF(67.0f, 95.0f)

            PointF(20.0f, 95.0f)
            PointF(20.0f, 80.0f)
            PointF(36.0f, 80.0f)
            PointF(38.0f, 64.0f)
            |]

    let ptsBishop2 =
        [|
        PointF(38.0f, 64.0f)
        PointF(26.0f, 56.0f)
        PointF(28.0f, 44.0f)
        |]

    let ptsBishop3 =
        [|
        PointF(28.0f, 44.0f)
        PointF(42.0f, 53.0f)
        PointF(42.0f, 47.0f)
        PointF(30.0f, 40.0f)
        PointF(42.0f, 22.0f)
        |]

    let ptsBishop4 =
        [|
        PointF(42.0f, 22.0f)
        PointF(60.0f, 46.0f)
        PointF(51.0f, 64.0f)
        |]

    member this.init() =
        base.init()

        let g = base.getGraphics

        let mutable path = new GraphicsPath()

        path.StartFigure()

        path.AddLines(ptsBishop)
        path.AddCurve(ptsBishop2)
        path.AddLines(ptsBishop3)
        path.AddCurve(ptsBishop4)

        path.CloseFigure()

        g.FillPath(Brushes.LightGray, path)
        g.DrawPath(Pens.Brown, path)

        g.FillEllipse(Brushes.Red, 38, 20, 8, 8)
        g.DrawEllipse(Pens.Blue, 38, 20, 8, 8)
We draw the King piece by adding lines to two GraphicsPath object -
type PieceKing() =
    inherit ChessPiece()
This points represents the top Cross of King piece -
let ptsKingTop =
         [|
         PointF(45.0f, 30.0f)
         PointF(45.0f, 24.0f)
         PointF(39.0f, 24.0f)
         PointF(39.0f, 19.0f)
         PointF(45.0f, 19.0f)
         PointF(45.0f, 14.0f)
         PointF(51.0f, 14.0f)
         PointF(51.0f, 19.0f)
         PointF(57.0f, 19.0f)
         PointF(57.0f, 24.0f)
         PointF(51.0f, 24.0f)
         PointF(51.0f, 30.0f)
         |]
And the following points represents the body of King -
let ptsKing =
        [|
        PointF(15.0f, 30.0f)

        PointF(20.0f, 55.0f)
        PointF(40.0f, 55.0f)

        PointF(30.0f, 80.0f)
        PointF(15.0f, 80.0f)

        PointF(15.0f, 95.0f)
        PointF(80.0f, 95.0f)

        PointF(80.0f, 80.0f)
        PointF(65.0f, 80.0f)

        PointF(55.0f, 55.0f)
        PointF(75.0f, 55.0f)

        PointF(80.0f, 30.0f)
        |]

member this.init() =
    base.init()

    let g = base.getGraphics
Since we need two GraphicsPath object, so better we create mutable object -
let mutable path = new GraphicsPath()
Add the top shape to the path -
path.StartFigure()
path.AddLines(ptsKingTop)
path.CloseFigure()
Draw it to the off-screen graphics -
g.FillPath(Brushes.Blue, path)
g.DrawPath(Pens.Yellow, path)
Create a new GraphicsPath object and add the body shape points to the new path -
path <- new GraphicsPath()

path.StartFigure()
path.AddLines(ptsKing)
path.CloseFigure()
Then draw it to the off-screen graphics -
g.FillPath(Brushes.LightGray, path)
g.DrawPath(Pens.Brown, path)
The following class represents our Queen piece -
type PieceQueen() =
    inherit ChessPiece()
The following PointF array builds our Queen piece -
let ptsQueen =
        [|
        PointF(23.0f, 30.0f)

        PointF(23.0f, 55.0f)
        PointF(40.0f, 55.0f)

        PointF(35.0f, 80.0f)
        PointF(15.0f, 80.0f)

        PointF(15.0f, 95.0f)
        PointF(80.0f, 95.0f)

        PointF(80.0f, 80.0f)
        PointF(60.0f, 80.0f)

        PointF(55.0f, 55.0f)
        PointF(73.0f, 55.0f)

        PointF(73.0f, 30.0f)
        |]
Then we implement the init function to add the PointF array to a GraphicsPath object and we fill the path with LightGray color and we also draw its border by calling DrawPath method of GraphicsPath class -
member this.init() =
    base.init()

    let g = base.getGraphics

    let path = new GraphicsPath()

    path.StartFigure()
    path.AddLines(ptsQueen)
    path.CloseFigure()

    g.FillPath(Brushes.LightGray, path)
    g.DrawPath(Pens.Brown, path)

    g.FillEllipse(Brushes.Orange, 24, 22, 8, 8)
    g.DrawEllipse(Pens.Brown, 24, 22, 8, 8)

    g.FillEllipse(Brushes.Orange, 40, 22, 6, 6)
    g.DrawEllipse(Pens.Yellow, 40, 22, 6, 6)

    g.FillEllipse(Brushes.Orange, 50, 22, 6, 6)
    g.DrawEllipse(Pens.Yellow, 50, 22, 6, 6)

    g.FillEllipse(Brushes.Orange, 65, 22, 8, 8)
    g.DrawEllipse(Pens.Brown, 65, 22, 8, 8)

    g.FillEllipse(Brushes.Red, 43, 12, 10, 10)
    g.DrawEllipse(Pens.Blue, 43, 12, 10, 10)
Here is our PiecePawn class implemention. We draw the Pawn by adding lines to a GraphicsPath object and drawing rectangles and ellipses -
type PiecePawn() =
    inherit ChessPiece()
The following PointF array represents the triangle shape of our Pawn -
let ptsPawn =
                [|
                PointF(68.0f, 80.0f)
                PointF(30.0f, 80.0f)
                PointF(48.0f, 30.0f)
                |]
Then we draw the triangle by adding the points array to a GraphicsPath obejct -
let g = base.getGraphics
let mutable path = new GraphicsPath()
path.StartFigure()
path.AddLines(ptsPawn)
path.CloseFigure()
g.FillPath(Brushes.LightGray, path)
g.DrawPath(Pens.Brown, path)
g.FillRectangle(Brushes.LightGray, 18, 80, 62, 15)
g.DrawRectangle(Pens.Brown, 18, 80, 62, 15)
g.FillEllipse(Brushes.Yellow, 36, 22, 26, 26)
g.DrawEllipse(Pens.DarkOrange, 36, 22, 26, 26)
g.DrawLine(Pens.Brown, 42, 26, 47, 29)
g.FillEllipse(Brushes.LightGreen, 42, 30, 6, 6)
g.FillEllipse(Brushes.Black, 43, 32, 4, 4)
g.DrawEllipse(Pens.Pink, 42, 30, 6, 6)
g.DrawLine(Pens.Brown, 57, 26, 51, 29)
g.FillEllipse(Brushes.LightGreen, 50, 30, 6, 6)
g.FillEllipse(Brushes.Black, 51, 32, 4, 4)
g.DrawEllipse(Pens.Pink, 50, 30, 6, 6)
path <- new GraphicsPath()
let ptsMouth =
[|
PointF(45.0f, 41.0f)
PointF(47.0f, 39.0f)
PointF(53.0f, 41.0f)
|]
path.AddLines(ptsMouth)
g.DrawPath(Pens.Brown, path)
After creating all the pieces, we create objects for each class in our main window class -
type MainWindow() =
    inherit Form()

    let rook = new PieceRook()
    let knight = new PieceKnight()
    let bishop = new PieceBishop()
    let king = new PieceKing()
    let queen = new PieceQueen()
    let pawn = new PiecePawn()
In the main window init member function, we call the init member function of every ChessPiece object -
rook.init()
knight.init()
bishop.init()
king.init()
queen.init()
pawn.init()
And finally, we draw our pieces in the main window paint event handler by calling the draw member function of ChessPiece class -
member this.Event_Paint(sender : System.Object, e : PaintEventArgs) =
e.Graphics.SmoothingMode <- SmoothingMode.HighQuality
e.Graphics.CompositingQuality <- CompositingQuality.HighQuality
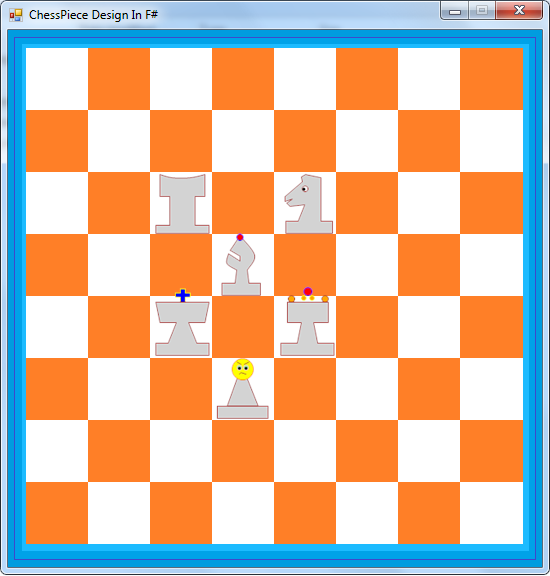
rook.draw(e.Graphics, 135, 125)
knight.draw(e.Graphics, 265, 125)
bishop.draw(e.Graphics, 197, 187)
king.draw(e.Graphics, 135, 247)
queen.draw(e.Graphics, 260, 247)
pawn.draw(e.Graphics, 194, 310)
Points of Interest
I think this article would be a good practice for us to learn both GDI+ and F# language.
Conclusion
In conclusion, I just want to say that, this article may not shows the best technique of designing chess game pieces through programming. But surely, you can learn the advance use of GDI+ in F# language.
Hi, I'm Shah Farhad Reza. I'm a desktop and web software developer.
Recently I've developed an web based ERP (Enterprise Resource Planning) Software for a manufacturing company. The software is in use and working effectively fulfilling its goal (Alhamdulillah) - [February 10, 2023]
The areas of my expertise are the followings:
- OS Kernel developing.
- Programming language's compiler design and implement.
- Expert in C, C++ and Visual Basic and have basic knowledge on C#, D, Java.
- A few times used the Microsoft's new language F#.
- SQL Database programming.
- I've basic knowledge on lowest level programming language like assembly.
- Learning Mozilla’s Rust & Google’s GO programming language for software development.
- Code optimization for performance.
- Multi-threaded programming in C/C++ and Java.
- Know various advanced computer algorithm and have used them to develop graphics and simulation programs. Also working with Linear Algebra and keen to learn Quadratic Algebra in future.
- Graphics and Game programming (Both 2D and 3D).
Currently, I'm doing research on programming language and its compiler development. I've made various kind of software and now I want to share my experiences with people.


 General
  News
News  Suggestion
  Question
  Bug
Bug  Answer
  Joke
Joke  Praise
  Rant
Rant  Admin
Admin 


