Intel® Developer Zone offers tools and how-to information for cross-platform app development, platform and technology information, code samples, and peer expertise to help developers innovate and succeed. Join our communities for Android, Internet of Things, Intel® RealSense™ Technology and Windows to download tools, access dev kits, share ideas with like-minded developers, and participate in hackathon’s, contests, roadshows, and local events.
Linderdaum* Engine is an open source, purely object-oriented 3D gaming engine for Microsoft Windows*, Google Android*, and BlackBerry OS 10 written in C++. It is designed to be an integrated solution for the development of interactive 3D applications, for game, industrial, and scientific visualization.
Setting the Build Process
To work with Linderdaum Engine you will first need to install:
- Linderdaum Engine SDK 0.6.08
- OpenAL
- Python* 3 (required version 3 or later)
In addition, you will need to install the following software for building projects on Android:
You will need to have a device with Android 2.2 or above for testing on. For the Android NDK to work properly, the name of the folder where you install the Linderdaum SDK must not have any spaces. The Linderdaum SDK has all the rights to build a library in compiled form (enter Libs.Win32/Libs.Win64 and BuildAndroid/jni ), so all you have to do is update the meta-information and build files. Run the binary out of the repository with the SDK first rebuildLSD.py, and then makeconfig.py. Now that you have everything installed, you can start writing multi-platform applications.
HelloAndroid application
So as not to overload the engine parts and to elaborate on the multi-platform aspects, we will work with a minimal 3D application in the Apps / Test_Android / Src / file and shown below:
Test_Android.cpp:
#include "Linderdaum.h"
sEnvironment* Env = NULL;
LMatrix4 Projection;
clVirtualTrackball Trackball;
clGameCamera* Camera = NULL;
clScene* Scene = NULL;
void DrawOverlay(LEvent Event, const LEventArgs& Args)
{
LMatrix4 Trans( Trackball.GetRotationMatrix() * Camera->GetCamera().GetModelViewMatrix() );
Scene->SetCameraTransform( Trans );
Scene->SetCameraProjection( Projection );
Scene->SetUseOffscreenBuffer( false, false );
Scene->RenderForward();
bool MousePressedL = Env->Console->IsKeyPressed( LK_LBUTTON );
Env->Viewport->UpdateTrackball( &Trackball, 10.0f, MousePressedL );
}
void Update( LEvent Event, const LEventArgs& Args )
{
}
APPLICATION_ENTRY_POINT
{
LString CommandLine;
EXTRACT_COMMAND_LINE(CommandLine);
Env = new sEnvironment();
Env->DeployDefaultEnvironment( CommandLine, "..\..\CommonMedia" );
Env->FileSystem->Mount("GameData");
Projection = Math::Perspective( 45.0f, Env->Viewport->GetAspectRatio(), 0.4f, 2000.0f );
Camera = Env->Linker->Instantiate( "clGameCamera" );
Camera->GetCamera().SetPosition( LVector3(0,-10,10) );
CONNECTOBJ( L_EVENT_TIMER, &clGameCamera::Event_TIMER, Camera );
Env->Connect( L_EVENT_DRAWOVERLAY, Utils::Bind( &DrawOverlay ) );
Env->Connect( L_EVENT_TIMER, Utils::Bind( &Update ) );
Scene = Env->Linker->Instantiate("clScene");
int ID = Scene->AddGeom( Env->Resources->CreateIcosahedron( 3.0f, LVector3(0) ) );
clMaterial* Mtl = Env->Resources->CreateMaterial();
Mtl->SetPropertyValue( "DiffuseColor", "1.0 0.0 0.0 0" );
Mtl->SetPropertyValue( "CastShadow", "false" );
Scene->SetMtl( ID, Mtl );
Scene->SetLocalTransform( ID, LMatrix4::GetTranslateMatrix( LVector3( 0.0f, 0.0f, 0.0f ) ) );
Env->RunApplication( DEFAULT_CONSOLE_AUTOEXEC );
APPLICATION_EXIT_POINT( Env );
}
APPLICATION_SHUTDOWN
{
}
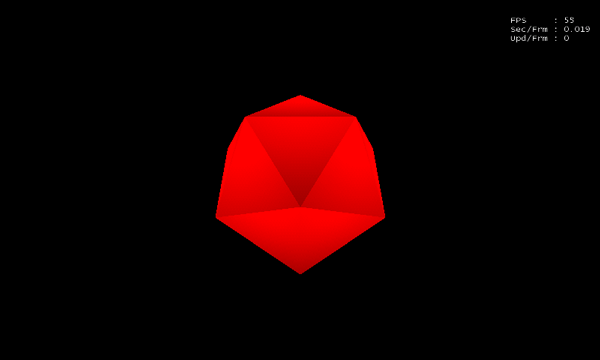
This code displays a red icosahedron in the center of the screen that can be rotated with the mouse. We also want to build the app without having to make any changes on the Android device or on a Windows PC.
Building an Engine for Android
Building applications for Android is easy, but you must set several tools:
- JAVA_HOME environment variable must refer to a folder with the JDK (On Ubuntu JDK the folder is usually /usr/lib/kvm/default-java)
- NDK_ROOT environment variable must refer to a folder with the Android NDK
- file Apps / Test_Android / local.properties needs to specify that the parameter 'sdk.dir =' is pointing to the folder with the Android SDK
We need to build an engine for Android (included with the SDK and already underway is libLinderdaumEngineCore.a, so a manual rebuild would only be needed if you want to dig deeper in the engine on your own). Run Cygwin Bash Shell, go to the directory, and perform BuildAndroid ndk-build -j4. As a result, you should see libLinderdaumEngineCore.a slightly larger than 100MB.
Building a Project for Android
Building an Android project requires changing several files in Apps/Test_Android. Here are the changes you should make:
ant.properties
android.library.reference.1=..\\\\..\\\\BuildAndroid
project.properties
target=android-21
local.properties
sdk.dir=<path to Android SDK, for example C:\\android-sdk>
res\values\strings.xml
="1.0"="utf-8"
<resources>
<string name="app_name">Test_Android</string>
</resources>
jni\Application.mk
APP_OPTIM := release
APP_PLATFORM := android-21
APP_STL := gnustl_static
APP_CPPFLAGS += -frtti
APP_CPPFLAGS += -fexceptions
APP_CPPFLAGS += -DANDROID
APP_ABI := x86
To use the tools from the Android SDK, you will need a manifesto AndroidManifest.xml. For example:
="1.0"="utf-8"
<manifest xmlns:android="http://schemas.android.com/apk/res/android"
package="com.linderdaum.engine.myfirstandroidapp"
android:versionCode="1"
android:versionName="0.6.00"
android:installLocation="auto">
<uses-sdk android:minSdkVersion="7" />
<uses-sdk android:targetSdkVersion="9" />
<supports-screens
android:smallScreens="true"
android:normalScreens="true"
android:largeScreens="true"
android:anyDensity="true" />
<uses-feature android:glEsVersion="0x00020000"/>
<uses-feature android:name="android.hardware.telephony" android:required="false" />
<uses-permission android:name="android.permission.INTERNET"/>
<uses-permission android:name="android.permission.WRITE_EXTERNAL_STORAGE"/>
<application android:label="@string/app_name"
android:installLocation="preferExternal"
android:debuggable="false">
<activity android:name="com.linderdaum.engine.LinderdaumEngineActivity"
android:launchMode="singleTask"
android:theme="@android:style/Theme.NoTitleBar.Fullscreen"
android:screenOrientation="landscape"
android:configChanges="orientation|keyboardHidden"
android:label="@string/app_name">
<intent-filter>
<action android:name="android.intent.action.MAIN" />
<category android:name="android.intent.category.LAUNCHER" />
</intent-filter>
</activity>
</application>
</manifest>
In different applications you may need to change a package=«com.linderdaum.engine.myfirstandroidapp». Go to Apps\Test_Android and run ndk-build over Cygwin. You should see the following:
$ ndk-build
Compile++ thumb  : LinderdaumEngine <= LAndroid.cpp
Compile thumb  : LinderdaumEngine <= LJNI.c
Compile++ thumb  : LinderdaumEngine <= Test_Android.cpp
Prebuilt       : libLinderdaumEngineCore.a <= jni/../../../BuildAndroid/obj/local/x86/
Prebuilt       : libFreeImage.a <= jni/../../../BuildAndroid/jni/x86/
Prebuilt       : libFreeType.a <= jni/../../../BuildAndroid/jni/x86/
Prebuilt       : libVorbis.a <= jni/../../../BuildAndroid/jni/x86/
Prebuilt       : libOGG.a <= jni/../../../BuildAndroid/jni/x86/
Prebuilt       : libOpenAL.a <= jni/../../../BuildAndroid/jni/x86/
Prebuilt       : libModPlug.a <= jni/../../../BuildAndroid/jni/x86/
Prebuilt       : libstdc++.a <= /sources/cxx-stl/gnu-libstdc++/libs/x86/
SharedLibrary  : libLinderdaumEngine.so
Install        : libLinderdaumEngine.so => libs/armeabi-v7a/libLinderdaumEngine.so
This is the end of the C++ part of this project. You still need to add Java and build a distribution in .apk. For this you need to create a build.xml:
="1.0"="UTF-8"
<project name="Asteroids" default="help">
<import file="../../BuildAndroid/CommonMedia.xml"/>
<property file="local.properties" />
<property file="ant.properties" />
<loadproperties srcFile="project.properties" />
<fail
message="sdk.dir is missing. Make sure to generate local.properties using 'android update project' or to inject it through an env var"
unless="sdk.dir"
/>
<target name="copy-game-data">
<delete dir="assets"/>
<copy todir="assets/Data">
<fileset dir="GameData">
</fileset>
</copy>
<copy todir="assets/Data">
<fileset dir="Data">
</fileset>
</copy>
</target>
<import file="${sdk.dir}/tools/ant/build.xml" />
</project>
Run ant copy-common-media debug and get ready for the distribution in the Apps\Test_Android\bin\Test_Android-debug.apk. The apk file can be installed on the device using this command:
adb install Test_Android-debug.apk
Run the application. You should see the following:
Related Articles and Resources
About the Author
Vitaliy Kalinin works in the Software & Services Group at Intel Corporation. He is a PhD student at Lobachevsky State University in Nizhny Novgorod, Russia. He has a Bachelor’s degree in economics and mathematics and a Master’s degree in applied economics and informatics. His main interest is mobile technologies and game development.
Intel is inside more and more Android devices, and we have tools and resources to make your app development faster and easier.


